


Trane Stealth™ Air-Cooled Chiller SCWF29
Need answers fast?
Explore the manual using AI.
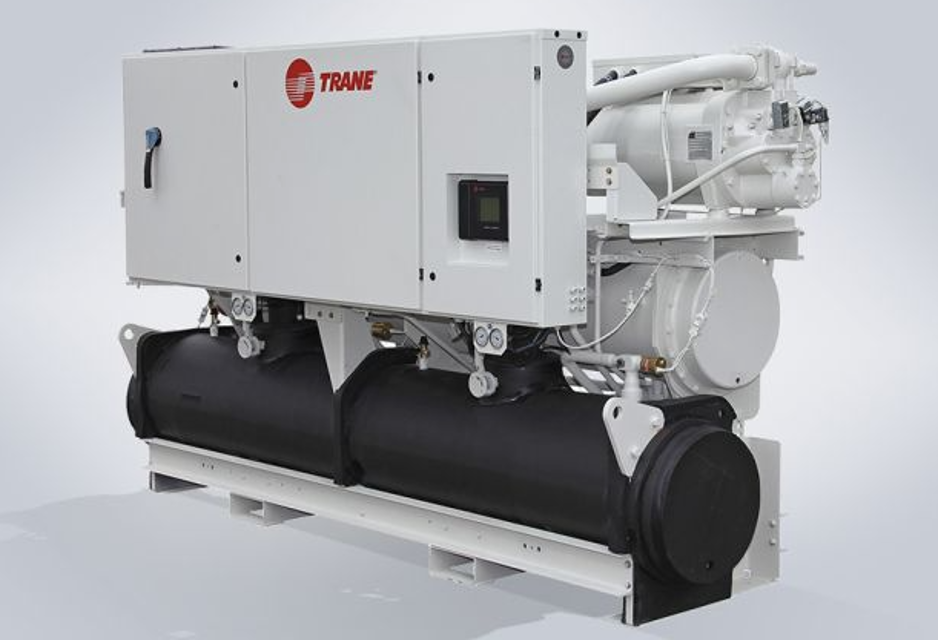
The Trane Stealth™ Air-Cooled Chiller SCWF29 is a high-efficiency cooling solution designed for industrial applications. This advanced chiller model offers reliable performance and energy savings, making it ideal for various commercial settings. Experience optimal temperature control with Trane's innovative technology.
Turn manuals into instant answers
with your AI-powered assistantTurn manuals into instant answers
with your AI-powered assistant
Manual for Trane Stealth™ Air-Cooled Chiller SCWF29
Complete asset maintenance, one click away
Get instant access to all the maintenance information you need. Empower technicians to perform preventive maintenance with asset packages, ready to use right out of the box.

Documents & Manuals
Find all the essential guides in one place.
 Tensioning Guide
- Belt-diagram
- C-120 pulleys
+ 13 more

Work Order Templates
Pre-built workflows to keep your asset running smoothly.
- Daily Electrical System Inspection
- Replace Roller and Pulley
- Install Engine B-120
+ 29 more

Procedures
Integrate maintenance plans directly into your work orders.
- Motion Industries
- Applied Industrial Technologies
- Electrical Brothers
+ 5 more

Parts
Access the parts list for your equipment in MaintainX.
- Drive Motor
- B2 Rollers
- Tensioning System
+ 40 more
Trane Stealth™ Air-Cooled Chiller SCWF29
Create an account to install this asset package.
Maintenance Plans for Trane Stealth™ Air-Cooled Chiller Model SCWF29
Integrate maintenance plans directly into your work orders in MaintainX.
Adjusting Belt Tension
NOTICE: Do not over-tension belts as it could reduce fan and motor bearing life, accelerate belt wear and possibly cause shaft failure.
To adjust belt tension see Figure 42, p. 89 and perform the following procedure:
Loosen bolts A, B, and E on both sides of the sliding motor base. See Figure 43, p. 90.
Loosen nuts C and D (as required for motor horsepower) to slide the motor on its mounting plate in the proper direction to tension or relieve tension on the belt.
Adjust nuts A-D and bolt E. Do not stretch the belts over the sheaves.
Retighten all nuts and bolts.
Verify tension is adjusted properly.
Recommended belt tension range values are on the unit fan scroll. To access the fan scroll, face the righthand side of the unit and remove the top left panel. The belt tension label is on the top right-hand corner of the fan scroll. See Figure 43, p. 90
The correct operation tension for a V-belt drive is the lowest tension at which the belt will not slip under the peak load conditions. It may be necessary to increase the tension of some drives to reduce flopping or excessive startup squealing.

1 Yearly Stealth™ Air-Cooled Chiller Maintenance
Check and tighten all set screws, bolts, locking collars and sheaves
Inspect, clean, and tighten all electrical connections
Visually inspect the entire unit casing for chips or corrosion. Remove rust or corrosion and repaint surfaces
Visually check for leaks in refrigerant piping
Inspect fan, motor, and control contacts. Replace badly worn or eroded contacts
Inspect the thermal expansion valve sensing bulbs for cleanliness, good contact with the suction line, and adequate insulation from ambient air
Verify the superheat setting is 12 -17°F at the compressor
When checking operating pressures and conditions, establish the following nominal conditions for consistent measurements
Leaving air temperature greater than 60°F
6 Monthly Stealth™ Air-Cooled Chiller Maintenance
Verify the fan motor is properly lubricated
Lubricate fan bearings
Note: The bearings are manufactured using a special synthetic lithium-based grease designed for long life and minimum lube intervals. Over lubrication can be just as harmful as not enough.
With power disconnected, manually rotate the fan wheel to check for obstructions in the housing or interference with fan blades. Remove obstructions and debris. Center the fan wheel if necessary.
Check the fan assembly sheave alignment. Tighten set screws to their proper torques.
Check water valves for leakage at valve stem packing nut.
Note: Perform this procedure monthly if the unit is in a coastal or corrosive environment.
Sign off on the 6 Monthly Stealth™ Air-Cooled Chiller Maintenance
Variable Frequency Drive Maintenance
WARNING: Hazardous Voltage w/Capacitors! Failure to disconnect power and discharge capacitors before servicing could result in death or serious injury.
Disconnect all electric power, including remote disconnects and discharge all motor start/run capacitors before servicing.
Follow proper lockout/tagout procedures to ensure the power cannot be inadvertently energized.
For variable frequency drives or other energy storing components provided by Trane or others, refer to the appropriate manufacturer's literature for allowable waiting periods for discharge of capacitors.
Verify with a CAT III or IV voltmeter rated per NFPA 70E that all capacitors have discharged.
For additional information regarding the safe discharge of capacitors, see PROD-SVB06 *- EN.
The VFD access panel is hinged to allow service access to the fan motor and belt drive components that are located behind it.
Remove the unit center cover panel to the left of the VFD panel.
Remove and discard the sheet metal shipping screws along the top and bottom edges of the VFD panel.
6 Monthly Drain Pan Maintenance
WARNING: Hazardous Voltage w/Capacitors! Failure to disconnect power and discharge capacitors before servicing could result in death or serious injury. Disconnect all electric power, including remote disconnects and discharge all motor start/run capacitors before servicing. Follow proper lockout/tagout procedures to ensure the power cannot be inadvertently energized.
For variable frequency drives or other energy storing components provided by Trane or others, refer to the appropriate manufacturer's literature for allowable waiting periods for discharge of capacitors. Verify with a CAT III or IV voltmeter rated per NFPA 70E that all capacitors have discharged.
For additional information regarding the safe discharge of capacitors, see PROD-SVB06 *- EN.
Check the condensate drain pan and drain line to ensure that the condensate drains properly
If evidence of standing water or condensate overflow exists, take steps to identify and remedy the cause immediately. Refer to the troubleshooting section of this manual for possible causes and solutions.
Disconnect all electrical power to the unit.
Don the appropriate personal protective equipment (PPE).
Remove all standing water.
Use a scraper or other tools to remove and solid matter. Remove solid matter with a vacuum device that utilizes high efficiency particulate arrestance (HEPA) filters with a minimum efficiency of 99.97% at 0.3 micron particle size.
Parts for Trane Stealth™ Air-Cooled Chiller SCWF29
Access the parts list for your equipment in MaintainX.
Zone Temperature Sensor
BAYSENS021
Zone Temperature Sensor
BAYSENS074
Zone Sensor
BAYSENS119
Zone Sensor
BAYSENS108
Zone Sensor
BAYSENS110
Zone Temperature Sensor
BAYSENS021
Zone Temperature Sensor
BAYSENS074
Zone Sensor
BAYSENS119
Zone Sensor
BAYSENS108
Zone Sensor
BAYSENS110
Zone Temperature Sensor
BAYSENS021
Zone Temperature Sensor
BAYSENS074
Zone Sensor
BAYSENS119
Zone Sensor
BAYSENS108
Zone Sensor
BAYSENS110
Unlock efficiency
with MaintainX CoPilot
MaintainX CoPilot is your expert colleague, on call 24/7, helping your team find the answers they need to keep equipment running.
Reduce Unplanned Downtime
Ensure your team follows consistent procedures to minimize equipment failures and costly delays.
Maximize Asset Availability
Keep your assets running longer and more reliably, with standardized maintenance workflows from OEM manuals.
Lower Maintenance Costs
Turn any technician into an expert to streamline operations, maintain more assets, and reduce overall costs.
Thousands of companies manage their assets with MaintainX

'%3e%3cpath%20fill='url(%23b)'%20d='M66.008%2080.068c-5.084-.786-9.763-3.834-12.442-8.68a16.942%2016.942%200%200%201-1.87-5.18c1.096.19%202.203.476%203.298.87%206.525%202.333%2010.836%207.68%2011.014%2012.99ZM51.47%2061.576c.488-5.524%203.62-10.716%208.847-13.597a17.132%2017.132%200%200%201%2011.335-1.882c-.798%208.145-7.43%2014.848-16.038%2015.599-1.417.119-2.799.07-4.144-.12Zm28.564-11.478a17.513%2017.513%200%200%201%203.727%204.62c4.608%208.335%201.584%2018.813-6.75%2023.409a16.988%2016.988%200%200%201-4.359%201.679%2019.624%2019.624%200%200%201-3.977-12.776c.346-7.561%204.942-13.931%2011.36-16.932Z'/%3e%3cpath%20fill='%23110F0D'%20fill-rule='evenodd'%20d='M142.831%2048.324h4.977V77.03h-4.977V48.324Zm27.278%2013.002c.322%201.048.453%202.263.453%203.62v12.073h-4.787V66.208c0-.75-.047-1.572-.154-2.143-.453-2.382-1.822-3.572-4.215-3.572-2.31%200-3.882%201.274-4.43%203.476-.143.596-.226%201.405-.226%202.25v10.8h-4.787V56.623h4.477v2.989c1.536-2.5%203.906-3.43%206.371-3.43%203.488%200%206.263%201.68%207.298%205.144Zm24.636%207.323c0%203.882-2.358%206.525-5.763%207.727-1.298.453-2.632.643-4.62.643h-10.169V48.324h9.085c1.691%200%203.156.143%204.049.38%203.465.93%205.727%203.68%205.727%207.335%200%202.441-.81%204.156-2.762%205.644%202.905%201.417%204.453%203.727%204.453%206.966Zm-15.634-8.656h4.584c1.024%200%201.917-.143%202.536-.417%201.215-.548%201.905-1.608%201.905-3.167%200-1.548-.643-2.572-1.845-3.132-.691-.31-1.762-.452-2.763-.452h-4.417v7.168Zm10.716%208.465c0-1.536-.893-3.37-3.227-3.893-.428-.095-1.036-.143-1.571-.143h-5.918v8.085h5.501c.56%200%201.429-.048%201.953-.167%201.94-.453%203.262-1.846%203.262-3.882Zm47.747-11.847-8.097%2020.408h-4.429l-8.109-20.408h5.191l5.192%2014.574%205.108-14.574h5.144Zm-20.218%2010.002c0%20.69-.036%201.262-.155%201.94h-15.943c.631%202.87%202.714%204.728%205.882%204.728%202.131%200%203.607-.882%204.703-2.525h4.87c-1.762%204.144-5.204%206.692-9.657%206.692-6.084%200-10.537-4.858-10.537-10.49%200-6.108%204.524-10.776%2010.335-10.776%206.239%200%2010.442%204.954%2010.502%2010.43Zm-4.763-1.405c-.333-2.846-2.643-4.858-5.691-4.858-2.894%200-5.287%201.929-5.621%204.858h11.312Zm-72.667%203.44c0%204.787-3.287%208.371-9.419%208.371H119.363V64.66c-1.917.274-3.87.69-5.811%201.238l4.537%2011.121h-5.418l-3.596-9.585c-5.144%202.084-10.085%205.216-14.217%209.585h-4.786L101.8%2048.312h4.56l5.68%2013.883a44.112%2044.112%200%200%201%207.323-1.774V48.312h9.084c1.703%200%203.156.143%204.061.393%203.453.929%205.727%203.667%205.727%207.323%200%201.917-.738%204.179-2.81%205.691%203.06%201.56%204.501%204.025%204.501%206.93Zm-15.634-8.667a62.664%2062.664%200%200%201%202.06-.036c1.703.012%203.239.131%204.608.37%201.441-.549%202.357-1.727%202.357-3.537%200-1.941-.881-3.144-2.488-3.667-.548-.18-1.358-.286-2.322-.286h-4.215v7.156Zm-16.55%203.905-3.715-9.894-6.394%2016.502c2.833-2.595%206.263-4.858%2010.109-6.608Zm27.254%204.74c0-2.775-3.131-4.347-8.513-4.418-.715%200-1.441.011-2.191.047v8.252h5.918c2.548%200%204.786-1.37%204.786-3.882Z'%20clip-rule='evenodd'/%3e%3c/g%3e%3cdefs%3e%3clinearGradient%20id='b'%20x1='51.47'%20x2='85.916'%20y1='62.946'%20y2='62.946'%20gradientUnits='userSpaceOnUse'%3e%3cstop%20stop-color='%23CD9F28'/%3e%3cstop%20offset='1'%20stop-color='%23ECD80B'/%3e%3c/linearGradient%3e%3cclipPath%20id='a'%3e%3cpath%20fill='%23fff'%20d='M51.47%2045.728h186.104V80.14H51.47z'/%3e%3c/clipPath%3e%3c/defs%3e%3c/svg%3e)


More from Trane


Explore Other Assets


© 2026 MaintainX. All rights reserved.