


Trane Series R™ Helical Rotary Chiller RTHCB2B2B2
Need answers fast?
Explore the manual using AI.
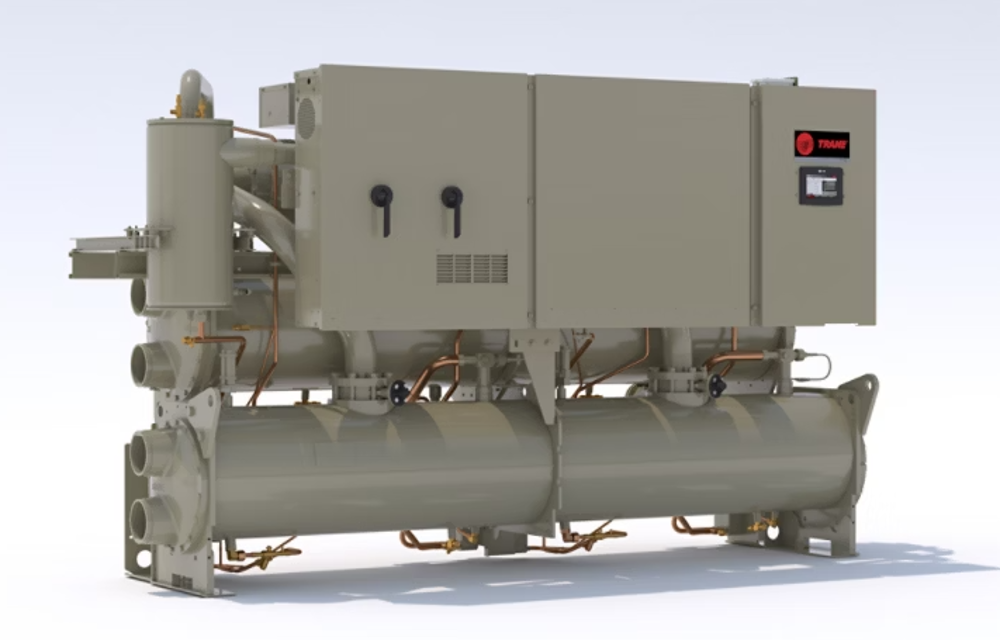
The Trane Series R™ Helical Rotary Chiller RTHCB2B2B2 is a high-efficiency cooling solution designed for industrial applications. Known for its reliability and performance, this chiller provides optimal temperature control while minimizing energy consumption, making it an ideal choice for large facilities.
Turn manuals into instant answers
with your AI-powered assistantTurn manuals into instant answers
with your AI-powered assistant
Manual for Trane Series R™ Helical Rotary Chiller RTHCB2B2B2
Complete asset maintenance, one click away
Get instant access to all the maintenance information you need. Empower technicians to perform preventive maintenance with asset packages, ready to use right out of the box.

Documents & Manuals
Find all the essential guides in one place.
 Tensioning Guide
- Belt-diagram
- C-120 pulleys
+ 13 more

Work Order Templates
Pre-built workflows to keep your asset running smoothly.
- Daily Electrical System Inspection
- Replace Roller and Pulley
- Install Engine B-120
+ 29 more

Procedures
Integrate maintenance plans directly into your work orders.
- Motion Industries
- Applied Industrial Technologies
- Electrical Brothers
+ 5 more

Parts
Access the parts list for your equipment in MaintainX.
- Drive Motor
- B2 Rollers
- Tensioning System
+ 40 more
Trane Series R™ Helical Rotary Chiller RTHCB2B2B2
Create an account to install this asset package.
Maintenance Plans for Trane Series R™ Helical Rotary Chiller Model RTHCB2B2B2
Integrate maintenance plans directly into your work orders in MaintainX.
1 Weekly Series R™ Helical Rotary Chiller Maintenance
After the unit has operated for approximately 30 minutes and the system has stabilized, check the operating conditions and complete the procedures below:
Log the chiller.
Check evaporator and condenser pressures with gauges and compare to the reading on the Clear Language Display.
Pressure readings should fall within the following ranges specified in the Operating Conditions table:
NOTE: Optimum condenser pressure is dependent on condenser water temperature, and should equal the saturation pressure of the refrigerant at a temperature 2 to 5°F above that of leaving condenser water at full load.
Sign off on the weekly maintenance

Oil Charging
Warning: This procedure requires trained personnel with PPE!
Locate the 1/4” schrader valve between the ball valve and oil filter (or the ball valve and oil cooler, if so equipped)
Loosely connect oil pump to schrader valve called out in step 1
Operate oil charging pump until oil appears at the charging valve connection; then tighten the connection
Note: To keep air from entering the oil, the charging valve connection must be air-tight
Close the ball valve just upstream of the schrader valve connected to the oil pump
At the UCP2 display panel, press <Service Tests> and enter the password (++--++) followed by <Enter>)
Press <enter> to access the service tools group
Press <next> 12 times to display “Master Oil Line Solenoid Valve: [Mode]”
1 Monthly Series R™ Helical Rotary Chiller Maintenance
Review operating log
Clean all water strainers in both the chilled and condensing water piping systems
Measure the oil filter pressure drop
Replace oil filter if required
Measure and log the subcooling and superheat
If operating conditions indicate a refrigerant shortage, leak check the unit using soap bubbles
Repair all leaks
Trim refrigerant charge until the unit operates in the conditions listed in Table 26 at full load, ARI conditions
NOTE: ARI conditions are: condenser water: 85°F and 3 GPM/XXX tons and evaporator water: 54-44°F
The Main Oil Filter (Hot Filter) Replacement
Warning: This procedure requires trained personnel with PPE!
Chiller shut down on a “Low Oil Flow” diagnostic?
Compressor shut down on a “Loss of Oil at Compressor (Running) diagnostic?
Pressure drop between the two service valves in the lubrication circuit
If pressure drop exceeds the maximum level, proceed with the following steps
Isolate the oil filter by closing the two ball valves located before and after the filter
Relieve the pressure from the hydraulic line through the 1/4” schrader valve located between the ball valve and the oil filter (or the ball valve and oil cooler, if so equipped)
Use a rubber mallet to break loose the nut that secures the oil filter element to the filter manifold
Turn the nut clockwise until the filter element detaches from the manifold
Oil Sump Level Check
Run the unit fully loaded for approximately 20 minutes.
Cycle the compressor off line.
Attach the 3/8” or 1/2” hose with a sightglass in the middle to the oil sump drain valve and the condenser service valve at the top of the condenser.
After the unit is off line for 10 minutes move the sightglass along the edge of the condenser tubesheet at the same height of the oil sump.
Enter the oil level from the bottom of the oil sump.
If the level is below 2”, there is not enough oil in the sump. This can occur from not enough oil in the system or more likely, oil migration to the evaporator. Oil migration can occur from a low refrigerant charge, gas pump malfunction, etc.
After the level is determined, close the service valves and remove the hose/sightglass assembly.
Sign off on the oil sump level check.
Parts for Trane Series R™ Helical Rotary Chiller RTHCB2B2B2
Access the parts list for your equipment in MaintainX.
Chiller
6200-0079-xx
Starter
6200-0055-xx
TCI
6200-0093-xx
RCLD
6200-0091-xx
CCCLD (Complex Character CLD)
6200-0092-xx
Chiller
6200-0079-xx
Starter
6200-0055-xx
TCI
6200-0093-xx
RCLD
6200-0091-xx
CCCLD (Complex Character CLD)
6200-0092-xx
Chiller
6200-0079-xx
Starter
6200-0055-xx
TCI
6200-0093-xx
RCLD
6200-0091-xx
CCCLD (Complex Character CLD)
6200-0092-xx
Unlock efficiency
with MaintainX CoPilot
MaintainX CoPilot is your expert colleague, on call 24/7, helping your team find the answers they need to keep equipment running.
Reduce Unplanned Downtime
Ensure your team follows consistent procedures to minimize equipment failures and costly delays.
Maximize Asset Availability
Keep your assets running longer and more reliably, with standardized maintenance workflows from OEM manuals.
Lower Maintenance Costs
Turn any technician into an expert to streamline operations, maintain more assets, and reduce overall costs.
Thousands of companies manage their assets with MaintainX

'%3e%3cpath%20fill='url(%23b)'%20d='M66.008%2080.068c-5.084-.786-9.763-3.834-12.442-8.68a16.942%2016.942%200%200%201-1.87-5.18c1.096.19%202.203.476%203.298.87%206.525%202.333%2010.836%207.68%2011.014%2012.99ZM51.47%2061.576c.488-5.524%203.62-10.716%208.847-13.597a17.132%2017.132%200%200%201%2011.335-1.882c-.798%208.145-7.43%2014.848-16.038%2015.599-1.417.119-2.799.07-4.144-.12Zm28.564-11.478a17.513%2017.513%200%200%201%203.727%204.62c4.608%208.335%201.584%2018.813-6.75%2023.409a16.988%2016.988%200%200%201-4.359%201.679%2019.624%2019.624%200%200%201-3.977-12.776c.346-7.561%204.942-13.931%2011.36-16.932Z'/%3e%3cpath%20fill='%23110F0D'%20fill-rule='evenodd'%20d='M142.831%2048.324h4.977V77.03h-4.977V48.324Zm27.278%2013.002c.322%201.048.453%202.263.453%203.62v12.073h-4.787V66.208c0-.75-.047-1.572-.154-2.143-.453-2.382-1.822-3.572-4.215-3.572-2.31%200-3.882%201.274-4.43%203.476-.143.596-.226%201.405-.226%202.25v10.8h-4.787V56.623h4.477v2.989c1.536-2.5%203.906-3.43%206.371-3.43%203.488%200%206.263%201.68%207.298%205.144Zm24.636%207.323c0%203.882-2.358%206.525-5.763%207.727-1.298.453-2.632.643-4.62.643h-10.169V48.324h9.085c1.691%200%203.156.143%204.049.38%203.465.93%205.727%203.68%205.727%207.335%200%202.441-.81%204.156-2.762%205.644%202.905%201.417%204.453%203.727%204.453%206.966Zm-15.634-8.656h4.584c1.024%200%201.917-.143%202.536-.417%201.215-.548%201.905-1.608%201.905-3.167%200-1.548-.643-2.572-1.845-3.132-.691-.31-1.762-.452-2.763-.452h-4.417v7.168Zm10.716%208.465c0-1.536-.893-3.37-3.227-3.893-.428-.095-1.036-.143-1.571-.143h-5.918v8.085h5.501c.56%200%201.429-.048%201.953-.167%201.94-.453%203.262-1.846%203.262-3.882Zm47.747-11.847-8.097%2020.408h-4.429l-8.109-20.408h5.191l5.192%2014.574%205.108-14.574h5.144Zm-20.218%2010.002c0%20.69-.036%201.262-.155%201.94h-15.943c.631%202.87%202.714%204.728%205.882%204.728%202.131%200%203.607-.882%204.703-2.525h4.87c-1.762%204.144-5.204%206.692-9.657%206.692-6.084%200-10.537-4.858-10.537-10.49%200-6.108%204.524-10.776%2010.335-10.776%206.239%200%2010.442%204.954%2010.502%2010.43Zm-4.763-1.405c-.333-2.846-2.643-4.858-5.691-4.858-2.894%200-5.287%201.929-5.621%204.858h11.312Zm-72.667%203.44c0%204.787-3.287%208.371-9.419%208.371H119.363V64.66c-1.917.274-3.87.69-5.811%201.238l4.537%2011.121h-5.418l-3.596-9.585c-5.144%202.084-10.085%205.216-14.217%209.585h-4.786L101.8%2048.312h4.56l5.68%2013.883a44.112%2044.112%200%200%201%207.323-1.774V48.312h9.084c1.703%200%203.156.143%204.061.393%203.453.929%205.727%203.667%205.727%207.323%200%201.917-.738%204.179-2.81%205.691%203.06%201.56%204.501%204.025%204.501%206.93Zm-15.634-8.667a62.664%2062.664%200%200%201%202.06-.036c1.703.012%203.239.131%204.608.37%201.441-.549%202.357-1.727%202.357-3.537%200-1.941-.881-3.144-2.488-3.667-.548-.18-1.358-.286-2.322-.286h-4.215v7.156Zm-16.55%203.905-3.715-9.894-6.394%2016.502c2.833-2.595%206.263-4.858%2010.109-6.608Zm27.254%204.74c0-2.775-3.131-4.347-8.513-4.418-.715%200-1.441.011-2.191.047v8.252h5.918c2.548%200%204.786-1.37%204.786-3.882Z'%20clip-rule='evenodd'/%3e%3c/g%3e%3cdefs%3e%3clinearGradient%20id='b'%20x1='51.47'%20x2='85.916'%20y1='62.946'%20y2='62.946'%20gradientUnits='userSpaceOnUse'%3e%3cstop%20stop-color='%23CD9F28'/%3e%3cstop%20offset='1'%20stop-color='%23ECD80B'/%3e%3c/linearGradient%3e%3cclipPath%20id='a'%3e%3cpath%20fill='%23fff'%20d='M51.47%2045.728h186.104V80.14H51.47z'/%3e%3c/clipPath%3e%3c/defs%3e%3c/svg%3e)


More from Trane


Explore Other Assets


© 2026 MaintainX. All rights reserved.