


Trane Modular Air Handler M-Series TEM4B0C37M31SA
Need answers fast?
Explore the manual using AI.
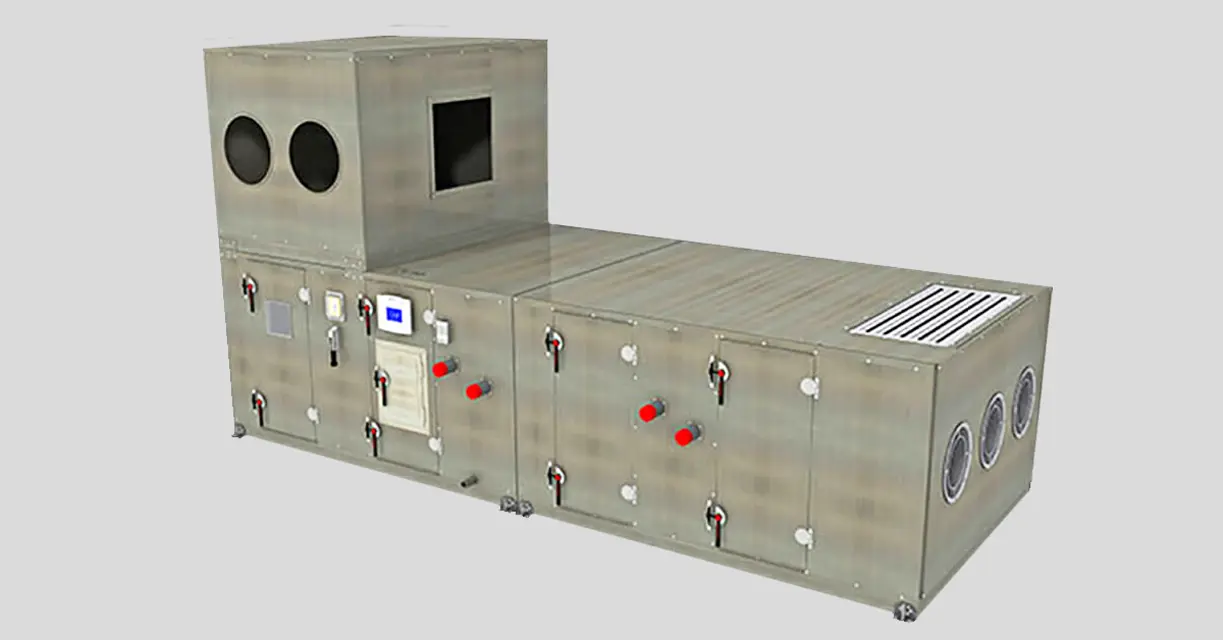
The Trane Modular Air Handler M-Series TEM4B0C37M31SA is a high-efficiency air handling unit designed for optimal indoor climate control. This versatile asset is ideal for commercial applications, providing reliable performance and energy savings while ensuring superior air quality.
Turn manuals into instant answers
with your AI-powered assistantTurn manuals into instant answers
with your AI-powered assistant
Manual for Trane Modular Air Handler M-Series TEM4B0C37M31SA
Complete asset maintenance, one click away
Get instant access to all the maintenance information you need. Empower technicians to perform preventive maintenance with asset packages, ready to use right out of the box.

Documents & Manuals
Find all the essential guides in one place.
 Tensioning Guide
- Belt-diagram
- C-120 pulleys
+ 13 more

Work Order Templates
Pre-built workflows to keep your asset running smoothly.
- Daily Electrical System Inspection
- Replace Roller and Pulley
- Install Engine B-120
+ 29 more

Procedures
Integrate maintenance plans directly into your work orders.
- Motion Industries
- Applied Industrial Technologies
- Electrical Brothers
+ 5 more

Parts
Access the parts list for your equipment in MaintainX.
- Drive Motor
- B2 Rollers
- Tensioning System
+ 40 more
Trane Modular Air Handler M-Series TEM4B0C37M31SA
Create an account to install this asset package.
Maintenance Plans for Trane Modular Air Handler Model M-Series TEM4B0C37M31SA
Integrate maintenance plans directly into your work orders in MaintainX.
1 Yearly Air Handler Maintenance
Inspect the unit casing for corrosion. If damage is found, clean and repaint the surface with a rust-resistant primer and vinyl chlorinated lacquer
Clean the fan wheels and fan shaft
Inspect and clean drain pans
Check damper linkages, set screws, and blade adjustment. Clean, but do not lubricate, the nylon damper rod bushings
Clean damper operators
Inspect electrical components and insulation
Inspect wiring for damage
Rotate the fan wheel and check for obstructions in the fan housing. The wheel should not rub on the fan housing. Adjust the center if necessary and tighten wheel set screws to the proper torque
Lubricate motor bearings in accordance with motor manufacturer’s recommendations

3 Monthly Coils Cleaning
Inspect coils for dirt build-up
Disconnect all electrical power to the unit
Use a soft brush to remove loose debris from both sides of the coil
Install a block-off to prevent spray from going through the coil and into a dry section of the unit and/or system ductwork
Mix a high-quality coil cleaning detergent with water according to the manufacturer’s instructions
Place the mixed solution in a garden pump-up sprayer or high-pressure sprayer
Maintain minimum nozzle spray angle of 15 degrees
Spray perpendicular to the coil face
Keep the nozzle at least 6 inches from the coil
1 Monthly Cartridge or Bag Relacement
Warning: Disconnect all electrical power to the unit before starting
Disconnected all electrical power to the unit?
Removed the dirty filters and block-offs from their installed position?
Kept the new bag filters folded and slid each filter into the filter rack, pushing them tightly against the unit?
Note: The pleats should be in the vertical position
If using the optional pre-filters, replaced them on the appropriate filter rack?
If fixed and adjustable block-offs are provided with the unit, slid the fixed block-offs into the filter track before the adjustable block- off?
Note: The adjustable block-off should always be installed last, next to the access door
Closed and secured the access door?
3 Monthly Coil Winterization
CAUTION: Coil Freezeup! Properly drain and vent coils when not in use. Trane recommends glycol protection in all possible freezing applications. Use a glycol approved for use with commercial cooling and heating systems and copper tube coils. Failure to do so may result in equipment damage
Drain water from the coil
Flush the coil with glycol if coils will be exposed to temperatures below 35 degrees
Install field-fitted drains and vents to permit winterization of coils not in use and to assist in evacuating air from the water system during startup
If draining is questionable because of dirt or scale deposits inside the coil, fill the coil with glycol before the heating season begins
Enter the Service Model No of Coil
Select the coil type
Winterize all coils in a given coil module
Sign off on the coil winterization
6 Monthly Fan Maintenance
WARNING: Rotating Components! Disconnect all electric power, including remote disconnects before servicing. Follow proper lockout/ tagout procedures to ensure the power can not be inadvertently energized. Secure drive sheaves to ensure rotor cannot freewheel. Failure to secure drive sheaves or disconnect power before servicing could result in death or serious injury.
Disconnect all electrical power to the unit
Wearing the appropriate personal protective equipment, remove any contamination
Vacuum the section with a vacuum device that uses high- efficiency particulate arrestance (HEPA) filters with a minimum efficiency of 99.97 percent at 0.3 micron particle size
Thoroughly clean any contaminated area(s) with a mild bleach and water solution or an EPA-approved sanitizer specifically designed for HVAC use
Immediately rinse the affected surfaces thoroughly with fresh water and a fresh sponge to prevent potential corrosion of metal surfaces
Allow the unit to dry completely before putting it back into service
Be careful any contaminated material does not contact other areas of the unit or building. Properly dispose of all contaminated materials and cleaning solution
Inspect fan motors periodically for excessive vibration or temperature
Parts for Trane Modular Air Handler M-Series TEM4B0C37M31SA
Access the parts list for your equipment in MaintainX.
Self-drilling Screw, 0.25-in
SCR01369
Self-drilling Screws, #10, On 8-in. Centers
SCR01789
Gasket
GKT 03870
Bearing Bracket Assembly
BRK1756
Kit With Sensor
X13100429010 THT 02442
Self-drilling Screw, 0.25-in
SCR01369
Self-drilling Screws, #10, On 8-in. Centers
SCR01789
Gasket
GKT 03870
Bearing Bracket Assembly
BRK1756
Kit With Sensor
X13100429010 THT 02442
Self-drilling Screw, 0.25-in
SCR01369
Self-drilling Screws, #10, On 8-in. Centers
SCR01789
Gasket
GKT 03870
Bearing Bracket Assembly
BRK1756
Kit With Sensor
X13100429010 THT 02442
Unlock efficiency
with MaintainX CoPilot
MaintainX CoPilot is your expert colleague, on call 24/7, helping your team find the answers they need to keep equipment running.
Reduce Unplanned Downtime
Ensure your team follows consistent procedures to minimize equipment failures and costly delays.
Maximize Asset Availability
Keep your assets running longer and more reliably, with standardized maintenance workflows from OEM manuals.
Lower Maintenance Costs
Turn any technician into an expert to streamline operations, maintain more assets, and reduce overall costs.
Thousands of companies manage their assets with MaintainX

'%3e%3cpath%20fill='url(%23b)'%20d='M66.008%2080.068c-5.084-.786-9.763-3.834-12.442-8.68a16.942%2016.942%200%200%201-1.87-5.18c1.096.19%202.203.476%203.298.87%206.525%202.333%2010.836%207.68%2011.014%2012.99ZM51.47%2061.576c.488-5.524%203.62-10.716%208.847-13.597a17.132%2017.132%200%200%201%2011.335-1.882c-.798%208.145-7.43%2014.848-16.038%2015.599-1.417.119-2.799.07-4.144-.12Zm28.564-11.478a17.513%2017.513%200%200%201%203.727%204.62c4.608%208.335%201.584%2018.813-6.75%2023.409a16.988%2016.988%200%200%201-4.359%201.679%2019.624%2019.624%200%200%201-3.977-12.776c.346-7.561%204.942-13.931%2011.36-16.932Z'/%3e%3cpath%20fill='%23110F0D'%20fill-rule='evenodd'%20d='M142.831%2048.324h4.977V77.03h-4.977V48.324Zm27.278%2013.002c.322%201.048.453%202.263.453%203.62v12.073h-4.787V66.208c0-.75-.047-1.572-.154-2.143-.453-2.382-1.822-3.572-4.215-3.572-2.31%200-3.882%201.274-4.43%203.476-.143.596-.226%201.405-.226%202.25v10.8h-4.787V56.623h4.477v2.989c1.536-2.5%203.906-3.43%206.371-3.43%203.488%200%206.263%201.68%207.298%205.144Zm24.636%207.323c0%203.882-2.358%206.525-5.763%207.727-1.298.453-2.632.643-4.62.643h-10.169V48.324h9.085c1.691%200%203.156.143%204.049.38%203.465.93%205.727%203.68%205.727%207.335%200%202.441-.81%204.156-2.762%205.644%202.905%201.417%204.453%203.727%204.453%206.966Zm-15.634-8.656h4.584c1.024%200%201.917-.143%202.536-.417%201.215-.548%201.905-1.608%201.905-3.167%200-1.548-.643-2.572-1.845-3.132-.691-.31-1.762-.452-2.763-.452h-4.417v7.168Zm10.716%208.465c0-1.536-.893-3.37-3.227-3.893-.428-.095-1.036-.143-1.571-.143h-5.918v8.085h5.501c.56%200%201.429-.048%201.953-.167%201.94-.453%203.262-1.846%203.262-3.882Zm47.747-11.847-8.097%2020.408h-4.429l-8.109-20.408h5.191l5.192%2014.574%205.108-14.574h5.144Zm-20.218%2010.002c0%20.69-.036%201.262-.155%201.94h-15.943c.631%202.87%202.714%204.728%205.882%204.728%202.131%200%203.607-.882%204.703-2.525h4.87c-1.762%204.144-5.204%206.692-9.657%206.692-6.084%200-10.537-4.858-10.537-10.49%200-6.108%204.524-10.776%2010.335-10.776%206.239%200%2010.442%204.954%2010.502%2010.43Zm-4.763-1.405c-.333-2.846-2.643-4.858-5.691-4.858-2.894%200-5.287%201.929-5.621%204.858h11.312Zm-72.667%203.44c0%204.787-3.287%208.371-9.419%208.371H119.363V64.66c-1.917.274-3.87.69-5.811%201.238l4.537%2011.121h-5.418l-3.596-9.585c-5.144%202.084-10.085%205.216-14.217%209.585h-4.786L101.8%2048.312h4.56l5.68%2013.883a44.112%2044.112%200%200%201%207.323-1.774V48.312h9.084c1.703%200%203.156.143%204.061.393%203.453.929%205.727%203.667%205.727%207.323%200%201.917-.738%204.179-2.81%205.691%203.06%201.56%204.501%204.025%204.501%206.93Zm-15.634-8.667a62.664%2062.664%200%200%201%202.06-.036c1.703.012%203.239.131%204.608.37%201.441-.549%202.357-1.727%202.357-3.537%200-1.941-.881-3.144-2.488-3.667-.548-.18-1.358-.286-2.322-.286h-4.215v7.156Zm-16.55%203.905-3.715-9.894-6.394%2016.502c2.833-2.595%206.263-4.858%2010.109-6.608Zm27.254%204.74c0-2.775-3.131-4.347-8.513-4.418-.715%200-1.441.011-2.191.047v8.252h5.918c2.548%200%204.786-1.37%204.786-3.882Z'%20clip-rule='evenodd'/%3e%3c/g%3e%3cdefs%3e%3clinearGradient%20id='b'%20x1='51.47'%20x2='85.916'%20y1='62.946'%20y2='62.946'%20gradientUnits='userSpaceOnUse'%3e%3cstop%20stop-color='%23CD9F28'/%3e%3cstop%20offset='1'%20stop-color='%23ECD80B'/%3e%3c/linearGradient%3e%3cclipPath%20id='a'%3e%3cpath%20fill='%23fff'%20d='M51.47%2045.728h186.104V80.14H51.47z'/%3e%3c/clipPath%3e%3c/defs%3e%3c/svg%3e)


More from Trane


Explore Other Assets


© 2026 MaintainX. All rights reserved.