


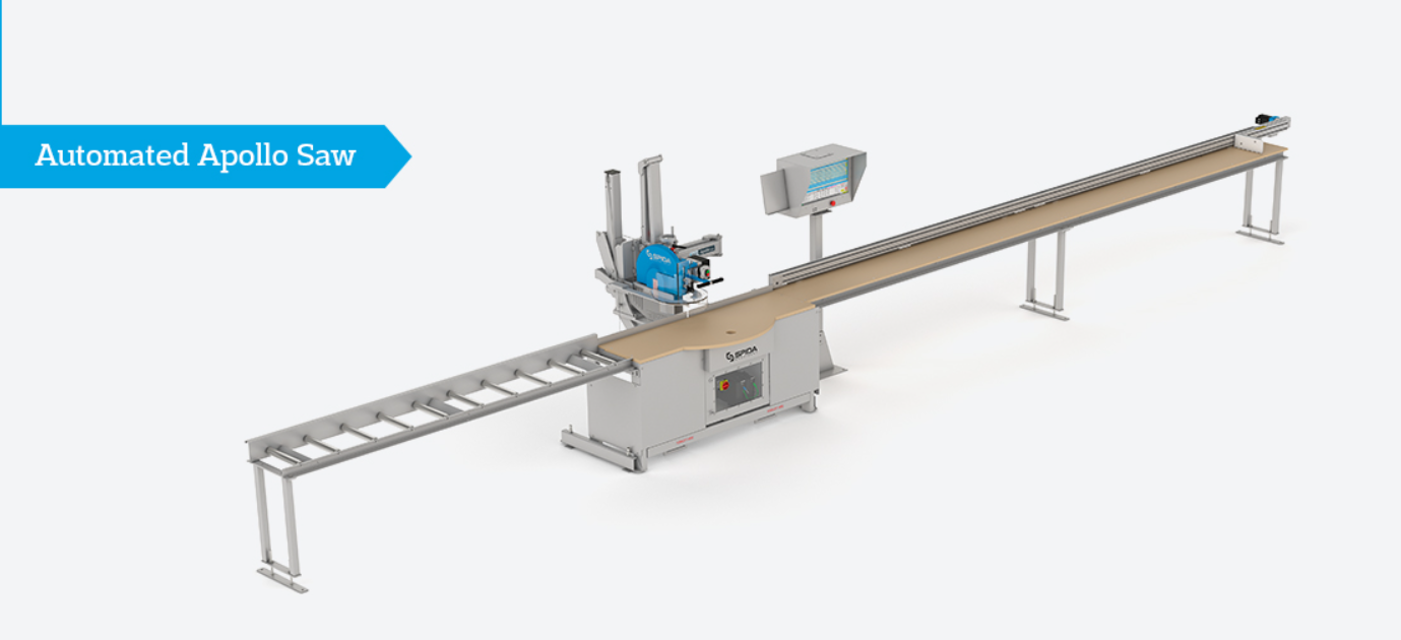
SPIDA Machinery Automated Apollo Saw Apollo SAW
Need answers fast?
Explore the manual using AI.
Turn manuals into instant answers
with your AI-powered assistantTurn manuals into instant answers
with your AI-powered assistant
Complete asset maintenance, one click away
Get instant access to all the maintenance information you need. Empower technicians to perform preventive maintenance with asset packages, ready to use right out of the box.

Documents & Manuals
Find all the essential guides in one place.
 Tensioning Guide
- Belt-diagram
- C-120 pulleys
+ 13 more

Work Order Templates
Pre-built workflows to keep your asset running smoothly.
- Daily Electrical System Inspection
- Replace Roller and Pulley
- Install Engine B-120
+ 29 more

Procedures
Integrate maintenance plans directly into your work orders.
- Motion Industries
- Applied Industrial Technologies
- Electrical Brothers
+ 5 more

Parts
Access the parts list for your equipment in MaintainX.
- Drive Motor
- B2 Rollers
- Tensioning System
+ 40 more
SPIDA Machinery Automated Apollo Saw Apollo SAW
Create an account to install this asset package.
Maintenance Plans for SPIDA Machinery Automated Apollo Saw Model Apollo SAW
Integrate maintenance plans directly into your work orders in MaintainX.
1 Daily Automated Apollo Saw Check
Guards in place and tight with no loose bolts
Work area surrounding the CSS Apollo Saw is clear of trip hazards, unnecessary tools, or other debris
Time for the saw blade to stop after the Saw has been switched off or the emergency stop has been applied
The gap between the brake pad and plate is set between 8 – 10 thou
Dust chute is clear of any obstructions or build-up of saw dust
Saw is free of any build-up of debris
No offcuts or sawdust blocking the saw
No unusual noises or vibrations from the Saw
Emergency stop is working and stops the machine when activated

Rotation Belt Replacement
Remove saw table top and blue guard plate in front of gearbox
Rotate saw to the left until the gearbox and belt adjusting rollers are accessible from the top
Loosen off the securing nut (1) using spanner provided, on both rollers. Turn eccentric nut (2) on both rollers until minimum tension is achieved and belt is loose
Remove the two plates securing ends of rotation belt by taking out the four bolts holding them on
Remove the old belt
Secure the end of the new belt to the left-hand side (one nearest the rotation gearbox) using one of the plates from the 4th step
Weave the new belt around the pulleys and secure the other end in place (remove as much “slack” as you can by hand)
Loosen securing nut on the pulley nearest the front of the saw and turn the eccentric nut until the maximum adjustment is achieved. Tighten the securing nut
Final tensioning of belt is achieved by adjusting the second tensioning roller
1 Monthly Automated Apollo Saw Check
Arm Assembly
The arm assembly should allow the user to smoothly pull the saw blade through the placed material to perform a cut; and should then allow the user to easily return the blade back into position behind the guard and hold it there until the next cut is required.
The arm assembly should be maintained every month to:
- Check on the condition of the bearings and other moving parts.
All assembly components should also be checked to ensure there is no damage or wear that will affect the performance of the assembly. Ensure that there are no loose, damaged, or missing bolts, and replace or tighten as necessary.
Do not use the Saw if any of the moving parts do not have fluid motion; if the saw blade is moving without any external force being applied; or if the blade is stuck in a certain position; and if any of the above cannot be fixed by general maintenance.
Height adjust and Blade Guard assemblies in good condition
The height adjust assembly should move the saw blade up and down easily as required, and the blade guard assembly should allow the saw blade to spin and cut easily while protecting the user from the saw blade.
Both assemblies should be maintained every month to:
Cuts Test
Testing the Cut Accuracy
Check that the blade is square to the fence and in a vertical plane (90°)
Place an off cut of timber on the table, ensuring it is against the fence (Must be clamped)
With the radial degree setting at 90°, cut the timber part way through
Without moving the timber reset the angle to 45° to the left and make a second cut part way through
Reset the angle to 45° to the right and make a third cut part way through
Check the alignment of the cuts. The points of intersection should all be at the same point at the rear face of the timber
If the point of intersection is too far back or forward, adjustment can be made at the fence. To adjust the fence, loosen the 8mm Countersunk Cap screws holding the fence to the base frame, on either side of the fence
If the intersection point is too far forward, move the fence forward
Motor Brake Replacement
When replacing the Motor brake on the Arbor motor, be sure to follow the instructions provided below depending on the type of brake being used:
Brake adjustment (or braking gap adjustment – r)
Adjust the screw until you achieve the braking gap value listed on the table below.
Note: For a quicker but more approximate adjustment, first tighten the adjustment screw clockwise until it reaches the bottom; then loosen it, turning it anti-clockwise (see values listed on the table above).
Connecting 100V Brakes on CEG Motors
• It is vitally important to ensure you have the correct connection of the motor brake to prevent damage to the brake.
• The Rectifier supplied is suitable for any mains Voltage supplied, it approximately halves the supply Alternating Voltage to DC (240V AC becomes ~100VDC and 415V AC becomes ~ 190VDC)
• Identify the Voltage of the brake fitted to the motor, usually it is 100V, however some units have 190V brakes. Check!
• To set correct gap on brake, fully tighten centre bolt and then undo ¾ of a turn. When energised it should “click”. During running there should be no smell of burning or heat and the blade should stop in ~ 8 seconds after powering off
Parts for SPIDA Machinery Automated Apollo Saw Apollo SAW
Access the parts list for your equipment in MaintainX.
Multi Monitor Assembly
0605000
Roller Table - 3M
1110000 - 3000
Rapid Stop Table (6M)
1202000
Parts For Ctype - Css Xl Saw
SM2K-CSSXLPARTS
Apollo & Cxl Assy Kit
SM2K-CXL-TYPE
Multi Monitor Assembly
0605000
Roller Table - 3M
1110000 - 3000
Rapid Stop Table (6M)
1202000
Parts For Ctype - Css Xl Saw
SM2K-CSSXLPARTS
Apollo & Cxl Assy Kit
SM2K-CXL-TYPE
Multi Monitor Assembly
0605000
Roller Table - 3M
1110000 - 3000
Rapid Stop Table (6M)
1202000
Parts For Ctype - Css Xl Saw
SM2K-CSSXLPARTS
Apollo & Cxl Assy Kit
SM2K-CXL-TYPE
Unlock efficiency
with MaintainX CoPilot
MaintainX CoPilot is your expert colleague, on call 24/7, helping your team find the answers they need to keep equipment running.
Reduce Unplanned Downtime
Ensure your team follows consistent procedures to minimize equipment failures and costly delays.
Maximize Asset Availability
Keep your assets running longer and more reliably, with standardized maintenance workflows from OEM manuals.
Lower Maintenance Costs
Turn any technician into an expert to streamline operations, maintain more assets, and reduce overall costs.
Thousands of companies manage their assets with MaintainX

'%3e%3cpath%20fill='url(%23b)'%20d='M66.008%2080.068c-5.084-.786-9.763-3.834-12.442-8.68a16.942%2016.942%200%200%201-1.87-5.18c1.096.19%202.203.476%203.298.87%206.525%202.333%2010.836%207.68%2011.014%2012.99ZM51.47%2061.576c.488-5.524%203.62-10.716%208.847-13.597a17.132%2017.132%200%200%201%2011.335-1.882c-.798%208.145-7.43%2014.848-16.038%2015.599-1.417.119-2.799.07-4.144-.12Zm28.564-11.478a17.513%2017.513%200%200%201%203.727%204.62c4.608%208.335%201.584%2018.813-6.75%2023.409a16.988%2016.988%200%200%201-4.359%201.679%2019.624%2019.624%200%200%201-3.977-12.776c.346-7.561%204.942-13.931%2011.36-16.932Z'/%3e%3cpath%20fill='%23110F0D'%20fill-rule='evenodd'%20d='M142.831%2048.324h4.977V77.03h-4.977V48.324Zm27.278%2013.002c.322%201.048.453%202.263.453%203.62v12.073h-4.787V66.208c0-.75-.047-1.572-.154-2.143-.453-2.382-1.822-3.572-4.215-3.572-2.31%200-3.882%201.274-4.43%203.476-.143.596-.226%201.405-.226%202.25v10.8h-4.787V56.623h4.477v2.989c1.536-2.5%203.906-3.43%206.371-3.43%203.488%200%206.263%201.68%207.298%205.144Zm24.636%207.323c0%203.882-2.358%206.525-5.763%207.727-1.298.453-2.632.643-4.62.643h-10.169V48.324h9.085c1.691%200%203.156.143%204.049.38%203.465.93%205.727%203.68%205.727%207.335%200%202.441-.81%204.156-2.762%205.644%202.905%201.417%204.453%203.727%204.453%206.966Zm-15.634-8.656h4.584c1.024%200%201.917-.143%202.536-.417%201.215-.548%201.905-1.608%201.905-3.167%200-1.548-.643-2.572-1.845-3.132-.691-.31-1.762-.452-2.763-.452h-4.417v7.168Zm10.716%208.465c0-1.536-.893-3.37-3.227-3.893-.428-.095-1.036-.143-1.571-.143h-5.918v8.085h5.501c.56%200%201.429-.048%201.953-.167%201.94-.453%203.262-1.846%203.262-3.882Zm47.747-11.847-8.097%2020.408h-4.429l-8.109-20.408h5.191l5.192%2014.574%205.108-14.574h5.144Zm-20.218%2010.002c0%20.69-.036%201.262-.155%201.94h-15.943c.631%202.87%202.714%204.728%205.882%204.728%202.131%200%203.607-.882%204.703-2.525h4.87c-1.762%204.144-5.204%206.692-9.657%206.692-6.084%200-10.537-4.858-10.537-10.49%200-6.108%204.524-10.776%2010.335-10.776%206.239%200%2010.442%204.954%2010.502%2010.43Zm-4.763-1.405c-.333-2.846-2.643-4.858-5.691-4.858-2.894%200-5.287%201.929-5.621%204.858h11.312Zm-72.667%203.44c0%204.787-3.287%208.371-9.419%208.371H119.363V64.66c-1.917.274-3.87.69-5.811%201.238l4.537%2011.121h-5.418l-3.596-9.585c-5.144%202.084-10.085%205.216-14.217%209.585h-4.786L101.8%2048.312h4.56l5.68%2013.883a44.112%2044.112%200%200%201%207.323-1.774V48.312h9.084c1.703%200%203.156.143%204.061.393%203.453.929%205.727%203.667%205.727%207.323%200%201.917-.738%204.179-2.81%205.691%203.06%201.56%204.501%204.025%204.501%206.93Zm-15.634-8.667a62.664%2062.664%200%200%201%202.06-.036c1.703.012%203.239.131%204.608.37%201.441-.549%202.357-1.727%202.357-3.537%200-1.941-.881-3.144-2.488-3.667-.548-.18-1.358-.286-2.322-.286h-4.215v7.156Zm-16.55%203.905-3.715-9.894-6.394%2016.502c2.833-2.595%206.263-4.858%2010.109-6.608Zm27.254%204.74c0-2.775-3.131-4.347-8.513-4.418-.715%200-1.441.011-2.191.047v8.252h5.918c2.548%200%204.786-1.37%204.786-3.882Z'%20clip-rule='evenodd'/%3e%3c/g%3e%3cdefs%3e%3clinearGradient%20id='b'%20x1='51.47'%20x2='85.916'%20y1='62.946'%20y2='62.946'%20gradientUnits='userSpaceOnUse'%3e%3cstop%20stop-color='%23CD9F28'/%3e%3cstop%20offset='1'%20stop-color='%23ECD80B'/%3e%3c/linearGradient%3e%3cclipPath%20id='a'%3e%3cpath%20fill='%23fff'%20d='M51.47%2045.728h186.104V80.14H51.47z'/%3e%3c/clipPath%3e%3c/defs%3e%3c/svg%3e)


Explore Other Assets


© 2026 MaintainX. All rights reserved.