


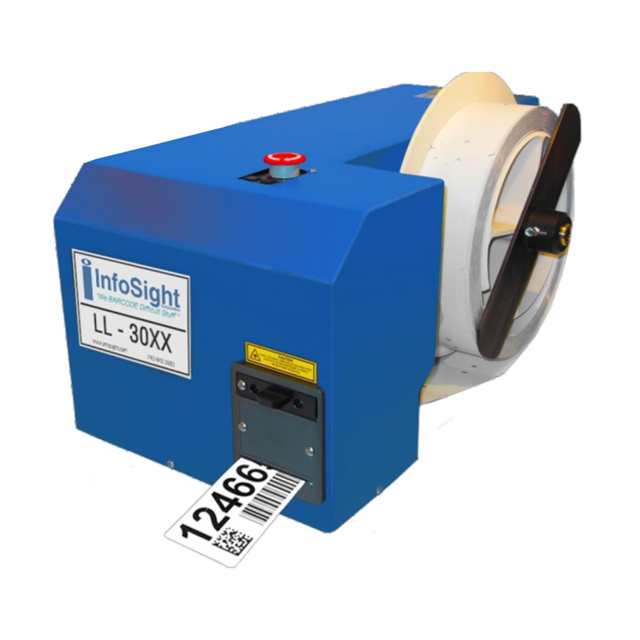
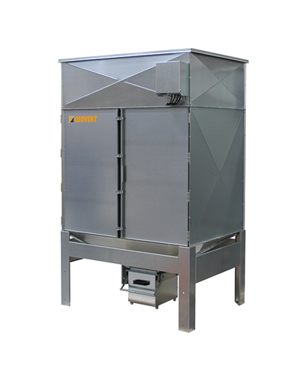
InfoSight Tag Printer LabeLase 3000
Need answers fast?
Explore the manual using AI.
Turn manuals into instant answers
with your AI-powered assistantTurn manuals into instant answers
with your AI-powered assistant
Complete asset maintenance, one click away
Get instant access to all the maintenance information you need. Empower technicians to perform preventive maintenance with asset packages, ready to use right out of the box.

Documents & Manuals
Find all the essential guides in one place.
 Tensioning Guide
- Belt-diagram
- C-120 pulleys
+ 13 more

Work Order Templates
Pre-built workflows to keep your asset running smoothly.
- Daily Electrical System Inspection
- Replace Roller and Pulley
- Install Engine B-120
+ 29 more

Procedures
Integrate maintenance plans directly into your work orders.
- Motion Industries
- Applied Industrial Technologies
- Electrical Brothers
+ 5 more

Parts
Access the parts list for your equipment in MaintainX.
- Drive Motor
- B2 Rollers
- Tensioning System
+ 40 more
InfoSight Tag Printer LabeLase 3000
Create an account to install this asset package.
Maintenance Plans for InfoSight Tag Printer Model LabeLase 3000
Integrate maintenance plans directly into your work orders in MaintainX.
Internal Drive Mechanism Cleaning
CAUTION: ALWAYS UNPLUG BOTH THE PRINTER POWER CORD AND ALL COMMUNICATION CABLES BEFORE SERVICING THE DRIVE UNIT
Is the printer unplugged?
The front cleanout plate may be removed to clean the drive mechanism without removing the printer cover. Extreme care must be used to avoid damaging laser optics, pass-through lens, optical tag & notch sensors, and other delicate components.
Is the front cleanout plate removed?
Is the pass-through lens left in place?
A soft brush or long Q-Tip can be used to loosen any debris, and a small PC keyboard vacuum with a 90-degree or flexible nose piece can be used to remove the loosened debris.
Is the debris loosened and removed?
The front cleanout plate is secured with two SECURITY TORX screws to prevent unintended opening.
Is the front cleanout plate secured?

Air Filter Replacement
The LabeLase® 3000 Tag Printer includes three light-duty foam filter elements, intended for use in a normal office environment. It is not intended to protect the printer from industrial contaminants or vapors, typical of a factory or mill environment
As the filter elements accumulate dust and pollen over time, air flow through the printer may be reduced
This may cause excessive dust to accumulate on the internal optics (lenses and mirrors), which may shorten their life considerably. Therefore, it is important to monitor the condition of the filters and determine the appropriate cleaning frequency for your specific environment
At high duty cycles when printing large batches of tags with a high percentage of black (printed) area, reduced air flow may also cause the internal temperature sensor to automatically shut down the laser tube until it cools back to its normal operating temperature – this is normal
The LL3000 series of printers generally require frequent air filter cleaning
REAR FILTER REMOVAL!
The filter cover is located on the rear of the printer, and is held in place by two thumb screws
Loosen the thumb screws and carefully remove the cover and the foam filter element underneath
Carefully blow any lint or dust off the filter, or gently wash it in soap and water. Dry the filter thoroughly before reinstalling
Lens Cleaning
CAUTION: LASER OPTICS ALIGNMENT SHOULD ONLY BE PERFORMED BY A QUALIFIED TECHNICIAN
The lens slide is secured with a SECURITY TORX screw to prevent unintended opening
Security screw removed
Lens slide carefully opened
CAUTION: DO NOT TOUCH LENS WITH FINGERS OR ANY SUBSTANCE CONTAINING ALCOHOL, OR PERMANENT DAMAGE MAY RESULT
Lens cleaning performed with non-abrasive, fiber-free cloth
White vinegar used for cleaning. Alcohol not used
Lens wiped gently, avoiding streaks
DO NOT RUB HARD!
Fuse Replacement
The incoming AC line is fused on both legs. Before replacing the fuses, first determine and fix the cause of the blown fuses
CAUTION: BE SURE TO REMOVE THE AC POWER CORD BEFORE REMOVING THE FUSE HOLDER OR PERFORMING ANY OTHER TROUBLESHOOTING OR MAINTENANCE!
To replace the fuses, remove the fuse holder on the back of the printer between the power cord input and the on-off rocker switch. The fuse holder only goes back in one-way. If it does not fit easily, turn it upside down and then insert it gently so that it snaps in place;
Unlock efficiency
with MaintainX CoPilot
MaintainX CoPilot is your expert colleague, on call 24/7, helping your team find the answers they need to keep equipment running.
Reduce Unplanned Downtime
Ensure your team follows consistent procedures to minimize equipment failures and costly delays.
Maximize Asset Availability
Keep your assets running longer and more reliably, with standardized maintenance workflows from OEM manuals.
Lower Maintenance Costs
Turn any technician into an expert to streamline operations, maintain more assets, and reduce overall costs.
Thousands of companies manage their assets with MaintainX

'%3e%3cpath%20fill='url(%23b)'%20d='M66.008%2080.068c-5.084-.786-9.763-3.834-12.442-8.68a16.942%2016.942%200%200%201-1.87-5.18c1.096.19%202.203.476%203.298.87%206.525%202.333%2010.836%207.68%2011.014%2012.99ZM51.47%2061.576c.488-5.524%203.62-10.716%208.847-13.597a17.132%2017.132%200%200%201%2011.335-1.882c-.798%208.145-7.43%2014.848-16.038%2015.599-1.417.119-2.799.07-4.144-.12Zm28.564-11.478a17.513%2017.513%200%200%201%203.727%204.62c4.608%208.335%201.584%2018.813-6.75%2023.409a16.988%2016.988%200%200%201-4.359%201.679%2019.624%2019.624%200%200%201-3.977-12.776c.346-7.561%204.942-13.931%2011.36-16.932Z'/%3e%3cpath%20fill='%23110F0D'%20fill-rule='evenodd'%20d='M142.831%2048.324h4.977V77.03h-4.977V48.324Zm27.278%2013.002c.322%201.048.453%202.263.453%203.62v12.073h-4.787V66.208c0-.75-.047-1.572-.154-2.143-.453-2.382-1.822-3.572-4.215-3.572-2.31%200-3.882%201.274-4.43%203.476-.143.596-.226%201.405-.226%202.25v10.8h-4.787V56.623h4.477v2.989c1.536-2.5%203.906-3.43%206.371-3.43%203.488%200%206.263%201.68%207.298%205.144Zm24.636%207.323c0%203.882-2.358%206.525-5.763%207.727-1.298.453-2.632.643-4.62.643h-10.169V48.324h9.085c1.691%200%203.156.143%204.049.38%203.465.93%205.727%203.68%205.727%207.335%200%202.441-.81%204.156-2.762%205.644%202.905%201.417%204.453%203.727%204.453%206.966Zm-15.634-8.656h4.584c1.024%200%201.917-.143%202.536-.417%201.215-.548%201.905-1.608%201.905-3.167%200-1.548-.643-2.572-1.845-3.132-.691-.31-1.762-.452-2.763-.452h-4.417v7.168Zm10.716%208.465c0-1.536-.893-3.37-3.227-3.893-.428-.095-1.036-.143-1.571-.143h-5.918v8.085h5.501c.56%200%201.429-.048%201.953-.167%201.94-.453%203.262-1.846%203.262-3.882Zm47.747-11.847-8.097%2020.408h-4.429l-8.109-20.408h5.191l5.192%2014.574%205.108-14.574h5.144Zm-20.218%2010.002c0%20.69-.036%201.262-.155%201.94h-15.943c.631%202.87%202.714%204.728%205.882%204.728%202.131%200%203.607-.882%204.703-2.525h4.87c-1.762%204.144-5.204%206.692-9.657%206.692-6.084%200-10.537-4.858-10.537-10.49%200-6.108%204.524-10.776%2010.335-10.776%206.239%200%2010.442%204.954%2010.502%2010.43Zm-4.763-1.405c-.333-2.846-2.643-4.858-5.691-4.858-2.894%200-5.287%201.929-5.621%204.858h11.312Zm-72.667%203.44c0%204.787-3.287%208.371-9.419%208.371H119.363V64.66c-1.917.274-3.87.69-5.811%201.238l4.537%2011.121h-5.418l-3.596-9.585c-5.144%202.084-10.085%205.216-14.217%209.585h-4.786L101.8%2048.312h4.56l5.68%2013.883a44.112%2044.112%200%200%201%207.323-1.774V48.312h9.084c1.703%200%203.156.143%204.061.393%203.453.929%205.727%203.667%205.727%207.323%200%201.917-.738%204.179-2.81%205.691%203.06%201.56%204.501%204.025%204.501%206.93Zm-15.634-8.667a62.664%2062.664%200%200%201%202.06-.036c1.703.012%203.239.131%204.608.37%201.441-.549%202.357-1.727%202.357-3.537%200-1.941-.881-3.144-2.488-3.667-.548-.18-1.358-.286-2.322-.286h-4.215v7.156Zm-16.55%203.905-3.715-9.894-6.394%2016.502c2.833-2.595%206.263-4.858%2010.109-6.608Zm27.254%204.74c0-2.775-3.131-4.347-8.513-4.418-.715%200-1.441.011-2.191.047v8.252h5.918c2.548%200%204.786-1.37%204.786-3.882Z'%20clip-rule='evenodd'/%3e%3c/g%3e%3cdefs%3e%3clinearGradient%20id='b'%20x1='51.47'%20x2='85.916'%20y1='62.946'%20y2='62.946'%20gradientUnits='userSpaceOnUse'%3e%3cstop%20stop-color='%23CD9F28'/%3e%3cstop%20offset='1'%20stop-color='%23ECD80B'/%3e%3c/linearGradient%3e%3cclipPath%20id='a'%3e%3cpath%20fill='%23fff'%20d='M51.47%2045.728h186.104V80.14H51.47z'/%3e%3c/clipPath%3e%3c/defs%3e%3c/svg%3e)


Explore Other Assets


© 2026 MaintainX. All rights reserved.