


Hobart Hobart - GPU-600 GPU-600
Need answers fast?
Explore the manual using AI.
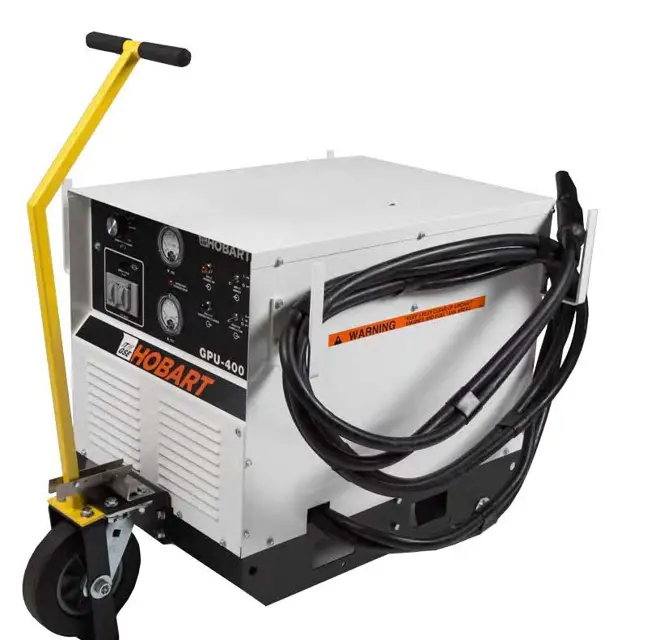
The Hobart GPU-600 is a high-performance industrial equipment designed for efficient food processing. Known for its reliability and durability, this model offers advanced features that enhance productivity in commercial kitchens. Regular maintenance ensures optimal performance and longevity of the Hobart GPU-600.
Turn manuals into instant answers
with your AI-powered assistantTurn manuals into instant answers
with your AI-powered assistant
Manual for Hobart Hobart - GPU-600 GPU-600
Complete asset maintenance, one click away
Get instant access to all the maintenance information you need. Empower technicians to perform preventive maintenance with asset packages, ready to use right out of the box.

Documents & Manuals
Find all the essential guides in one place.
 Tensioning Guide
- Belt-diagram
- C-120 pulleys
+ 13 more

Work Order Templates
Pre-built workflows to keep your asset running smoothly.
- Daily Electrical System Inspection
- Replace Roller and Pulley
- Install Engine B-120
+ 29 more

Procedures
Integrate maintenance plans directly into your work orders.
- Motion Industries
- Applied Industrial Technologies
- Electrical Brothers
+ 5 more

Parts
Access the parts list for your equipment in MaintainX.
- Drive Motor
- B2 Rollers
- Tensioning System
+ 40 more
Hobart Hobart - GPU-600 GPU-600
Create an account to install this asset package.
Maintenance Plans for Hobart Hobart - GPU-600 Model GPU-600
Integrate maintenance plans directly into your work orders in MaintainX.
Internal Inspection
Turn off input power at the source. Make sure that power cannot be inadvertently turned back on.
a) Using compressed air or a soft brush, clean any dirt and debris from the interior.
b) Inspect terminal blocks for evidence of overheating due to loose electrical connections.
c) Inspect electrical and mechanical connections for tightness.
d) Remove the front panel screw that holds the circuit board panel. Swing the circuit board panel out to the side.
e) Inspect the circuit board for evidence of overheating, such as burned components.
f) Inspect the hinge for the circuit board panel. If this hinge sticks or is difficult to operate, spray the hinge with a silicone spray lubricant.
g) Inspect all wiring, leads, and cables. Inspect for cuts, abrasions, and signs of deterioration and overheating. Inspect the leads for broken strands and terminals.
h) Inspect the output contactor. If the contacts are badly burned, the contactor should be replaced as soon as possible. Slightly pitted and burned contacts can be cleaned up with a commercial contact cleaner and very fine-grained emery cloth or equivalent.

1 Month Check
Check starting current limit functioning
6 Month Check
- Check cable connections (internal)
- Check all output contactor contacts
- Check power input contactor contacts
- Check voltmeter & ammeter accuracy
- Check all wiring and connections
- Inspect and clean general (light duty);
GPU Removal and Replacement
a) Turn off the input power at the source. Make sure that the power cannot be inadvertently turned back on.
b) Remove the top cover.
c) Disconnect the three AC input leads at the terminals on the input contactor and the grounding wire at the grounding lug.
d) Loosen the cable clamp on the rear of the GPU and remove the input cable from the clamp.
e) Disconnect the output cable from the output contactor (+) and the ammeter shunt (-).
f) Loosen the cable clamp at the base and remove the output cable from the GPU.
g) If the unit is a bridge mount unit, also disconnect and remove the remote control cables.
h) If the unit is bridge mount or fixed mount, attach a lifting hoist or forklift to the bottom of the GPU and remove the mounting screws or bolts that attach the GPU to its mounting.
i) Carefully remove the GPU.
Daily Check
- Inspect equipment
- Inspect AC input cables
- Check fan thermostat operation
- Check indicating lights;
Parts for Hobart Hobart - GPU-600 GPU-600
Access the parts list for your equipment in MaintainX.
Support, Bridge Mount
288272
Cable
402025-002
Label, General
286441
Base Assembly
-
Rectifier, Output, SCR Assembly
288305-002
Support, Bridge Mount
288272
Cable
402025-002
Label, General
286441
Base Assembly
-
Rectifier, Output, SCR Assembly
288305-002
Support, Bridge Mount
288272
Cable
402025-002
Label, General
286441
Base Assembly
-
Rectifier, Output, SCR Assembly
288305-002
Unlock efficiency
with MaintainX CoPilot
MaintainX CoPilot is your expert colleague, on call 24/7, helping your team find the answers they need to keep equipment running.
Reduce Unplanned Downtime
Ensure your team follows consistent procedures to minimize equipment failures and costly delays.
Maximize Asset Availability
Keep your assets running longer and more reliably, with standardized maintenance workflows from OEM manuals.
Lower Maintenance Costs
Turn any technician into an expert to streamline operations, maintain more assets, and reduce overall costs.
Thousands of companies manage their assets with MaintainX

'%3e%3cpath%20fill='url(%23b)'%20d='M66.008%2080.068c-5.084-.786-9.763-3.834-12.442-8.68a16.942%2016.942%200%200%201-1.87-5.18c1.096.19%202.203.476%203.298.87%206.525%202.333%2010.836%207.68%2011.014%2012.99ZM51.47%2061.576c.488-5.524%203.62-10.716%208.847-13.597a17.132%2017.132%200%200%201%2011.335-1.882c-.798%208.145-7.43%2014.848-16.038%2015.599-1.417.119-2.799.07-4.144-.12Zm28.564-11.478a17.513%2017.513%200%200%201%203.727%204.62c4.608%208.335%201.584%2018.813-6.75%2023.409a16.988%2016.988%200%200%201-4.359%201.679%2019.624%2019.624%200%200%201-3.977-12.776c.346-7.561%204.942-13.931%2011.36-16.932Z'/%3e%3cpath%20fill='%23110F0D'%20fill-rule='evenodd'%20d='M142.831%2048.324h4.977V77.03h-4.977V48.324Zm27.278%2013.002c.322%201.048.453%202.263.453%203.62v12.073h-4.787V66.208c0-.75-.047-1.572-.154-2.143-.453-2.382-1.822-3.572-4.215-3.572-2.31%200-3.882%201.274-4.43%203.476-.143.596-.226%201.405-.226%202.25v10.8h-4.787V56.623h4.477v2.989c1.536-2.5%203.906-3.43%206.371-3.43%203.488%200%206.263%201.68%207.298%205.144Zm24.636%207.323c0%203.882-2.358%206.525-5.763%207.727-1.298.453-2.632.643-4.62.643h-10.169V48.324h9.085c1.691%200%203.156.143%204.049.38%203.465.93%205.727%203.68%205.727%207.335%200%202.441-.81%204.156-2.762%205.644%202.905%201.417%204.453%203.727%204.453%206.966Zm-15.634-8.656h4.584c1.024%200%201.917-.143%202.536-.417%201.215-.548%201.905-1.608%201.905-3.167%200-1.548-.643-2.572-1.845-3.132-.691-.31-1.762-.452-2.763-.452h-4.417v7.168Zm10.716%208.465c0-1.536-.893-3.37-3.227-3.893-.428-.095-1.036-.143-1.571-.143h-5.918v8.085h5.501c.56%200%201.429-.048%201.953-.167%201.94-.453%203.262-1.846%203.262-3.882Zm47.747-11.847-8.097%2020.408h-4.429l-8.109-20.408h5.191l5.192%2014.574%205.108-14.574h5.144Zm-20.218%2010.002c0%20.69-.036%201.262-.155%201.94h-15.943c.631%202.87%202.714%204.728%205.882%204.728%202.131%200%203.607-.882%204.703-2.525h4.87c-1.762%204.144-5.204%206.692-9.657%206.692-6.084%200-10.537-4.858-10.537-10.49%200-6.108%204.524-10.776%2010.335-10.776%206.239%200%2010.442%204.954%2010.502%2010.43Zm-4.763-1.405c-.333-2.846-2.643-4.858-5.691-4.858-2.894%200-5.287%201.929-5.621%204.858h11.312Zm-72.667%203.44c0%204.787-3.287%208.371-9.419%208.371H119.363V64.66c-1.917.274-3.87.69-5.811%201.238l4.537%2011.121h-5.418l-3.596-9.585c-5.144%202.084-10.085%205.216-14.217%209.585h-4.786L101.8%2048.312h4.56l5.68%2013.883a44.112%2044.112%200%200%201%207.323-1.774V48.312h9.084c1.703%200%203.156.143%204.061.393%203.453.929%205.727%203.667%205.727%207.323%200%201.917-.738%204.179-2.81%205.691%203.06%201.56%204.501%204.025%204.501%206.93Zm-15.634-8.667a62.664%2062.664%200%200%201%202.06-.036c1.703.012%203.239.131%204.608.37%201.441-.549%202.357-1.727%202.357-3.537%200-1.941-.881-3.144-2.488-3.667-.548-.18-1.358-.286-2.322-.286h-4.215v7.156Zm-16.55%203.905-3.715-9.894-6.394%2016.502c2.833-2.595%206.263-4.858%2010.109-6.608Zm27.254%204.74c0-2.775-3.131-4.347-8.513-4.418-.715%200-1.441.011-2.191.047v8.252h5.918c2.548%200%204.786-1.37%204.786-3.882Z'%20clip-rule='evenodd'/%3e%3c/g%3e%3cdefs%3e%3clinearGradient%20id='b'%20x1='51.47'%20x2='85.916'%20y1='62.946'%20y2='62.946'%20gradientUnits='userSpaceOnUse'%3e%3cstop%20stop-color='%23CD9F28'/%3e%3cstop%20offset='1'%20stop-color='%23ECD80B'/%3e%3c/linearGradient%3e%3cclipPath%20id='a'%3e%3cpath%20fill='%23fff'%20d='M51.47%2045.728h186.104V80.14H51.47z'/%3e%3c/clipPath%3e%3c/defs%3e%3c/svg%3e)


More from Hobart


Explore Other Assets


© 2026 MaintainX. All rights reserved.