


Hayward SwimClear™ Cartridge Filter C3030
Need answers fast?
Explore the manual using AI.

Turn manuals into instant answers
with your AI-powered assistantTurn manuals into instant answers
with your AI-powered assistant
Complete asset maintenance, one click away
Get instant access to all the maintenance information you need. Empower technicians to perform preventive maintenance with asset packages, ready to use right out of the box.

Documents & Manuals
Find all the essential guides in one place.
 Tensioning Guide
- Belt-diagram
- C-120 pulleys
+ 13 more

Work Order Templates
Pre-built workflows to keep your asset running smoothly.
- Daily Electrical System Inspection
- Replace Roller and Pulley
- Install Engine B-120
+ 29 more

Procedures
Integrate maintenance plans directly into your work orders.
- Motion Industries
- Applied Industrial Technologies
- Electrical Brothers
+ 5 more

Parts
Access the parts list for your equipment in MaintainX.
- Drive Motor
- B2 Rollers
- Tensioning System
+ 40 more
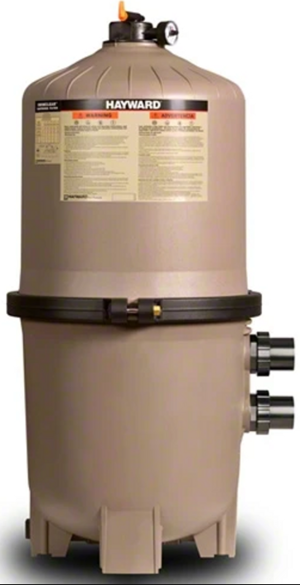
Hayward SwimClear™ Cartridge Filter C3030
Create an account to install this asset package.
Maintenance Plans for Hayward SwimClear™ Cartridge Filter Model C3030
Integrate maintenance plans directly into your work orders in MaintainX.
Filter Maintenance
WARNING: This product should be installed and serviced only by a qualified pool professional.
Turn off all system circulation pumps and all electric power on the equipment pad.
Set all system valves in a position to prevent water flow to the filter.
The manual air relief valve must be placed in the OPEN position. (Fig 6)
Remove filter drain plug (Fig 4) and drain water from filter.
Using 3/4” wrenches or hex sockets, loosen and remove the clamp nut and the clamp bolt. (Fig 5)
Holding both ends of the filter clamp carefully spread the clamp ends.
Remove the clamp by lifting over the upper filter body. Do not to drop the clamp during removal, because the clamp could be damaged. Do not strike the clamp with metal tools as they can damage the clamp.
Lift off upper filter body. Do not use the pressure gauge to lift the upper filter body.

Cartridge Removal
Remove the top Manifold, which is exposed when the upper filter body is removed. (Fig 4)
Remove the filter cartridge elements by using slight rocking motion and lifting up.
Clean filter cartridge elements.
Seal Ring / Seal Surface Cleaning
Warning: Do not use any petroleum solvents to clean filter components.
Filter tank seal removed
Upload a photo of the lower filter body seal surface after cleaning
Lower filter body seal surface and seal cleaned without solvent
Upload a photo of the upper filter body seal surface after cleaning
Upper filter body seal surface cleaned
Notice: Do not lubricate DEX2422Z2 seal.
Sign off on the seal ring / seal surface cleaning
Manual Air Relief Valve Removal
WARNING: This product should be installed and serviced only by a qualified pool professional.
Turn off all system circulation pumps and all electric power on the equipment pad.
Set all system valves in a position to prevent water from flowing to the filter.
The manual air relief valve must be placed in the OPEN position.
Wait until all water leakage has stopped.
Grasp the MAR body at the flats, turn the MAR counterclockwise until the indicator on the on the MAR flange is aligned with the “UNLOCK” position on the upper filter body.
Pull straight up to remove the MAR, a slight rocking motion may help.
Sign off on the Manual Air Relief Valve Removal
Parts for Hayward SwimClear™ Cartridge Filter C3030
Access the parts list for your equipment in MaintainX.
Pressure Gauge
ECX2712B1
O-Ring Kit (Set Of 2)
DEX2420Z8A
Air Relief Valve Nut
CCX1000N
Manual Air Relief W/O-Ring
CCX1000V
Manual Air Relief Assembly
DEX2420MAR2
Pressure Gauge
ECX2712B1
O-Ring Kit (Set Of 2)
DEX2420Z8A
Air Relief Valve Nut
CCX1000N
Manual Air Relief W/O-Ring
CCX1000V
Manual Air Relief Assembly
DEX2420MAR2
Pressure Gauge
ECX2712B1
O-Ring Kit (Set Of 2)
DEX2420Z8A
Air Relief Valve Nut
CCX1000N
Manual Air Relief W/O-Ring
CCX1000V
Manual Air Relief Assembly
DEX2420MAR2
Unlock efficiency
with MaintainX CoPilot
MaintainX CoPilot is your expert colleague, on call 24/7, helping your team find the answers they need to keep equipment running.
Reduce Unplanned Downtime
Ensure your team follows consistent procedures to minimize equipment failures and costly delays.
Maximize Asset Availability
Keep your assets running longer and more reliably, with standardized maintenance workflows from OEM manuals.
Lower Maintenance Costs
Turn any technician into an expert to streamline operations, maintain more assets, and reduce overall costs.
Thousands of companies manage their assets with MaintainX

'%3e%3cpath%20fill='url(%23b)'%20d='M66.008%2080.068c-5.084-.786-9.763-3.834-12.442-8.68a16.942%2016.942%200%200%201-1.87-5.18c1.096.19%202.203.476%203.298.87%206.525%202.333%2010.836%207.68%2011.014%2012.99ZM51.47%2061.576c.488-5.524%203.62-10.716%208.847-13.597a17.132%2017.132%200%200%201%2011.335-1.882c-.798%208.145-7.43%2014.848-16.038%2015.599-1.417.119-2.799.07-4.144-.12Zm28.564-11.478a17.513%2017.513%200%200%201%203.727%204.62c4.608%208.335%201.584%2018.813-6.75%2023.409a16.988%2016.988%200%200%201-4.359%201.679%2019.624%2019.624%200%200%201-3.977-12.776c.346-7.561%204.942-13.931%2011.36-16.932Z'/%3e%3cpath%20fill='%23110F0D'%20fill-rule='evenodd'%20d='M142.831%2048.324h4.977V77.03h-4.977V48.324Zm27.278%2013.002c.322%201.048.453%202.263.453%203.62v12.073h-4.787V66.208c0-.75-.047-1.572-.154-2.143-.453-2.382-1.822-3.572-4.215-3.572-2.31%200-3.882%201.274-4.43%203.476-.143.596-.226%201.405-.226%202.25v10.8h-4.787V56.623h4.477v2.989c1.536-2.5%203.906-3.43%206.371-3.43%203.488%200%206.263%201.68%207.298%205.144Zm24.636%207.323c0%203.882-2.358%206.525-5.763%207.727-1.298.453-2.632.643-4.62.643h-10.169V48.324h9.085c1.691%200%203.156.143%204.049.38%203.465.93%205.727%203.68%205.727%207.335%200%202.441-.81%204.156-2.762%205.644%202.905%201.417%204.453%203.727%204.453%206.966Zm-15.634-8.656h4.584c1.024%200%201.917-.143%202.536-.417%201.215-.548%201.905-1.608%201.905-3.167%200-1.548-.643-2.572-1.845-3.132-.691-.31-1.762-.452-2.763-.452h-4.417v7.168Zm10.716%208.465c0-1.536-.893-3.37-3.227-3.893-.428-.095-1.036-.143-1.571-.143h-5.918v8.085h5.501c.56%200%201.429-.048%201.953-.167%201.94-.453%203.262-1.846%203.262-3.882Zm47.747-11.847-8.097%2020.408h-4.429l-8.109-20.408h5.191l5.192%2014.574%205.108-14.574h5.144Zm-20.218%2010.002c0%20.69-.036%201.262-.155%201.94h-15.943c.631%202.87%202.714%204.728%205.882%204.728%202.131%200%203.607-.882%204.703-2.525h4.87c-1.762%204.144-5.204%206.692-9.657%206.692-6.084%200-10.537-4.858-10.537-10.49%200-6.108%204.524-10.776%2010.335-10.776%206.239%200%2010.442%204.954%2010.502%2010.43Zm-4.763-1.405c-.333-2.846-2.643-4.858-5.691-4.858-2.894%200-5.287%201.929-5.621%204.858h11.312Zm-72.667%203.44c0%204.787-3.287%208.371-9.419%208.371H119.363V64.66c-1.917.274-3.87.69-5.811%201.238l4.537%2011.121h-5.418l-3.596-9.585c-5.144%202.084-10.085%205.216-14.217%209.585h-4.786L101.8%2048.312h4.56l5.68%2013.883a44.112%2044.112%200%200%201%207.323-1.774V48.312h9.084c1.703%200%203.156.143%204.061.393%203.453.929%205.727%203.667%205.727%207.323%200%201.917-.738%204.179-2.81%205.691%203.06%201.56%204.501%204.025%204.501%206.93Zm-15.634-8.667a62.664%2062.664%200%200%201%202.06-.036c1.703.012%203.239.131%204.608.37%201.441-.549%202.357-1.727%202.357-3.537%200-1.941-.881-3.144-2.488-3.667-.548-.18-1.358-.286-2.322-.286h-4.215v7.156Zm-16.55%203.905-3.715-9.894-6.394%2016.502c2.833-2.595%206.263-4.858%2010.109-6.608Zm27.254%204.74c0-2.775-3.131-4.347-8.513-4.418-.715%200-1.441.011-2.191.047v8.252h5.918c2.548%200%204.786-1.37%204.786-3.882Z'%20clip-rule='evenodd'/%3e%3c/g%3e%3cdefs%3e%3clinearGradient%20id='b'%20x1='51.47'%20x2='85.916'%20y1='62.946'%20y2='62.946'%20gradientUnits='userSpaceOnUse'%3e%3cstop%20stop-color='%23CD9F28'/%3e%3cstop%20offset='1'%20stop-color='%23ECD80B'/%3e%3c/linearGradient%3e%3cclipPath%20id='a'%3e%3cpath%20fill='%23fff'%20d='M51.47%2045.728h186.104V80.14H51.47z'/%3e%3c/clipPath%3e%3c/defs%3e%3c/svg%3e)


More from Hayward


Explore Other Assets


© 2026 MaintainX. All rights reserved.