


Gardner Denver High Inlet Temperature Refrigerated Compressed Air Dryer RHT100
Need answers fast?
Explore the manual using AI.
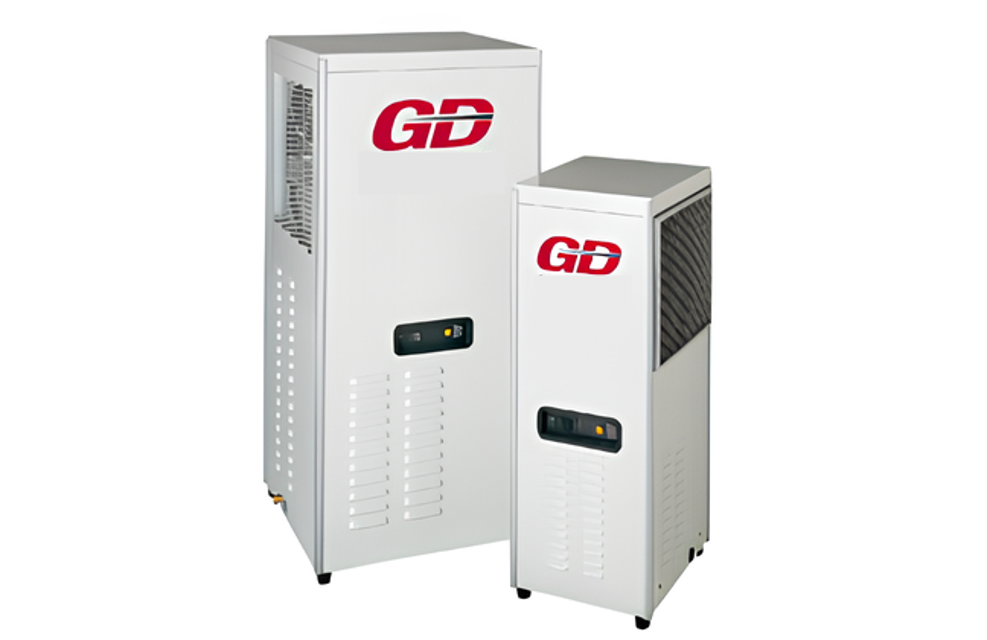
The Gardner Denver High Inlet Temperature Refrigerated Compressed Air Dryer RHT100 is designed for efficient moisture removal in compressed air systems. This model ensures optimal performance and reliability, making it ideal for industrial applications requiring high-quality air treatment solutions.
Turn manuals into instant answers
with your AI-powered assistantTurn manuals into instant answers
with your AI-powered assistant
Manual for Gardner Denver High Inlet Temperature Refrigerated Compressed Air Dryer RHT100
Complete asset maintenance, one click away
Get instant access to all the maintenance information you need. Empower technicians to perform preventive maintenance with asset packages, ready to use right out of the box.

Documents & Manuals
Find all the essential guides in one place.
 Tensioning Guide
- Belt-diagram
- C-120 pulleys
+ 13 more

Work Order Templates
Pre-built workflows to keep your asset running smoothly.
- Daily Electrical System Inspection
- Replace Roller and Pulley
- Install Engine B-120
+ 29 more

Procedures
Integrate maintenance plans directly into your work orders.
- Motion Industries
- Applied Industrial Technologies
- Electrical Brothers
+ 5 more

Parts
Access the parts list for your equipment in MaintainX.
- Drive Motor
- B2 Rollers
- Tensioning System
+ 40 more
Gardner Denver High Inlet Temperature Refrigerated Compressed Air Dryer RHT100
Create an account to install this asset package.
Maintenance Plans for Gardner Denver High Inlet Temperature Refrigerated Compressed Air Dryer Model RHT100
Integrate maintenance plans directly into your work orders in MaintainX.
1 Monthly Ambient Air Filter Cleaning
CAUTION! DRYER IS A PRESSURE CONTAINING DEVICE. DEPRESSURIZE BEFORE SERVICING.
• Ambient air filter - Clean accumulated dust and dirt from ambient air filter monthly or more often if air flow across the condenser is impeded.
A. Remove top panel.
B. Remove ambient air filter by sliding upwards.
C. Wash with soap and water and allow to dry before reinstalling.
NOTE: Do not use solvents to clean ambient air filter.
D. Reinstall filter and top panel.;

1 Yearly Drain Mechanism Replacement
• Check daily to be sure automatic drain is discharging.
• Replace drain mechanism yearly.
A. Shut-off compressed air supply to the dryer and depressurize.
B. Remove top panel.
C. Remove two screws holding side panel then remove side panel by sliding upwards.
D. Disconnect drain tube from bulkhead fitting in cabinet base. To remove, press the plastic collar in, toward the fitting, while pulling the tube out of the fitting.
E. Remove bowl - push bowl up, turn 1/8th turn to your left, and pull bowl straight down.
F. Remove drain tube fitting from bottom of bowl.
G. Remove old drain mechanism by turning knurled fitting to the right (clockwise) and remove.
1 Monthly Inlet Strainer Cleaning
CAUTION! DRYER IS A PRESSURE CONTAINING DEVICE. DEPRESSURIZE BEFORE SERVICING.
Inlet strainer - clean inlet strainer monthly or more often if rapid clogging occurs.
A. Shut-off compressed air supply to the strainer and depressurize.
B. Remove screen and clean or replace.
C. Reinstall.
1 Yearly Separator/Filter Element Replacement
Replace separator/filter element yearly or more often if pressure drop across the dryer is excessive.
A. Shut-off compressed air supply to the dryer and depressurize.
B. Remove top panel.
C. Remove two screws holding side panel and remove side panel by sliding upwards.
D. Disconnect drain tube from bulkhead fitting in cabinet base. To remove, press the plastic collar in, toward the fitting, while pulling the tube out of the fitting.
E. Remove bowl - push bowl up, turn bowl 1/8th turn to your left, and pull straight down.
F. Clean filter bowl.
G. Replace element.
1. Replacing complete element
Parts for Gardner Denver High Inlet Temperature Refrigerated Compressed Air Dryer RHT100
Access the parts list for your equipment in MaintainX.
Drain Mechanism
G05-4170-08
Capacitor, Run 220-240/1/50
G5910-103-13
Light, Fault 230v
G6350-451-11
Strainer, Inlet
G4731-735-3
Fan Blade
G6105-378-5
Drain Mechanism
G05-4170-08
Capacitor, Run 220-240/1/50
G5910-103-13
Light, Fault 230v
G6350-451-11
Strainer, Inlet
G4731-735-3
Fan Blade
G6105-378-5
Drain Mechanism
G05-4170-08
Capacitor, Run 220-240/1/50
G5910-103-13
Light, Fault 230v
G6350-451-11
Strainer, Inlet
G4731-735-3
Fan Blade
G6105-378-5
Unlock efficiency
with MaintainX CoPilot
MaintainX CoPilot is your expert colleague, on call 24/7, helping your team find the answers they need to keep equipment running.
Reduce Unplanned Downtime
Ensure your team follows consistent procedures to minimize equipment failures and costly delays.
Maximize Asset Availability
Keep your assets running longer and more reliably, with standardized maintenance workflows from OEM manuals.
Lower Maintenance Costs
Turn any technician into an expert to streamline operations, maintain more assets, and reduce overall costs.
Thousands of companies manage their assets with MaintainX

'%3e%3cpath%20fill='url(%23b)'%20d='M66.008%2080.068c-5.084-.786-9.763-3.834-12.442-8.68a16.942%2016.942%200%200%201-1.87-5.18c1.096.19%202.203.476%203.298.87%206.525%202.333%2010.836%207.68%2011.014%2012.99ZM51.47%2061.576c.488-5.524%203.62-10.716%208.847-13.597a17.132%2017.132%200%200%201%2011.335-1.882c-.798%208.145-7.43%2014.848-16.038%2015.599-1.417.119-2.799.07-4.144-.12Zm28.564-11.478a17.513%2017.513%200%200%201%203.727%204.62c4.608%208.335%201.584%2018.813-6.75%2023.409a16.988%2016.988%200%200%201-4.359%201.679%2019.624%2019.624%200%200%201-3.977-12.776c.346-7.561%204.942-13.931%2011.36-16.932Z'/%3e%3cpath%20fill='%23110F0D'%20fill-rule='evenodd'%20d='M142.831%2048.324h4.977V77.03h-4.977V48.324Zm27.278%2013.002c.322%201.048.453%202.263.453%203.62v12.073h-4.787V66.208c0-.75-.047-1.572-.154-2.143-.453-2.382-1.822-3.572-4.215-3.572-2.31%200-3.882%201.274-4.43%203.476-.143.596-.226%201.405-.226%202.25v10.8h-4.787V56.623h4.477v2.989c1.536-2.5%203.906-3.43%206.371-3.43%203.488%200%206.263%201.68%207.298%205.144Zm24.636%207.323c0%203.882-2.358%206.525-5.763%207.727-1.298.453-2.632.643-4.62.643h-10.169V48.324h9.085c1.691%200%203.156.143%204.049.38%203.465.93%205.727%203.68%205.727%207.335%200%202.441-.81%204.156-2.762%205.644%202.905%201.417%204.453%203.727%204.453%206.966Zm-15.634-8.656h4.584c1.024%200%201.917-.143%202.536-.417%201.215-.548%201.905-1.608%201.905-3.167%200-1.548-.643-2.572-1.845-3.132-.691-.31-1.762-.452-2.763-.452h-4.417v7.168Zm10.716%208.465c0-1.536-.893-3.37-3.227-3.893-.428-.095-1.036-.143-1.571-.143h-5.918v8.085h5.501c.56%200%201.429-.048%201.953-.167%201.94-.453%203.262-1.846%203.262-3.882Zm47.747-11.847-8.097%2020.408h-4.429l-8.109-20.408h5.191l5.192%2014.574%205.108-14.574h5.144Zm-20.218%2010.002c0%20.69-.036%201.262-.155%201.94h-15.943c.631%202.87%202.714%204.728%205.882%204.728%202.131%200%203.607-.882%204.703-2.525h4.87c-1.762%204.144-5.204%206.692-9.657%206.692-6.084%200-10.537-4.858-10.537-10.49%200-6.108%204.524-10.776%2010.335-10.776%206.239%200%2010.442%204.954%2010.502%2010.43Zm-4.763-1.405c-.333-2.846-2.643-4.858-5.691-4.858-2.894%200-5.287%201.929-5.621%204.858h11.312Zm-72.667%203.44c0%204.787-3.287%208.371-9.419%208.371H119.363V64.66c-1.917.274-3.87.69-5.811%201.238l4.537%2011.121h-5.418l-3.596-9.585c-5.144%202.084-10.085%205.216-14.217%209.585h-4.786L101.8%2048.312h4.56l5.68%2013.883a44.112%2044.112%200%200%201%207.323-1.774V48.312h9.084c1.703%200%203.156.143%204.061.393%203.453.929%205.727%203.667%205.727%207.323%200%201.917-.738%204.179-2.81%205.691%203.06%201.56%204.501%204.025%204.501%206.93Zm-15.634-8.667a62.664%2062.664%200%200%201%202.06-.036c1.703.012%203.239.131%204.608.37%201.441-.549%202.357-1.727%202.357-3.537%200-1.941-.881-3.144-2.488-3.667-.548-.18-1.358-.286-2.322-.286h-4.215v7.156Zm-16.55%203.905-3.715-9.894-6.394%2016.502c2.833-2.595%206.263-4.858%2010.109-6.608Zm27.254%204.74c0-2.775-3.131-4.347-8.513-4.418-.715%200-1.441.011-2.191.047v8.252h5.918c2.548%200%204.786-1.37%204.786-3.882Z'%20clip-rule='evenodd'/%3e%3c/g%3e%3cdefs%3e%3clinearGradient%20id='b'%20x1='51.47'%20x2='85.916'%20y1='62.946'%20y2='62.946'%20gradientUnits='userSpaceOnUse'%3e%3cstop%20stop-color='%23CD9F28'/%3e%3cstop%20offset='1'%20stop-color='%23ECD80B'/%3e%3c/linearGradient%3e%3cclipPath%20id='a'%3e%3cpath%20fill='%23fff'%20d='M51.47%2045.728h186.104V80.14H51.47z'/%3e%3c/clipPath%3e%3c/defs%3e%3c/svg%3e)


More from Gardner Denver


Explore Other Assets


© 2026 MaintainX. All rights reserved.