


Gardner Denver Air Dryer DGH165
Need answers fast?
Explore the manual using AI.
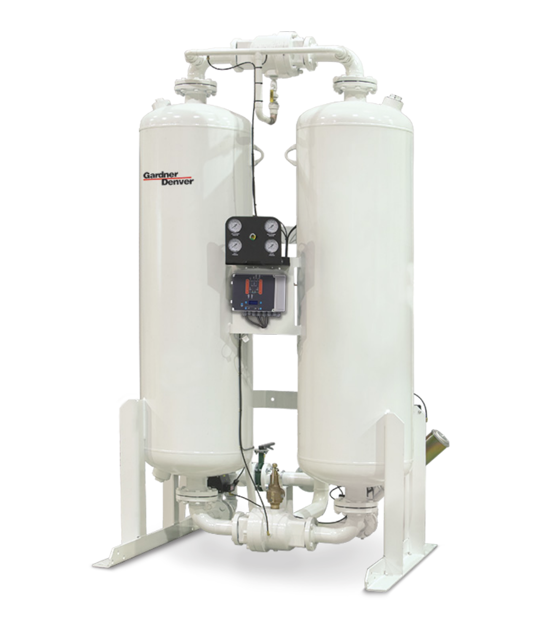
The Gardner Denver DGH165 is a high-performance air dryer designed for industrial applications. This model efficiently removes moisture from compressed air systems, ensuring optimal performance and longevity of equipment. With robust construction and advanced technology, the DGH165 is ideal for maintaining air quality in various industrial settings.
Turn manuals into instant answers
with your AI-powered assistantTurn manuals into instant answers
with your AI-powered assistant
Manual for Gardner Denver Air Dryer DGH165
Complete asset maintenance, one click away
Get instant access to all the maintenance information you need. Empower technicians to perform preventive maintenance with asset packages, ready to use right out of the box.

Documents & Manuals
Find all the essential guides in one place.
 Tensioning Guide
- Belt-diagram
- C-120 pulleys
+ 13 more

Work Order Templates
Pre-built workflows to keep your asset running smoothly.
- Daily Electrical System Inspection
- Replace Roller and Pulley
- Install Engine B-120
+ 29 more

Procedures
Integrate maintenance plans directly into your work orders.
- Motion Industries
- Applied Industrial Technologies
- Electrical Brothers
+ 5 more

Parts
Access the parts list for your equipment in MaintainX.
- Drive Motor
- B2 Rollers
- Tensioning System
+ 40 more
Gardner Denver Air Dryer DGH165
Create an account to install this asset package.
Maintenance Plans for Gardner Denver Air Dryer Model DGH165
Integrate maintenance plans directly into your work orders in MaintainX.
1 Yearly Mufflers Replacement
Warning: This procedure requires trained personnel with PPE!
Muffler disseminator elements clogged with desiccant dust?
Enter the back pressure in the muffler cartridges
If the tower pressure gauge of the off-stream tower rises above 5 psig (3.5 barg), the muffler elements should be replaced.
Tower pressure gauge of the off-stream tower above 5 psig (3.5 barg)?
IMPORTANT: Replace muffler cores provided with unit after 5 complete cycles following the completion of the Start-Up Procedures.
Sign off on the mufflers replacement

Valves Maintenance
Process and pilot valves checked for leaks and proper operation
Purge pressure adjustment valve checked for proper adjustment
Air control valves are operating and sequencing correctly
Inlet/Outlet switching valves are functioning correctly
High Pressure Models 40 through 450 ONLY. Inlet switching valves are normally open
Purge/repressurization valves are normally closed
12 volt DC, normally-closed, 3-way pilot solenoid valves are wired to the controller
Purge pressure and subsequent flow is adjusted by means of a quarter-turn ball valve
Models 40 through 3000 are equipped with a single safety relief valve
1 Yearly Pilot Air Filter Element Replacement
WARNING! The pilot air filter housing is a pressure-containing device, de-pressurize before servicing.
Enter the current pilot air pressure
Is the dryer isolated from air supply?
Is the dryer de-pressurized?
Is the filter bowl removed?
Is the filter bowl cleaned?
Is the element replaced?
Sign off on the pilot air filter element replacement
Desiccant Replacement
NOTE: The use of the correct replacement desiccant is necessary for proper dryer operation. Never use hygroscopic salts of the type commonly used in “deliquescent ” type dryers.
1. Frequency Of Desiccant Replacement
Desiccant should be replaced whenever the required dew point cannot be maintained while the dryer is being operated within its design conditions and there are no mechanical malfunctions. Refer to Section 11.0 for troubleshooting hints.
NOTE: Desiccant life is determined by the quality of the inlet air. Proper filtering of the inlet air will extend the life of the desiccant. Typically desiccant life is 3 to 5 years.
2. Procedure for Desiccant Charge Replacement
• De-pressurize and de-energize the dryer.
• Remove the fill and drain plugs from desiccant tower and drain the spent desiccant. Place a container at the base of the vessel to collect the desiccant. If necessary tap the sides of the vessels with a rubber mallet to loosen desiccant.
NOTE: Use extreme care when inserting rods or other tools through the desiccant fill or drain ports to loosen packed desiccant. Internal flow diffusers at the ends of the desiccant beds can be damaged or punctured by sharp instruments. These diffusers are necessary to distribute the airflow and keep the desiccant beads within the tower. Desiccant beads in exhaust mufflers, afterfilters, or the piping connected to the desiccant towers may indicate a perforation of a diffuser.
• Replace the drain plug using Teflon tape or another pipe thread sealant suitable for compressed air service.
Parts for Gardner Denver Air Dryer DGH165
Access the parts list for your equipment in MaintainX.
Muffler Insert
G3126761
Purge Orifice
G3161996
Purge Gauge
G3249310
Moisture Indicator
G4003167
Purge Muffler
G3090655
Muffler Insert
G3126761
Purge Orifice
G3161996
Purge Gauge
G3249310
Moisture Indicator
G4003167
Purge Muffler
G3090655
Muffler Insert
G3126761
Purge Orifice
G3161996
Purge Gauge
G3249310
Moisture Indicator
G4003167
Purge Muffler
G3090655
Unlock efficiency
with MaintainX CoPilot
MaintainX CoPilot is your expert colleague, on call 24/7, helping your team find the answers they need to keep equipment running.
Reduce Unplanned Downtime
Ensure your team follows consistent procedures to minimize equipment failures and costly delays.
Maximize Asset Availability
Keep your assets running longer and more reliably, with standardized maintenance workflows from OEM manuals.
Lower Maintenance Costs
Turn any technician into an expert to streamline operations, maintain more assets, and reduce overall costs.
Thousands of companies manage their assets with MaintainX

'%3e%3cpath%20fill='url(%23b)'%20d='M66.008%2080.068c-5.084-.786-9.763-3.834-12.442-8.68a16.942%2016.942%200%200%201-1.87-5.18c1.096.19%202.203.476%203.298.87%206.525%202.333%2010.836%207.68%2011.014%2012.99ZM51.47%2061.576c.488-5.524%203.62-10.716%208.847-13.597a17.132%2017.132%200%200%201%2011.335-1.882c-.798%208.145-7.43%2014.848-16.038%2015.599-1.417.119-2.799.07-4.144-.12Zm28.564-11.478a17.513%2017.513%200%200%201%203.727%204.62c4.608%208.335%201.584%2018.813-6.75%2023.409a16.988%2016.988%200%200%201-4.359%201.679%2019.624%2019.624%200%200%201-3.977-12.776c.346-7.561%204.942-13.931%2011.36-16.932Z'/%3e%3cpath%20fill='%23110F0D'%20fill-rule='evenodd'%20d='M142.831%2048.324h4.977V77.03h-4.977V48.324Zm27.278%2013.002c.322%201.048.453%202.263.453%203.62v12.073h-4.787V66.208c0-.75-.047-1.572-.154-2.143-.453-2.382-1.822-3.572-4.215-3.572-2.31%200-3.882%201.274-4.43%203.476-.143.596-.226%201.405-.226%202.25v10.8h-4.787V56.623h4.477v2.989c1.536-2.5%203.906-3.43%206.371-3.43%203.488%200%206.263%201.68%207.298%205.144Zm24.636%207.323c0%203.882-2.358%206.525-5.763%207.727-1.298.453-2.632.643-4.62.643h-10.169V48.324h9.085c1.691%200%203.156.143%204.049.38%203.465.93%205.727%203.68%205.727%207.335%200%202.441-.81%204.156-2.762%205.644%202.905%201.417%204.453%203.727%204.453%206.966Zm-15.634-8.656h4.584c1.024%200%201.917-.143%202.536-.417%201.215-.548%201.905-1.608%201.905-3.167%200-1.548-.643-2.572-1.845-3.132-.691-.31-1.762-.452-2.763-.452h-4.417v7.168Zm10.716%208.465c0-1.536-.893-3.37-3.227-3.893-.428-.095-1.036-.143-1.571-.143h-5.918v8.085h5.501c.56%200%201.429-.048%201.953-.167%201.94-.453%203.262-1.846%203.262-3.882Zm47.747-11.847-8.097%2020.408h-4.429l-8.109-20.408h5.191l5.192%2014.574%205.108-14.574h5.144Zm-20.218%2010.002c0%20.69-.036%201.262-.155%201.94h-15.943c.631%202.87%202.714%204.728%205.882%204.728%202.131%200%203.607-.882%204.703-2.525h4.87c-1.762%204.144-5.204%206.692-9.657%206.692-6.084%200-10.537-4.858-10.537-10.49%200-6.108%204.524-10.776%2010.335-10.776%206.239%200%2010.442%204.954%2010.502%2010.43Zm-4.763-1.405c-.333-2.846-2.643-4.858-5.691-4.858-2.894%200-5.287%201.929-5.621%204.858h11.312Zm-72.667%203.44c0%204.787-3.287%208.371-9.419%208.371H119.363V64.66c-1.917.274-3.87.69-5.811%201.238l4.537%2011.121h-5.418l-3.596-9.585c-5.144%202.084-10.085%205.216-14.217%209.585h-4.786L101.8%2048.312h4.56l5.68%2013.883a44.112%2044.112%200%200%201%207.323-1.774V48.312h9.084c1.703%200%203.156.143%204.061.393%203.453.929%205.727%203.667%205.727%207.323%200%201.917-.738%204.179-2.81%205.691%203.06%201.56%204.501%204.025%204.501%206.93Zm-15.634-8.667a62.664%2062.664%200%200%201%202.06-.036c1.703.012%203.239.131%204.608.37%201.441-.549%202.357-1.727%202.357-3.537%200-1.941-.881-3.144-2.488-3.667-.548-.18-1.358-.286-2.322-.286h-4.215v7.156Zm-16.55%203.905-3.715-9.894-6.394%2016.502c2.833-2.595%206.263-4.858%2010.109-6.608Zm27.254%204.74c0-2.775-3.131-4.347-8.513-4.418-.715%200-1.441.011-2.191.047v8.252h5.918c2.548%200%204.786-1.37%204.786-3.882Z'%20clip-rule='evenodd'/%3e%3c/g%3e%3cdefs%3e%3clinearGradient%20id='b'%20x1='51.47'%20x2='85.916'%20y1='62.946'%20y2='62.946'%20gradientUnits='userSpaceOnUse'%3e%3cstop%20stop-color='%23CD9F28'/%3e%3cstop%20offset='1'%20stop-color='%23ECD80B'/%3e%3c/linearGradient%3e%3cclipPath%20id='a'%3e%3cpath%20fill='%23fff'%20d='M51.47%2045.728h186.104V80.14H51.47z'/%3e%3c/clipPath%3e%3c/defs%3e%3c/svg%3e)


More from Gardner Denver


Explore Other Assets


© 2026 MaintainX. All rights reserved.