


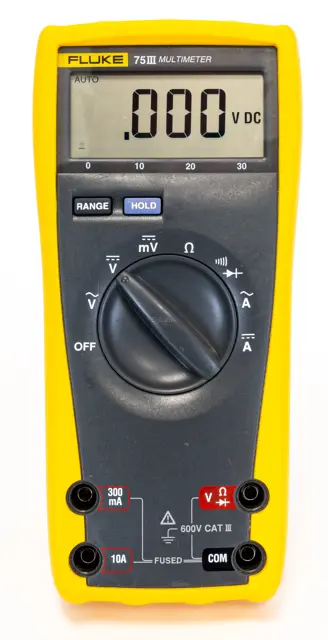
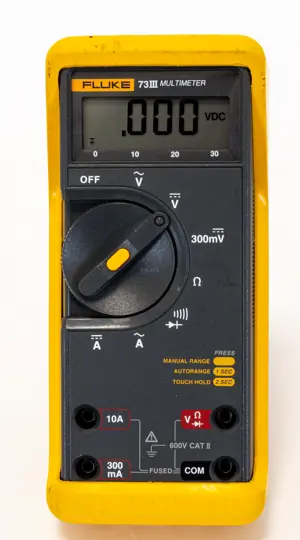
Fluke Multimeter 75
Need answers fast?
Explore the manual using AI.
Turn manuals into instant answers
with your AI-powered assistantTurn manuals into instant answers
with your AI-powered assistant
Manual for Fluke Multimeter 75
Complete asset maintenance, one click away
Get instant access to all the maintenance information you need. Empower technicians to perform preventive maintenance with asset packages, ready to use right out of the box.

Documents & Manuals
Find all the essential guides in one place.
 Tensioning Guide
- Belt-diagram
- C-120 pulleys
+ 13 more

Work Order Templates
Pre-built workflows to keep your asset running smoothly.
- Daily Electrical System Inspection
- Replace Roller and Pulley
- Install Engine B-120
+ 29 more

Procedures
Integrate maintenance plans directly into your work orders.
- Motion Industries
- Applied Industrial Technologies
- Electrical Brothers
+ 5 more

Parts
Access the parts list for your equipment in MaintainX.
- Drive Motor
- B2 Rollers
- Tensioning System
+ 40 more
Fluke Multimeter 75
Create an account to install this asset package.
Maintenance Plans for Fluke Multimeter Model 75
Integrate maintenance plans directly into your work orders in MaintainX.
Multimeter Calibration
Set the DC Voltage Calibrator to zero, and set the UUT to the VDC function.
Remove the case top cover as previously described.
Connect the DC Voltage Calibrator to the and COM input terminals of the UUT.
Set the DC Voltage Calibrator for an output of +3.000V dc
Adjust R8 for a display reading of +3.000V dc ±.001V.
Sign off on the multimeter calibration

Multimeter Cleaning
Warning: Do not use aromatic hydrocarbons or chlorinated solvents for cleaning.
Do not allow the LCD to get wet. Remove the display assembly before washing the pca.
Do not use detergent of any kind for cleaning the pca.
Do not remove lubricants from the switch when cleaning the pca.
Clean the instrument case with a mild detergent and water.
The pca may be washed with isopropyl alcohol or deionized water and a soft brush.
Remove the display assembly and fuses before washing, and avoid washing the switch if possible.
Dry the pca with clean dry air at low pressure, then bake it at 50°C for 24 hours.
Sign off on the multimeter cleaning
1 Yearly Multimeter Check
Performance Tests
Instrument Type - Multi-Product Calibrator
Recommended Model - Fluke 5500A
Initial Procedure
Room temperature in °C
Fuses and battery in good condition
To prevent fire, install fuses in accordance with the rating shown on the back of the meter.
Sign off on the multimeter check
Multimeter Check
Display Test (70/73 Series III below s/n 80810247 only)
To test the display, turn the UUT on and check whether all display segments come on.
Display Test (21/23/75/77 Series III only)
To test the display, press the range and hold buttons while turning the UUT on and check whether all display segments come on.
DC Voltage Test
Connect the ground/common/low side of the DC calibrator to COM on the UUT.
1. Set the UUT function switch to VDC, and connect the DC Voltage Calibrator output to the v and COM input terminals of the UUT.
2. Referring to Table 3, set the DC Voltage Calibrator for the output indicated in steps 1 through 5 only. Verify that the UUT display reading is within the limits shown.
3. Set the DC Voltage Calibrator for an output of +300 mV, and switch the UUT to the 300 mV function.
Parts for Fluke Multimeter 75
Access the parts list for your equipment in MaintainX.
Fuse, 11A (Fast Acting), 1000 VAC/DC Min Interrupt Rating 17 kA
803293
Fuse, 630 mA (Fast Acting), 250V Min Interrupt Rating 1500A or IEC 127-1
740670
Bottom Case Assembly (For S/N Below 1646056)
659128
Bottom Case Assembly (For S/N Above 1646056)
1646042
Case top Assembly
659125
Fuse, 11A (Fast Acting), 1000 VAC/DC Min Interrupt Rating 17 kA
803293
Fuse, 630 mA (Fast Acting), 250V Min Interrupt Rating 1500A or IEC 127-1
740670
Bottom Case Assembly (For S/N Below 1646056)
659128
Bottom Case Assembly (For S/N Above 1646056)
1646042
Case top Assembly
659125
Fuse, 11A (Fast Acting), 1000 VAC/DC Min Interrupt Rating 17 kA
803293
Fuse, 630 mA (Fast Acting), 250V Min Interrupt Rating 1500A or IEC 127-1
740670
Bottom Case Assembly (For S/N Below 1646056)
659128
Bottom Case Assembly (For S/N Above 1646056)
1646042
Case top Assembly
659125
Unlock efficiency
with MaintainX CoPilot
MaintainX CoPilot is your expert colleague, on call 24/7, helping your team find the answers they need to keep equipment running.
Reduce Unplanned Downtime
Ensure your team follows consistent procedures to minimize equipment failures and costly delays.
Maximize Asset Availability
Keep your assets running longer and more reliably, with standardized maintenance workflows from OEM manuals.
Lower Maintenance Costs
Turn any technician into an expert to streamline operations, maintain more assets, and reduce overall costs.
Thousands of companies manage their assets with MaintainX

'%3e%3cpath%20fill='url(%23b)'%20d='M66.008%2080.068c-5.084-.786-9.763-3.834-12.442-8.68a16.942%2016.942%200%200%201-1.87-5.18c1.096.19%202.203.476%203.298.87%206.525%202.333%2010.836%207.68%2011.014%2012.99ZM51.47%2061.576c.488-5.524%203.62-10.716%208.847-13.597a17.132%2017.132%200%200%201%2011.335-1.882c-.798%208.145-7.43%2014.848-16.038%2015.599-1.417.119-2.799.07-4.144-.12Zm28.564-11.478a17.513%2017.513%200%200%201%203.727%204.62c4.608%208.335%201.584%2018.813-6.75%2023.409a16.988%2016.988%200%200%201-4.359%201.679%2019.624%2019.624%200%200%201-3.977-12.776c.346-7.561%204.942-13.931%2011.36-16.932Z'/%3e%3cpath%20fill='%23110F0D'%20fill-rule='evenodd'%20d='M142.831%2048.324h4.977V77.03h-4.977V48.324Zm27.278%2013.002c.322%201.048.453%202.263.453%203.62v12.073h-4.787V66.208c0-.75-.047-1.572-.154-2.143-.453-2.382-1.822-3.572-4.215-3.572-2.31%200-3.882%201.274-4.43%203.476-.143.596-.226%201.405-.226%202.25v10.8h-4.787V56.623h4.477v2.989c1.536-2.5%203.906-3.43%206.371-3.43%203.488%200%206.263%201.68%207.298%205.144Zm24.636%207.323c0%203.882-2.358%206.525-5.763%207.727-1.298.453-2.632.643-4.62.643h-10.169V48.324h9.085c1.691%200%203.156.143%204.049.38%203.465.93%205.727%203.68%205.727%207.335%200%202.441-.81%204.156-2.762%205.644%202.905%201.417%204.453%203.727%204.453%206.966Zm-15.634-8.656h4.584c1.024%200%201.917-.143%202.536-.417%201.215-.548%201.905-1.608%201.905-3.167%200-1.548-.643-2.572-1.845-3.132-.691-.31-1.762-.452-2.763-.452h-4.417v7.168Zm10.716%208.465c0-1.536-.893-3.37-3.227-3.893-.428-.095-1.036-.143-1.571-.143h-5.918v8.085h5.501c.56%200%201.429-.048%201.953-.167%201.94-.453%203.262-1.846%203.262-3.882Zm47.747-11.847-8.097%2020.408h-4.429l-8.109-20.408h5.191l5.192%2014.574%205.108-14.574h5.144Zm-20.218%2010.002c0%20.69-.036%201.262-.155%201.94h-15.943c.631%202.87%202.714%204.728%205.882%204.728%202.131%200%203.607-.882%204.703-2.525h4.87c-1.762%204.144-5.204%206.692-9.657%206.692-6.084%200-10.537-4.858-10.537-10.49%200-6.108%204.524-10.776%2010.335-10.776%206.239%200%2010.442%204.954%2010.502%2010.43Zm-4.763-1.405c-.333-2.846-2.643-4.858-5.691-4.858-2.894%200-5.287%201.929-5.621%204.858h11.312Zm-72.667%203.44c0%204.787-3.287%208.371-9.419%208.371H119.363V64.66c-1.917.274-3.87.69-5.811%201.238l4.537%2011.121h-5.418l-3.596-9.585c-5.144%202.084-10.085%205.216-14.217%209.585h-4.786L101.8%2048.312h4.56l5.68%2013.883a44.112%2044.112%200%200%201%207.323-1.774V48.312h9.084c1.703%200%203.156.143%204.061.393%203.453.929%205.727%203.667%205.727%207.323%200%201.917-.738%204.179-2.81%205.691%203.06%201.56%204.501%204.025%204.501%206.93Zm-15.634-8.667a62.664%2062.664%200%200%201%202.06-.036c1.703.012%203.239.131%204.608.37%201.441-.549%202.357-1.727%202.357-3.537%200-1.941-.881-3.144-2.488-3.667-.548-.18-1.358-.286-2.322-.286h-4.215v7.156Zm-16.55%203.905-3.715-9.894-6.394%2016.502c2.833-2.595%206.263-4.858%2010.109-6.608Zm27.254%204.74c0-2.775-3.131-4.347-8.513-4.418-.715%200-1.441.011-2.191.047v8.252h5.918c2.548%200%204.786-1.37%204.786-3.882Z'%20clip-rule='evenodd'/%3e%3c/g%3e%3cdefs%3e%3clinearGradient%20id='b'%20x1='51.47'%20x2='85.916'%20y1='62.946'%20y2='62.946'%20gradientUnits='userSpaceOnUse'%3e%3cstop%20stop-color='%23CD9F28'/%3e%3cstop%20offset='1'%20stop-color='%23ECD80B'/%3e%3c/linearGradient%3e%3cclipPath%20id='a'%3e%3cpath%20fill='%23fff'%20d='M51.47%2045.728h186.104V80.14H51.47z'/%3e%3c/clipPath%3e%3c/defs%3e%3c/svg%3e)


More from Fluke

Explore Other Assets


© 2026 MaintainX. All rights reserved.