


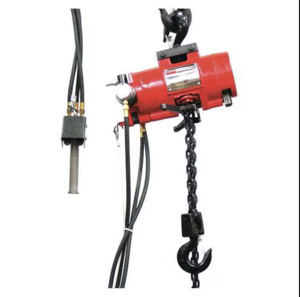
Dayton Electric Chain Hoist 3YE10
Need answers fast?
Explore the manual using AI.

Turn manuals into instant answers
with your AI-powered assistantTurn manuals into instant answers
with your AI-powered assistant
Manual for Dayton Electric Chain Hoist 3YE10
Complete asset maintenance, one click away
Get instant access to all the maintenance information you need. Empower technicians to perform preventive maintenance with asset packages, ready to use right out of the box.

Documents & Manuals
Find all the essential guides in one place.
 Tensioning Guide
- Belt-diagram
- C-120 pulleys
+ 13 more

Work Order Templates
Pre-built workflows to keep your asset running smoothly.
- Daily Electrical System Inspection
- Replace Roller and Pulley
- Install Engine B-120
+ 29 more

Procedures
Integrate maintenance plans directly into your work orders.
- Motion Industries
- Applied Industrial Technologies
- Electrical Brothers
+ 5 more

Parts
Access the parts list for your equipment in MaintainX.
- Drive Motor
- B2 Rollers
- Tensioning System
+ 40 more
Dayton Electric Chain Hoist 3YE10
Create an account to install this asset package.
Maintenance Plans for Dayton Electric Chain Hoist Model 3YE10
Integrate maintenance plans directly into your work orders in MaintainX.
1 Daily Chain Hoist Maintenance
Inspect Operating Controls
Deficiencies in Operating Controls
Inspect Limit Switches
Deficiencies in Limit Switches
Inspect Brake Mechanism
Deficiencies in Brake Mechanism
Inspect Hooks
Deficiencies in Hooks
Inspect Suspension Lug (if used)

Chain Hoist Voltage Conversion
Warning: Always disconnect hoist from power supply before starting the procedure
Hoist disconnected from power supply
Remove the electrical cover
Electrical cover removed
Reconnect the leads to the terminal block according to the wiring diagram located inside the electrical cover
Leads reconnected according to the wiring diagram
Recheck phasing and limit switch operation after converting voltage
Phasing and limit switch operation checked
Check for securely fastened terminals and damaged insulation
Chain Replacement With Chain In Hoist
Run hook up to its limit
DISCONNECT HOIST FROM POWER SUPPLY and remove the electrical cover
Remove the spring guide plate from the slots in the limit switch nuts
Turn the slotted nut back to about the center of the threaded screw
Remove the load block assembly from old chain
Remove the chain stripper to detach the chain from the chain anchor and pull it through the load block assembly
Pull the chain out of the chain stripper
Make a 'C' link by grinding through the end link on the load end of the old chain
Attach the new chain to the load end of the old chain using the 'C' link
1 Monthly Load Hook Bearing Lubrication
Warning: Ensure the machine is turned off before starting the lubrication process
Select the type of service
Was the Load Hook Bearing lubricated with SAE 30 gear or motor oil?
Upload a photo of the lubricated Load Hook Bearing
Sign off on the Load Hook Bearing lubrication
1 Daily Chain Inspection
Chain is to be kept clean and lubricated.
Visually check chain every time hoist is used.
Hoist must not be operated when chain is twisted or kinked. An important phase of hoist maintenance is chain inspection. Check individual links and check for chain elongation.
1. Check the chain for overall wear or stretch by selecting an unworn, unstretched length of chain (at the slack end for example).; Let the chain hang vertically with a light load (about 20 pounds) on the chain to pull it taut.; Use a large caliper to measure the outside length of a convenient number of links about 12 inches).; Measure the same number of links in a used section of chain and calculate the percentage increase in length of the worn chain.
2. If the length of the worn chain is more than 1½% longer than the unused chain (0.015" per inch of chain measured), then the chain should be replaced.; If the chain is worn less than 1½%, check it at several more places along its length.
If any section is worn more than 1½%, the chain should be replaced.
CAUTION
The chain used on this hoist has very carefully controlled dimensions and has been heat treated. Do not attempt to substitute other manufacturer's chain.;
Parts for Dayton Electric Chain Hoist 3YE10
Access the parts list for your equipment in MaintainX.
Cover Screw
H2976P
Trim Cover
JM37
Transmission Housing
JM3533
Transmission Case Gasket
JM560
Transmission Cover
JM34
Cover Screw
H2976P
Trim Cover
JM37
Transmission Housing
JM3533
Transmission Case Gasket
JM560
Transmission Cover
JM34
Cover Screw
H2976P
Trim Cover
JM37
Transmission Housing
JM3533
Transmission Case Gasket
JM560
Transmission Cover
JM34
Unlock efficiency
with MaintainX CoPilot
MaintainX CoPilot is your expert colleague, on call 24/7, helping your team find the answers they need to keep equipment running.
Reduce Unplanned Downtime
Ensure your team follows consistent procedures to minimize equipment failures and costly delays.
Maximize Asset Availability
Keep your assets running longer and more reliably, with standardized maintenance workflows from OEM manuals.
Lower Maintenance Costs
Turn any technician into an expert to streamline operations, maintain more assets, and reduce overall costs.
Thousands of companies manage their assets with MaintainX

'%3e%3cpath%20fill='url(%23b)'%20d='M66.008%2080.068c-5.084-.786-9.763-3.834-12.442-8.68a16.942%2016.942%200%200%201-1.87-5.18c1.096.19%202.203.476%203.298.87%206.525%202.333%2010.836%207.68%2011.014%2012.99ZM51.47%2061.576c.488-5.524%203.62-10.716%208.847-13.597a17.132%2017.132%200%200%201%2011.335-1.882c-.798%208.145-7.43%2014.848-16.038%2015.599-1.417.119-2.799.07-4.144-.12Zm28.564-11.478a17.513%2017.513%200%200%201%203.727%204.62c4.608%208.335%201.584%2018.813-6.75%2023.409a16.988%2016.988%200%200%201-4.359%201.679%2019.624%2019.624%200%200%201-3.977-12.776c.346-7.561%204.942-13.931%2011.36-16.932Z'/%3e%3cpath%20fill='%23110F0D'%20fill-rule='evenodd'%20d='M142.831%2048.324h4.977V77.03h-4.977V48.324Zm27.278%2013.002c.322%201.048.453%202.263.453%203.62v12.073h-4.787V66.208c0-.75-.047-1.572-.154-2.143-.453-2.382-1.822-3.572-4.215-3.572-2.31%200-3.882%201.274-4.43%203.476-.143.596-.226%201.405-.226%202.25v10.8h-4.787V56.623h4.477v2.989c1.536-2.5%203.906-3.43%206.371-3.43%203.488%200%206.263%201.68%207.298%205.144Zm24.636%207.323c0%203.882-2.358%206.525-5.763%207.727-1.298.453-2.632.643-4.62.643h-10.169V48.324h9.085c1.691%200%203.156.143%204.049.38%203.465.93%205.727%203.68%205.727%207.335%200%202.441-.81%204.156-2.762%205.644%202.905%201.417%204.453%203.727%204.453%206.966Zm-15.634-8.656h4.584c1.024%200%201.917-.143%202.536-.417%201.215-.548%201.905-1.608%201.905-3.167%200-1.548-.643-2.572-1.845-3.132-.691-.31-1.762-.452-2.763-.452h-4.417v7.168Zm10.716%208.465c0-1.536-.893-3.37-3.227-3.893-.428-.095-1.036-.143-1.571-.143h-5.918v8.085h5.501c.56%200%201.429-.048%201.953-.167%201.94-.453%203.262-1.846%203.262-3.882Zm47.747-11.847-8.097%2020.408h-4.429l-8.109-20.408h5.191l5.192%2014.574%205.108-14.574h5.144Zm-20.218%2010.002c0%20.69-.036%201.262-.155%201.94h-15.943c.631%202.87%202.714%204.728%205.882%204.728%202.131%200%203.607-.882%204.703-2.525h4.87c-1.762%204.144-5.204%206.692-9.657%206.692-6.084%200-10.537-4.858-10.537-10.49%200-6.108%204.524-10.776%2010.335-10.776%206.239%200%2010.442%204.954%2010.502%2010.43Zm-4.763-1.405c-.333-2.846-2.643-4.858-5.691-4.858-2.894%200-5.287%201.929-5.621%204.858h11.312Zm-72.667%203.44c0%204.787-3.287%208.371-9.419%208.371H119.363V64.66c-1.917.274-3.87.69-5.811%201.238l4.537%2011.121h-5.418l-3.596-9.585c-5.144%202.084-10.085%205.216-14.217%209.585h-4.786L101.8%2048.312h4.56l5.68%2013.883a44.112%2044.112%200%200%201%207.323-1.774V48.312h9.084c1.703%200%203.156.143%204.061.393%203.453.929%205.727%203.667%205.727%207.323%200%201.917-.738%204.179-2.81%205.691%203.06%201.56%204.501%204.025%204.501%206.93Zm-15.634-8.667a62.664%2062.664%200%200%201%202.06-.036c1.703.012%203.239.131%204.608.37%201.441-.549%202.357-1.727%202.357-3.537%200-1.941-.881-3.144-2.488-3.667-.548-.18-1.358-.286-2.322-.286h-4.215v7.156Zm-16.55%203.905-3.715-9.894-6.394%2016.502c2.833-2.595%206.263-4.858%2010.109-6.608Zm27.254%204.74c0-2.775-3.131-4.347-8.513-4.418-.715%200-1.441.011-2.191.047v8.252h5.918c2.548%200%204.786-1.37%204.786-3.882Z'%20clip-rule='evenodd'/%3e%3c/g%3e%3cdefs%3e%3clinearGradient%20id='b'%20x1='51.47'%20x2='85.916'%20y1='62.946'%20y2='62.946'%20gradientUnits='userSpaceOnUse'%3e%3cstop%20stop-color='%23CD9F28'/%3e%3cstop%20offset='1'%20stop-color='%23ECD80B'/%3e%3c/linearGradient%3e%3cclipPath%20id='a'%3e%3cpath%20fill='%23fff'%20d='M51.47%2045.728h186.104V80.14H51.47z'/%3e%3c/clipPath%3e%3c/defs%3e%3c/svg%3e)


More from Dayton


Explore Other Assets


© 2026 MaintainX. All rights reserved.