


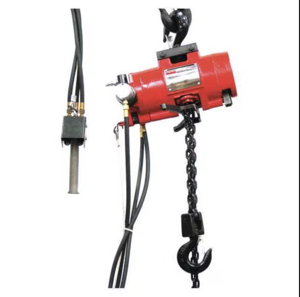
Dayton Electric Chain Hoist 3YB80
Need answers fast?
Explore the manual using AI.

Turn manuals into instant answers
with your AI-powered assistantTurn manuals into instant answers
with your AI-powered assistant
Manual for Dayton Electric Chain Hoist 3YB80
Complete asset maintenance, one click away
Get instant access to all the maintenance information you need. Empower technicians to perform preventive maintenance with asset packages, ready to use right out of the box.

Documents & Manuals
Find all the essential guides in one place.
 Tensioning Guide
- Belt-diagram
- C-120 pulleys
+ 13 more

Work Order Templates
Pre-built workflows to keep your asset running smoothly.
- Daily Electrical System Inspection
- Replace Roller and Pulley
- Install Engine B-120
+ 29 more

Procedures
Integrate maintenance plans directly into your work orders.
- Motion Industries
- Applied Industrial Technologies
- Electrical Brothers
+ 5 more

Parts
Access the parts list for your equipment in MaintainX.
- Drive Motor
- B2 Rollers
- Tensioning System
+ 40 more
Dayton Electric Chain Hoist 3YB80
Create an account to install this asset package.
Maintenance Plans for Dayton Electric Chain Hoist Model 3YB80
Integrate maintenance plans directly into your work orders in MaintainX.
1 Monthly Chain Hoist Maintenance
Periodic — Indicates items requiring inspection monthly to yearly. Inspections to be performed by or under the direction of a properly designated period.; The exact period of inspection will depend on frequency and type of usage. Determination of this period will be based on the user’s experience.; It is recommended that the user begin with a monthly inspection and extend the periods to quarterly, semi-annually or annually based on user’s monthly experience.
1. Inspect Hook and Suspension
Possible Deficiencies:; - Cracks, bending, stripped threads Lug Connections
2. Inspect Pins, Bearings, Bushings; Possible Deficiencies:; - Excessive wear, corrosion, cracks, distortion Shafts, Couplings
3. Inspect Nuts, Bolts, Rivets
Possible Deficiencies:; - Looseness, stripped and damaged threads, corrosion
4. Inspect Sheaves
Possible Deficiencies:; - Distortion, cracks, and excessive wear.
- Build-up of foreign substances

Brake Adjustment
Warning: Disconnect hoist from power supply before starting the procedure
Hoist disconnected from power supply
Upload a photo of the electrical cover removed
Enter the gap between the brake armature and the field
Is the gap within the acceptable range (0.015\ - 0.040\")?"
Adjust the 3 locknuts and check with a feeler gauge to ensure the gap is the same on both ends of the solenoid
Is the bottom of the armature not bearing against the splined adapter?
Enter the disc thickness
Is the disc thickness above the minimum allowable (.162\)?"
Chain Replacement With No Chain In Hoist
DISCONNECT HOIST FROM POWER SUPPLY and move hoist to a work table. Do not remove the electrical cover.
Detach the chain stripper from the bottom of the hoist.
Following the instructions in the section on GEARING, disassemble the transmission assembly.
Remove the output shaft through the transmission, allowing the load sheave and chain guide to be removed from the bottom of the hoist.
Be care not to lose the spacer that is between the load sheave and the bearing on the motor end.
NOTE: Inspect chain guides and load sheave for wear, replace as needed.
Lay the new chain over the load sheave. Allow about 15\ of chain below the hoist on the slack end."
Be sure the welds of the upstanding links are out away from the load sheave and the proper orientation is observed for attachment of the slack end.
Also be sure the load hook assembly (if already attached to the chain) is toward the center of the hoist or to your right looking from the transmission end.
Load Chain Lowering Without Power
Warning: This procedure should only be performed in an emergency when the power fails with a load suspended.
Hoist disconnected from power supply and electrical cover removed
Warning: Do not allow screwdriver blades to touch rotating friction disc.
Disc brake opened manually using two screwdriver blades
Pressure applied to the underside of the armature plate to close the solenoid and release the brake
Caution: Do not allow the load to descend rapidly. This causes the motor to race and serious damage may result.
Several quick releases used instead of holding brake open continuously
Normal lowering speed not exceeded
Sign off on the load chain lowering procedure
Chain Hoist Lubrication
Proper lubrication is necessary for a long and relatively trouble-tree hoist operation.; Refer to the following and the RECOMMENDED LUBRICATION SCHEDULE for lubrication points, type of lubricant, and frequency of lubrication.
LOAD CHAIN.; Clean the load chain with acid-free solvent and coat with SAE 90 gear oil. Wipe excess oil to prevent dripping. Never apply grease to the chain.
GEARING.; The gear case of this hoist is filled at assembly with approximately 1½ pints of SAE 90 EP gear oil.; Check oil level by removing the oil level check plug from the side of the hoist. With the hoist hanging level, gear oil should be even with the hole.
BEARINGS. All bearings except hook and idler sheave bearings are lubricated at the factory and should not require additional lubrication. Noisy or worn bearings should be replaced.
LIMIT SWITCH SHAFT.; Remove any dirt accumulation and spray with a general purpose lubricant.
HOOK BEARING.; Apply a few drops of SAE 30 gear or motor oil around the edge of the bearing.
IDLER SHEAVE BEARING (BUSHING).; Disassemble load block and apply a light coat of NLGI #2 grease, or equivalent, inside of bearing.;
Parts for Dayton Electric Chain Hoist 3YB80
Access the parts list for your equipment in MaintainX.
Cover Screw
H2976P
Trim Cover
JM37
Transmission Housing
JM3533
Transmission Case Gasket
JM560
Transmission Cover
JM34
Cover Screw
H2976P
Trim Cover
JM37
Transmission Housing
JM3533
Transmission Case Gasket
JM560
Transmission Cover
JM34
Cover Screw
H2976P
Trim Cover
JM37
Transmission Housing
JM3533
Transmission Case Gasket
JM560
Transmission Cover
JM34
Unlock efficiency
with MaintainX CoPilot
MaintainX CoPilot is your expert colleague, on call 24/7, helping your team find the answers they need to keep equipment running.
Reduce Unplanned Downtime
Ensure your team follows consistent procedures to minimize equipment failures and costly delays.
Maximize Asset Availability
Keep your assets running longer and more reliably, with standardized maintenance workflows from OEM manuals.
Lower Maintenance Costs
Turn any technician into an expert to streamline operations, maintain more assets, and reduce overall costs.
Thousands of companies manage their assets with MaintainX

'%3e%3cpath%20fill='url(%23b)'%20d='M66.008%2080.068c-5.084-.786-9.763-3.834-12.442-8.68a16.942%2016.942%200%200%201-1.87-5.18c1.096.19%202.203.476%203.298.87%206.525%202.333%2010.836%207.68%2011.014%2012.99ZM51.47%2061.576c.488-5.524%203.62-10.716%208.847-13.597a17.132%2017.132%200%200%201%2011.335-1.882c-.798%208.145-7.43%2014.848-16.038%2015.599-1.417.119-2.799.07-4.144-.12Zm28.564-11.478a17.513%2017.513%200%200%201%203.727%204.62c4.608%208.335%201.584%2018.813-6.75%2023.409a16.988%2016.988%200%200%201-4.359%201.679%2019.624%2019.624%200%200%201-3.977-12.776c.346-7.561%204.942-13.931%2011.36-16.932Z'/%3e%3cpath%20fill='%23110F0D'%20fill-rule='evenodd'%20d='M142.831%2048.324h4.977V77.03h-4.977V48.324Zm27.278%2013.002c.322%201.048.453%202.263.453%203.62v12.073h-4.787V66.208c0-.75-.047-1.572-.154-2.143-.453-2.382-1.822-3.572-4.215-3.572-2.31%200-3.882%201.274-4.43%203.476-.143.596-.226%201.405-.226%202.25v10.8h-4.787V56.623h4.477v2.989c1.536-2.5%203.906-3.43%206.371-3.43%203.488%200%206.263%201.68%207.298%205.144Zm24.636%207.323c0%203.882-2.358%206.525-5.763%207.727-1.298.453-2.632.643-4.62.643h-10.169V48.324h9.085c1.691%200%203.156.143%204.049.38%203.465.93%205.727%203.68%205.727%207.335%200%202.441-.81%204.156-2.762%205.644%202.905%201.417%204.453%203.727%204.453%206.966Zm-15.634-8.656h4.584c1.024%200%201.917-.143%202.536-.417%201.215-.548%201.905-1.608%201.905-3.167%200-1.548-.643-2.572-1.845-3.132-.691-.31-1.762-.452-2.763-.452h-4.417v7.168Zm10.716%208.465c0-1.536-.893-3.37-3.227-3.893-.428-.095-1.036-.143-1.571-.143h-5.918v8.085h5.501c.56%200%201.429-.048%201.953-.167%201.94-.453%203.262-1.846%203.262-3.882Zm47.747-11.847-8.097%2020.408h-4.429l-8.109-20.408h5.191l5.192%2014.574%205.108-14.574h5.144Zm-20.218%2010.002c0%20.69-.036%201.262-.155%201.94h-15.943c.631%202.87%202.714%204.728%205.882%204.728%202.131%200%203.607-.882%204.703-2.525h4.87c-1.762%204.144-5.204%206.692-9.657%206.692-6.084%200-10.537-4.858-10.537-10.49%200-6.108%204.524-10.776%2010.335-10.776%206.239%200%2010.442%204.954%2010.502%2010.43Zm-4.763-1.405c-.333-2.846-2.643-4.858-5.691-4.858-2.894%200-5.287%201.929-5.621%204.858h11.312Zm-72.667%203.44c0%204.787-3.287%208.371-9.419%208.371H119.363V64.66c-1.917.274-3.87.69-5.811%201.238l4.537%2011.121h-5.418l-3.596-9.585c-5.144%202.084-10.085%205.216-14.217%209.585h-4.786L101.8%2048.312h4.56l5.68%2013.883a44.112%2044.112%200%200%201%207.323-1.774V48.312h9.084c1.703%200%203.156.143%204.061.393%203.453.929%205.727%203.667%205.727%207.323%200%201.917-.738%204.179-2.81%205.691%203.06%201.56%204.501%204.025%204.501%206.93Zm-15.634-8.667a62.664%2062.664%200%200%201%202.06-.036c1.703.012%203.239.131%204.608.37%201.441-.549%202.357-1.727%202.357-3.537%200-1.941-.881-3.144-2.488-3.667-.548-.18-1.358-.286-2.322-.286h-4.215v7.156Zm-16.55%203.905-3.715-9.894-6.394%2016.502c2.833-2.595%206.263-4.858%2010.109-6.608Zm27.254%204.74c0-2.775-3.131-4.347-8.513-4.418-.715%200-1.441.011-2.191.047v8.252h5.918c2.548%200%204.786-1.37%204.786-3.882Z'%20clip-rule='evenodd'/%3e%3c/g%3e%3cdefs%3e%3clinearGradient%20id='b'%20x1='51.47'%20x2='85.916'%20y1='62.946'%20y2='62.946'%20gradientUnits='userSpaceOnUse'%3e%3cstop%20stop-color='%23CD9F28'/%3e%3cstop%20offset='1'%20stop-color='%23ECD80B'/%3e%3c/linearGradient%3e%3cclipPath%20id='a'%3e%3cpath%20fill='%23fff'%20d='M51.47%2045.728h186.104V80.14H51.47z'/%3e%3c/clipPath%3e%3c/defs%3e%3c/svg%3e)


More from Dayton


Explore Other Assets


© 2026 MaintainX. All rights reserved.