


Daikin Packaged Gas / Electric Unit DFG0724DL
Need answers fast?
Explore the manual using AI.
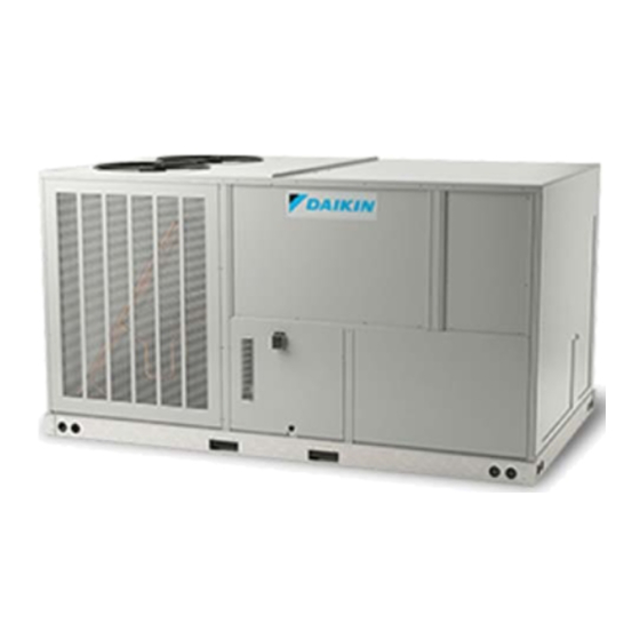
The Daikin Packaged Gas/Electric Unit DFG0724DL is a versatile HVAC solution designed for efficient heating and cooling. This unit combines gas and electric capabilities, ensuring optimal performance and energy savings for commercial and industrial applications. Ideal for various environments, it delivers reliable climate control with advanced technology.
Turn manuals into instant answers
with your AI-powered assistantTurn manuals into instant answers
with your AI-powered assistant
Manual for Daikin Packaged Gas / Electric Unit DFG0724DL
Complete asset maintenance, one click away
Get instant access to all the maintenance information you need. Empower technicians to perform preventive maintenance with asset packages, ready to use right out of the box.

Documents & Manuals
Find all the essential guides in one place.
 Tensioning Guide
- Belt-diagram
- C-120 pulleys
+ 13 more

Work Order Templates
Pre-built workflows to keep your asset running smoothly.
- Daily Electrical System Inspection
- Replace Roller and Pulley
- Install Engine B-120
+ 29 more

Procedures
Integrate maintenance plans directly into your work orders.
- Motion Industries
- Applied Industrial Technologies
- Electrical Brothers
+ 5 more

Parts
Access the parts list for your equipment in MaintainX.
- Drive Motor
- B2 Rollers
- Tensioning System
+ 40 more
Daikin Packaged Gas / Electric Unit DFG0724DL
Create an account to install this asset package.
Maintenance Plans for Daikin Packaged Gas / Electric Unit Model DFG0724DL
Integrate maintenance plans directly into your work orders in MaintainX.
6 Monthly Routine Maintenance
WARNING! ELECTRICAL SHOCK, FIRE OR EXPLOSION HAZARD
Failure to follow safety warnings exactly could result in dangerous operation, serious injury, death or property damage
Improper servicing could result in dangerous operation, serious injury, death or property damage
Before servicing, disconnect all electrical power to furnace
When servicing controls, label all wires prior to disconnecting. Reconnect wires correctly
Verify proper operation after servicing
WARNING! HIGH VOLTAGE! DISCONNECT ALL POWER BEFORE SERVICING OR INSTALLING THIS UNIT. MULTIPLE POWER SOURCES MAY BE PRESENT. FAILURE TO DO SO MAY CAUSE PROPERTY DAMAGE, PERSONAL INJURY OR DEATH
WARNING! TO PREVENT PERSONAL INJURY OR DEATH DUE TO IMPROPER INSTALLATION, ADJUSTMENT, ALTERATION, SERVICE OR MAINTENANCE, REFER TO THIS MANUAL. FOR ADDITIONAL ASSISTANCE OR INFORMATION, CONSULT A QUALIFIED INSTALLER, SERVICE AGENCY OR THE GAS SUPPLIER
CAUTION! SHEET METAL PARTS, SCREWS, CLIPS AND SIMILAR ITEMS INHERENTLY HAVE SHARP EDGES, AND IT IS NECESSARY THAT THE INSTALLER AND SERVICE PERSONNEL EXERCISE CAUTION

Flame Sensor Cleaning
Warning: This procedure should be performed by trained personnel only!
Is the flame sensor visibly dirty?
If the flame sensor is dirty, proceed with the cleaning. If not, report the condition to the maintenance team.
Upload a photo of the flame sensor before cleaning
Was the cleaning successful?
Enter the microamp signal after cleaning
Sign off on the flame sensor cleaning
2 Monthly Filter Inspection
CAUTION! TO PREVENT PROPERTY DAMAGE DUE TO FIRE AND LOSS OF EQUIPMENT EFFICIENCY OR EQUIPMENT DAMAGE DUE TO DUST AND LINT BUILD UP ON INTERNAL PARTS, NEVER OPERATE UNIT WITHOUT AN AIR FILTER INSTALLED IN THE RETURN AIR SYSTEM
Dirty filters are the most common cause of inadequate heating or cooling performance
Filter inspection should be made at least every two months; more often if necessary because of local conditions and usage;
Is the air filter clean?
Is the filter damaged?
Describe the condition of the filter
Sign off on the filter inspection
MicroChannel Heat Exchanger Maintenance
CAUTION! Prior to servicing MCHE, be sure to disconnect the power supply and use lock-out methods to prevent the power from accidentally being turned on
SHUT DOWN PERIODS
During periods when the MCHE is not operated for longer than a week, the MCHE must be completely cleaned following the cleaning procedure. This practice must also be performed during short shut-down periods where corrosive deposits accumulate on the MCHE
CLEANING PRDOCEDURE
Relative to tube & fin heat exchangers, MicroChannel heat exchanger coils tend to accumulate more dirt on the surface of the coil and less dirt inside the coil, making them easier to clean
STEP 1: Remove Surface Debris
Remove surface dirt, leaves, fibers, etc. with a vacuum cleaner (preferably with a brush or other soft attachment rather than a metal tube), compressed air blown from the inside out, and/or a soft bristle (not wire!) brush. Do not impact or scrape the coil with the vacuum tube, air nozzle, etc
STEP 2: Rinse the coil by following procedure
1. Rinse the coil by approved MCHE cleaner first, or rinsing by water directly
1 Yearly Burner Flame Check
NOTE: This will involve removing and reinstalling the heat exchanger door on the unit, which is held by two screws. If you are uncertain about your ability to do this, contact a qualified servicer. If a strong wind is blowing, it may alter the airflow pattern within the unit enough that an inspection of the burner flames is not possible.
Is the heat exchanger door properly removed?
Is the heat exchanger door properly reinstalled?
Is the burner flame visually checked?
Is there a strong wind blowing?
If a strong wind is blowing, reschedule the inspection.
Sign off on the burner flame check
Parts for Daikin Packaged Gas / Electric Unit DFG0724DL
Access the parts list for your equipment in MaintainX.
Flue Extension Kit
HEFLUE048060
Flue Extension Kit
HEFLUE048060
Flue Extension Kit
HEFLUE048060
Unlock efficiency
with MaintainX CoPilot
MaintainX CoPilot is your expert colleague, on call 24/7, helping your team find the answers they need to keep equipment running.
Reduce Unplanned Downtime
Ensure your team follows consistent procedures to minimize equipment failures and costly delays.
Maximize Asset Availability
Keep your assets running longer and more reliably, with standardized maintenance workflows from OEM manuals.
Lower Maintenance Costs
Turn any technician into an expert to streamline operations, maintain more assets, and reduce overall costs.
Thousands of companies manage their assets with MaintainX

'%3e%3cpath%20fill='url(%23b)'%20d='M66.008%2080.068c-5.084-.786-9.763-3.834-12.442-8.68a16.942%2016.942%200%200%201-1.87-5.18c1.096.19%202.203.476%203.298.87%206.525%202.333%2010.836%207.68%2011.014%2012.99ZM51.47%2061.576c.488-5.524%203.62-10.716%208.847-13.597a17.132%2017.132%200%200%201%2011.335-1.882c-.798%208.145-7.43%2014.848-16.038%2015.599-1.417.119-2.799.07-4.144-.12Zm28.564-11.478a17.513%2017.513%200%200%201%203.727%204.62c4.608%208.335%201.584%2018.813-6.75%2023.409a16.988%2016.988%200%200%201-4.359%201.679%2019.624%2019.624%200%200%201-3.977-12.776c.346-7.561%204.942-13.931%2011.36-16.932Z'/%3e%3cpath%20fill='%23110F0D'%20fill-rule='evenodd'%20d='M142.831%2048.324h4.977V77.03h-4.977V48.324Zm27.278%2013.002c.322%201.048.453%202.263.453%203.62v12.073h-4.787V66.208c0-.75-.047-1.572-.154-2.143-.453-2.382-1.822-3.572-4.215-3.572-2.31%200-3.882%201.274-4.43%203.476-.143.596-.226%201.405-.226%202.25v10.8h-4.787V56.623h4.477v2.989c1.536-2.5%203.906-3.43%206.371-3.43%203.488%200%206.263%201.68%207.298%205.144Zm24.636%207.323c0%203.882-2.358%206.525-5.763%207.727-1.298.453-2.632.643-4.62.643h-10.169V48.324h9.085c1.691%200%203.156.143%204.049.38%203.465.93%205.727%203.68%205.727%207.335%200%202.441-.81%204.156-2.762%205.644%202.905%201.417%204.453%203.727%204.453%206.966Zm-15.634-8.656h4.584c1.024%200%201.917-.143%202.536-.417%201.215-.548%201.905-1.608%201.905-3.167%200-1.548-.643-2.572-1.845-3.132-.691-.31-1.762-.452-2.763-.452h-4.417v7.168Zm10.716%208.465c0-1.536-.893-3.37-3.227-3.893-.428-.095-1.036-.143-1.571-.143h-5.918v8.085h5.501c.56%200%201.429-.048%201.953-.167%201.94-.453%203.262-1.846%203.262-3.882Zm47.747-11.847-8.097%2020.408h-4.429l-8.109-20.408h5.191l5.192%2014.574%205.108-14.574h5.144Zm-20.218%2010.002c0%20.69-.036%201.262-.155%201.94h-15.943c.631%202.87%202.714%204.728%205.882%204.728%202.131%200%203.607-.882%204.703-2.525h4.87c-1.762%204.144-5.204%206.692-9.657%206.692-6.084%200-10.537-4.858-10.537-10.49%200-6.108%204.524-10.776%2010.335-10.776%206.239%200%2010.442%204.954%2010.502%2010.43Zm-4.763-1.405c-.333-2.846-2.643-4.858-5.691-4.858-2.894%200-5.287%201.929-5.621%204.858h11.312Zm-72.667%203.44c0%204.787-3.287%208.371-9.419%208.371H119.363V64.66c-1.917.274-3.87.69-5.811%201.238l4.537%2011.121h-5.418l-3.596-9.585c-5.144%202.084-10.085%205.216-14.217%209.585h-4.786L101.8%2048.312h4.56l5.68%2013.883a44.112%2044.112%200%200%201%207.323-1.774V48.312h9.084c1.703%200%203.156.143%204.061.393%203.453.929%205.727%203.667%205.727%207.323%200%201.917-.738%204.179-2.81%205.691%203.06%201.56%204.501%204.025%204.501%206.93Zm-15.634-8.667a62.664%2062.664%200%200%201%202.06-.036c1.703.012%203.239.131%204.608.37%201.441-.549%202.357-1.727%202.357-3.537%200-1.941-.881-3.144-2.488-3.667-.548-.18-1.358-.286-2.322-.286h-4.215v7.156Zm-16.55%203.905-3.715-9.894-6.394%2016.502c2.833-2.595%206.263-4.858%2010.109-6.608Zm27.254%204.74c0-2.775-3.131-4.347-8.513-4.418-.715%200-1.441.011-2.191.047v8.252h5.918c2.548%200%204.786-1.37%204.786-3.882Z'%20clip-rule='evenodd'/%3e%3c/g%3e%3cdefs%3e%3clinearGradient%20id='b'%20x1='51.47'%20x2='85.916'%20y1='62.946'%20y2='62.946'%20gradientUnits='userSpaceOnUse'%3e%3cstop%20stop-color='%23CD9F28'/%3e%3cstop%20offset='1'%20stop-color='%23ECD80B'/%3e%3c/linearGradient%3e%3cclipPath%20id='a'%3e%3cpath%20fill='%23fff'%20d='M51.47%2045.728h186.104V80.14H51.47z'/%3e%3c/clipPath%3e%3c/defs%3e%3c/svg%3e)


More from Daikin


Explore Other Assets


© 2026 MaintainX. All rights reserved.