


Crown Self-Generating Steam Jacketed Kettle EL-60
Need answers fast?
Explore the manual using AI.
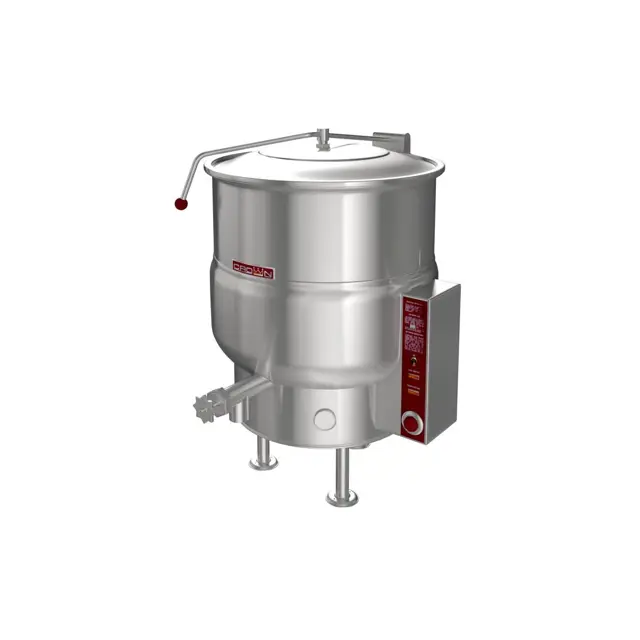
The Crown Self-Generating Steam Jacketed Kettle EL-60 is an efficient industrial cooking solution designed for uniform heating and precise temperature control. Ideal for food processing, this kettle enhances productivity while ensuring consistent results, making it a vital asset in commercial kitchens and food manufacturing facilities.
Turn manuals into instant answers
with your AI-powered assistantTurn manuals into instant answers
with your AI-powered assistant
Manual for Crown Self-Generating Steam Jacketed Kettle EL-60
Complete asset maintenance, one click away
Get instant access to all the maintenance information you need. Empower technicians to perform preventive maintenance with asset packages, ready to use right out of the box.

Documents & Manuals
Find all the essential guides in one place.
 Tensioning Guide
- Belt-diagram
- C-120 pulleys
+ 13 more

Work Order Templates
Pre-built workflows to keep your asset running smoothly.
- Daily Electrical System Inspection
- Replace Roller and Pulley
- Install Engine B-120
+ 29 more

Procedures
Integrate maintenance plans directly into your work orders.
- Motion Industries
- Applied Industrial Technologies
- Electrical Brothers
+ 5 more

Parts
Access the parts list for your equipment in MaintainX.
- Drive Motor
- B2 Rollers
- Tensioning System
+ 40 more
Crown Self-Generating Steam Jacketed Kettle EL-60
Create an account to install this asset package.
Maintenance Plans for Crown Self-Generating Steam Jacketed Kettle Model EL-60
Integrate maintenance plans directly into your work orders in MaintainX.
Draw-off Valve Cleaning
NOTICE: Draw-off valve has a vulcanized rubber coated stem for better sealing. Do not over tighten. This may cause the rubber to pull away from stem and permanently damage it. This is not covered under warranty.
Turn the large hex nut on the draw-off valve counterclockwise until it is completely disengaged from the threads.
Grasp the valve knob and slowly pull out the valve stem. Wash the valve stem, disk and handle.
Insert a nylon brush, wet with detergent and water, into the valve body and tangent draw-off tube. Brush vigorously.
Replace the valve stem assembly and turn the hex nut until snug.
Rinse the kettle with clean warm water.
Leave the draw-off valve open when the kettle is not in use.
Sign off on the draw-off valve cleaning

Kettle Cleaning
WARNING! Disconnect the power supply to the appliance before cleaning or servicing.
WARNING! Never spray water into electric controls or components!
WARNING! The equipment and its parts are hot. Use care when operating, cleaning and servicing.
CAUTION! Do not use cleaning agents that are corrosive.
Kettle cooled enough to touch?
Rinse the inside of the kettle thoroughly and drain to remove any food particles.
Clean the kettle with a mild detergent and water using a nylon brush.
Rinse the inside of the kettle thoroughly with clean water. Drain the kettle.
Wipe the exterior of the kettle with a clean, damp cloth.
Dairy Draw-off Valve Cleaning
Warning: Handle the plug with both hands as it is heavy.
Plug removed successfully?
Plug placed in a plastic pail with mild soap solution?
All surfaces of the plug cleaned with a soft cloth or brush?
Valve rinsed well in a plastic pail with fresh water?
Kettle washed out as normal?
Plug returned into the body and secured tightly?
If cleaning a body and plug assembly, follow the same steps for the body.
Body cleaned successfully?
2 Monthly Safety Valve Maintenance
CAUTION! Under normal operating conditions a 'try lever test' should be performed every two months. Under severe service conditions, or if corrosion and/or deposits are noticed within the valve body, testing must be performed more often.
CAUTION! Hot, high pressure fluid may be discharged from body drain and vent during 'try lever' test. Care must be taken to avoid any bodily contact.
CAUTION! High sound levels may be experienced during 'try lever' test. Wear proper safety equipment and exercise extreme care!
Test at, or near, half of the operating pressure by holding the test lever fully open for at least two seconds to flush the valve seat free of sediment and debris. Then release lever and permit the valve to snap shut.
If lift lever does not activate, or there is no evidence of discharge, turn off equipment immediately and contact a licensed contractor or qualified service personnel.
Sign off on the safety valve maintenance
Unlock efficiency
with MaintainX CoPilot
MaintainX CoPilot is your expert colleague, on call 24/7, helping your team find the answers they need to keep equipment running.
Reduce Unplanned Downtime
Ensure your team follows consistent procedures to minimize equipment failures and costly delays.
Maximize Asset Availability
Keep your assets running longer and more reliably, with standardized maintenance workflows from OEM manuals.
Lower Maintenance Costs
Turn any technician into an expert to streamline operations, maintain more assets, and reduce overall costs.
Thousands of companies manage their assets with MaintainX

'%3e%3cpath%20fill='url(%23b)'%20d='M66.008%2080.068c-5.084-.786-9.763-3.834-12.442-8.68a16.942%2016.942%200%200%201-1.87-5.18c1.096.19%202.203.476%203.298.87%206.525%202.333%2010.836%207.68%2011.014%2012.99ZM51.47%2061.576c.488-5.524%203.62-10.716%208.847-13.597a17.132%2017.132%200%200%201%2011.335-1.882c-.798%208.145-7.43%2014.848-16.038%2015.599-1.417.119-2.799.07-4.144-.12Zm28.564-11.478a17.513%2017.513%200%200%201%203.727%204.62c4.608%208.335%201.584%2018.813-6.75%2023.409a16.988%2016.988%200%200%201-4.359%201.679%2019.624%2019.624%200%200%201-3.977-12.776c.346-7.561%204.942-13.931%2011.36-16.932Z'/%3e%3cpath%20fill='%23110F0D'%20fill-rule='evenodd'%20d='M142.831%2048.324h4.977V77.03h-4.977V48.324Zm27.278%2013.002c.322%201.048.453%202.263.453%203.62v12.073h-4.787V66.208c0-.75-.047-1.572-.154-2.143-.453-2.382-1.822-3.572-4.215-3.572-2.31%200-3.882%201.274-4.43%203.476-.143.596-.226%201.405-.226%202.25v10.8h-4.787V56.623h4.477v2.989c1.536-2.5%203.906-3.43%206.371-3.43%203.488%200%206.263%201.68%207.298%205.144Zm24.636%207.323c0%203.882-2.358%206.525-5.763%207.727-1.298.453-2.632.643-4.62.643h-10.169V48.324h9.085c1.691%200%203.156.143%204.049.38%203.465.93%205.727%203.68%205.727%207.335%200%202.441-.81%204.156-2.762%205.644%202.905%201.417%204.453%203.727%204.453%206.966Zm-15.634-8.656h4.584c1.024%200%201.917-.143%202.536-.417%201.215-.548%201.905-1.608%201.905-3.167%200-1.548-.643-2.572-1.845-3.132-.691-.31-1.762-.452-2.763-.452h-4.417v7.168Zm10.716%208.465c0-1.536-.893-3.37-3.227-3.893-.428-.095-1.036-.143-1.571-.143h-5.918v8.085h5.501c.56%200%201.429-.048%201.953-.167%201.94-.453%203.262-1.846%203.262-3.882Zm47.747-11.847-8.097%2020.408h-4.429l-8.109-20.408h5.191l5.192%2014.574%205.108-14.574h5.144Zm-20.218%2010.002c0%20.69-.036%201.262-.155%201.94h-15.943c.631%202.87%202.714%204.728%205.882%204.728%202.131%200%203.607-.882%204.703-2.525h4.87c-1.762%204.144-5.204%206.692-9.657%206.692-6.084%200-10.537-4.858-10.537-10.49%200-6.108%204.524-10.776%2010.335-10.776%206.239%200%2010.442%204.954%2010.502%2010.43Zm-4.763-1.405c-.333-2.846-2.643-4.858-5.691-4.858-2.894%200-5.287%201.929-5.621%204.858h11.312Zm-72.667%203.44c0%204.787-3.287%208.371-9.419%208.371H119.363V64.66c-1.917.274-3.87.69-5.811%201.238l4.537%2011.121h-5.418l-3.596-9.585c-5.144%202.084-10.085%205.216-14.217%209.585h-4.786L101.8%2048.312h4.56l5.68%2013.883a44.112%2044.112%200%200%201%207.323-1.774V48.312h9.084c1.703%200%203.156.143%204.061.393%203.453.929%205.727%203.667%205.727%207.323%200%201.917-.738%204.179-2.81%205.691%203.06%201.56%204.501%204.025%204.501%206.93Zm-15.634-8.667a62.664%2062.664%200%200%201%202.06-.036c1.703.012%203.239.131%204.608.37%201.441-.549%202.357-1.727%202.357-3.537%200-1.941-.881-3.144-2.488-3.667-.548-.18-1.358-.286-2.322-.286h-4.215v7.156Zm-16.55%203.905-3.715-9.894-6.394%2016.502c2.833-2.595%206.263-4.858%2010.109-6.608Zm27.254%204.74c0-2.775-3.131-4.347-8.513-4.418-.715%200-1.441.011-2.191.047v8.252h5.918c2.548%200%204.786-1.37%204.786-3.882Z'%20clip-rule='evenodd'/%3e%3c/g%3e%3cdefs%3e%3clinearGradient%20id='b'%20x1='51.47'%20x2='85.916'%20y1='62.946'%20y2='62.946'%20gradientUnits='userSpaceOnUse'%3e%3cstop%20stop-color='%23CD9F28'/%3e%3cstop%20offset='1'%20stop-color='%23ECD80B'/%3e%3c/linearGradient%3e%3cclipPath%20id='a'%3e%3cpath%20fill='%23fff'%20d='M51.47%2045.728h186.104V80.14H51.47z'/%3e%3c/clipPath%3e%3c/defs%3e%3c/svg%3e)


More from Crown


Explore Other Assets


© 2026 MaintainX. All rights reserved.