


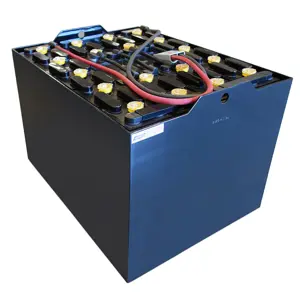
Crown Charger Module FS3-MP336-2
Need answers fast?
Explore the manual using AI.

The Crown Charger Module FS3-MP336-2 is a high-performance industrial battery charger designed for efficient charging of various battery types. Known for its reliability and advanced features, this module ensures optimal battery performance and longevity, making it an essential component in industrial applications.
Turn manuals into instant answers
with your AI-powered assistantTurn manuals into instant answers
with your AI-powered assistant
Manual for Crown Charger Module FS3-MP336-2
Complete asset maintenance, one click away
Get instant access to all the maintenance information you need. Empower technicians to perform preventive maintenance with asset packages, ready to use right out of the box.

Documents & Manuals
Find all the essential guides in one place.
 Tensioning Guide
- Belt-diagram
- C-120 pulleys
+ 13 more

Work Order Templates
Pre-built workflows to keep your asset running smoothly.
- Daily Electrical System Inspection
- Replace Roller and Pulley
- Install Engine B-120
+ 29 more

Procedures
Integrate maintenance plans directly into your work orders.
- Motion Industries
- Applied Industrial Technologies
- Electrical Brothers
+ 5 more

Parts
Access the parts list for your equipment in MaintainX.
- Drive Motor
- B2 Rollers
- Tensioning System
+ 40 more
Crown Charger Module FS3-MP336-2
Create an account to install this asset package.
Maintenance Plans for Crown Charger Module Model FS3-MP336-2
Integrate maintenance plans directly into your work orders in MaintainX.
6 Monthly Charger Service
Warning: This service requires trained personnel with PPE!
Air inlet filter free from dirt build up?
Charger Modules' airflow monitoring functional?
Charger Modules' cooling air supply healthy?
Note: A blocked filter will affect the cooling ability, reduced airflow could lead to the Charger protecting itself by backing off the output power and eventually shutting down.
Power modules backed off due to over temperature?
Note: Having the power modules back off due to over temperature will cause longer charge times and the inability to charge the battery correctly, units operated with blocked filters for extended periods will result in premature failure of the Charger Module cooling fans.
Select the service interval
Number of charge cycles performed

Charger Test
Warning: This test requires trained personnel only
Ensure that the LCD displays the start-up screen with mains power only applied to the Charger
Hold down the 'Up' and 'Down' buttons simultaneously for 10 seconds and ensure that the display changes to Test Mode Disabled
Press the 'Down' button to get to the Self-Test Disabled menu, then press the ENTER button to bring up the double headed arrow
Press the 'Up' button to enable Self Test and press the ENTER button. In the Cancel/Store menu press the 'Down' button to select Store
Press ENTER and in the Switch Test menu Toggle the On/Off switch. Ensure that the Red Charging lamp in illuminated and the display reads Red Led Test. Press the 'Up' button to pass the test
In Green Led Test menu ensure that the Green Ready lamp is illuminated and the display reads Green Led Test. Press the 'Up' button to pass the test
In the Buzzer Test menu ensure the buzzer is sounding, press the 'Up' button to pass the test. The next 3 tests are automated and require no user intervention
On completion of the test the LCD comes up as shown below, if a fault occurs the test will stop at the point of failure. Cycling the power returns the Charger to normal operation mode
Charger Cleaning
Warning: This procedure requires trained personnel with PPE!
Module taken to a suitable location for cleaning
Build-up brushed from the front grills without forcing it down into the fans
Length of the screw driver used to lock the fan impeller in place
Compressed air blower used to blow the dust through the module and out the back
Excessive pressure or close nozzle to the air inlet avoided
Internal area of the module cleaned with a gentle air flow
Does the Charger Module have considerable dust build up?
Housing blown out if Charger Module has considerable dust build up
1 Monthly Charger Filter Cleaning
- Clean the filters
1. The filter material is an electrostatic polypropylene type that is easily cleaned with compressed air or in extreme situations washed with clean soapy water
2. Before attempting to clean the filter it is necessary to remove it from the housing and taken to an appropriate place to be cleaned
3. If it is washed it must be left to dry fully before being refitted to the charger, drawing moist or wet air into the Charger Modules could cause failure of the modules
Accordingly when the filter is inspected, the front air inlet grills of the Charger Modules should be inspected for excessive signs of dirt build up. Should the Charger modules be covered in dust they should be removed from the housing for close inspection of any external signs of damage or corrosion. If it is just a build-up of dry dust the Charger Module should be cleaned out;
Parts for Crown Charger Module FS3-MP336-2
Access the parts list for your equipment in MaintainX.
DC Output Plug Retaining Screw
396531
Module Slot Blanking Plate
396535
Carry Handle
396510
FS3 Lid (C)
396532
MPC35 Main Board Assembly
396504
DC Output Plug Retaining Screw
396531
Module Slot Blanking Plate
396535
Carry Handle
396510
FS3 Lid (C)
396532
MPC35 Main Board Assembly
396504
DC Output Plug Retaining Screw
396531
Module Slot Blanking Plate
396535
Carry Handle
396510
FS3 Lid (C)
396532
MPC35 Main Board Assembly
396504
Unlock efficiency
with MaintainX CoPilot
MaintainX CoPilot is your expert colleague, on call 24/7, helping your team find the answers they need to keep equipment running.
Reduce Unplanned Downtime
Ensure your team follows consistent procedures to minimize equipment failures and costly delays.
Maximize Asset Availability
Keep your assets running longer and more reliably, with standardized maintenance workflows from OEM manuals.
Lower Maintenance Costs
Turn any technician into an expert to streamline operations, maintain more assets, and reduce overall costs.
Thousands of companies manage their assets with MaintainX

'%3e%3cpath%20fill='url(%23b)'%20d='M66.008%2080.068c-5.084-.786-9.763-3.834-12.442-8.68a16.942%2016.942%200%200%201-1.87-5.18c1.096.19%202.203.476%203.298.87%206.525%202.333%2010.836%207.68%2011.014%2012.99ZM51.47%2061.576c.488-5.524%203.62-10.716%208.847-13.597a17.132%2017.132%200%200%201%2011.335-1.882c-.798%208.145-7.43%2014.848-16.038%2015.599-1.417.119-2.799.07-4.144-.12Zm28.564-11.478a17.513%2017.513%200%200%201%203.727%204.62c4.608%208.335%201.584%2018.813-6.75%2023.409a16.988%2016.988%200%200%201-4.359%201.679%2019.624%2019.624%200%200%201-3.977-12.776c.346-7.561%204.942-13.931%2011.36-16.932Z'/%3e%3cpath%20fill='%23110F0D'%20fill-rule='evenodd'%20d='M142.831%2048.324h4.977V77.03h-4.977V48.324Zm27.278%2013.002c.322%201.048.453%202.263.453%203.62v12.073h-4.787V66.208c0-.75-.047-1.572-.154-2.143-.453-2.382-1.822-3.572-4.215-3.572-2.31%200-3.882%201.274-4.43%203.476-.143.596-.226%201.405-.226%202.25v10.8h-4.787V56.623h4.477v2.989c1.536-2.5%203.906-3.43%206.371-3.43%203.488%200%206.263%201.68%207.298%205.144Zm24.636%207.323c0%203.882-2.358%206.525-5.763%207.727-1.298.453-2.632.643-4.62.643h-10.169V48.324h9.085c1.691%200%203.156.143%204.049.38%203.465.93%205.727%203.68%205.727%207.335%200%202.441-.81%204.156-2.762%205.644%202.905%201.417%204.453%203.727%204.453%206.966Zm-15.634-8.656h4.584c1.024%200%201.917-.143%202.536-.417%201.215-.548%201.905-1.608%201.905-3.167%200-1.548-.643-2.572-1.845-3.132-.691-.31-1.762-.452-2.763-.452h-4.417v7.168Zm10.716%208.465c0-1.536-.893-3.37-3.227-3.893-.428-.095-1.036-.143-1.571-.143h-5.918v8.085h5.501c.56%200%201.429-.048%201.953-.167%201.94-.453%203.262-1.846%203.262-3.882Zm47.747-11.847-8.097%2020.408h-4.429l-8.109-20.408h5.191l5.192%2014.574%205.108-14.574h5.144Zm-20.218%2010.002c0%20.69-.036%201.262-.155%201.94h-15.943c.631%202.87%202.714%204.728%205.882%204.728%202.131%200%203.607-.882%204.703-2.525h4.87c-1.762%204.144-5.204%206.692-9.657%206.692-6.084%200-10.537-4.858-10.537-10.49%200-6.108%204.524-10.776%2010.335-10.776%206.239%200%2010.442%204.954%2010.502%2010.43Zm-4.763-1.405c-.333-2.846-2.643-4.858-5.691-4.858-2.894%200-5.287%201.929-5.621%204.858h11.312Zm-72.667%203.44c0%204.787-3.287%208.371-9.419%208.371H119.363V64.66c-1.917.274-3.87.69-5.811%201.238l4.537%2011.121h-5.418l-3.596-9.585c-5.144%202.084-10.085%205.216-14.217%209.585h-4.786L101.8%2048.312h4.56l5.68%2013.883a44.112%2044.112%200%200%201%207.323-1.774V48.312h9.084c1.703%200%203.156.143%204.061.393%203.453.929%205.727%203.667%205.727%207.323%200%201.917-.738%204.179-2.81%205.691%203.06%201.56%204.501%204.025%204.501%206.93Zm-15.634-8.667a62.664%2062.664%200%200%201%202.06-.036c1.703.012%203.239.131%204.608.37%201.441-.549%202.357-1.727%202.357-3.537%200-1.941-.881-3.144-2.488-3.667-.548-.18-1.358-.286-2.322-.286h-4.215v7.156Zm-16.55%203.905-3.715-9.894-6.394%2016.502c2.833-2.595%206.263-4.858%2010.109-6.608Zm27.254%204.74c0-2.775-3.131-4.347-8.513-4.418-.715%200-1.441.011-2.191.047v8.252h5.918c2.548%200%204.786-1.37%204.786-3.882Z'%20clip-rule='evenodd'/%3e%3c/g%3e%3cdefs%3e%3clinearGradient%20id='b'%20x1='51.47'%20x2='85.916'%20y1='62.946'%20y2='62.946'%20gradientUnits='userSpaceOnUse'%3e%3cstop%20stop-color='%23CD9F28'/%3e%3cstop%20offset='1'%20stop-color='%23ECD80B'/%3e%3c/linearGradient%3e%3cclipPath%20id='a'%3e%3cpath%20fill='%23fff'%20d='M51.47%2045.728h186.104V80.14H51.47z'/%3e%3c/clipPath%3e%3c/defs%3e%3c/svg%3e)


More from Crown


Explore Other Assets


© 2026 MaintainX. All rights reserved.