


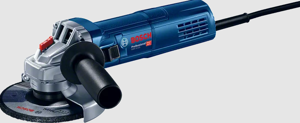
Bosch Router PR20EVS
Need answers fast?
Explore the manual using AI.
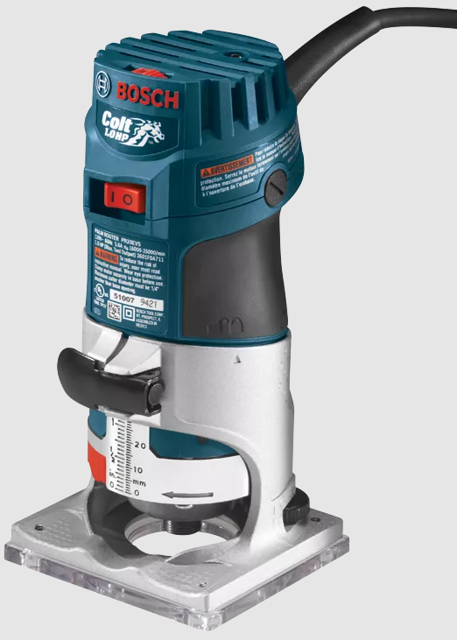
The Bosch Router PR20EVS is a high-performance, versatile router designed for precision woodworking. This compact tool features a powerful motor and variable speed control, making it ideal for both professional and DIY projects. Ensure optimal performance with regular maintenance and quality spare parts.
Turn manuals into instant answers
with your AI-powered assistantTurn manuals into instant answers
with your AI-powered assistant
Manual for Bosch Router PR20EVS
Complete asset maintenance, one click away
Get instant access to all the maintenance information you need. Empower technicians to perform preventive maintenance with asset packages, ready to use right out of the box.

Documents & Manuals
Find all the essential guides in one place.
 Tensioning Guide
- Belt-diagram
- C-120 pulleys
+ 13 more

Work Order Templates
Pre-built workflows to keep your asset running smoothly.
- Daily Electrical System Inspection
- Replace Roller and Pulley
- Install Engine B-120
+ 29 more

Procedures
Integrate maintenance plans directly into your work orders.
- Motion Industries
- Applied Industrial Technologies
- Electrical Brothers
+ 5 more

Parts
Access the parts list for your equipment in MaintainX.
- Drive Motor
- B2 Rollers
- Tensioning System
+ 40 more
Bosch Router PR20EVS
Create an account to install this asset package.
Maintenance Plans for Bosch Router Model PR20EVS
Integrate maintenance plans directly into your work orders in MaintainX.
Installation of Bit
Insert bit to the desired depth as per the instructions on page 9.
Press large red spindle lock button on top of offset spindle (Fig. 27).
Tighten collet nut using the same collet wrench as is used on the motor’s own collet nut. (The collet used on the PR004 is the same type of self-releasing collet used on the motor itself when used with the other bases.)
Make a trial cut to check the depth and readjust as necessary.
Sign off on the bit installation

Fine Depth Adjustment
Warning: Adjust the depth-of-cut only when the motor is switched off.
Open the clamping lever. Fig. 12(A)
Adjust the desired depth-of-cut with the knurled wheel on back of base. Fig. 12(D)
Rotate the knurled wheel
Each complete rotation of the dial equals 1.25 mm (approximately 3/64\)"
Close the clamping lever. Fig. 12(A) Always make sure the motor is held tightly in the base.
Re-adjusting the nut can change the tension of the clamping lever. (See “To Clamp Motor”, below)
Check the depth-of-cut and make an additional fine adjustment if necessary. (Note: the depth of the motor and bit may shift very slightly when the clamping lever is closed.)
Make a trial cut to verify that the router is set to make the cut as desired.
Motor Installation
Remove collet from motor and install toothed drive pulley using collet wrench. Make sure that drive gear is fully tightened onto the motor’s spindle.
The motor is then installed into the base according to the instructions on page 9.
Insert screwdriver (not included) through the U-shaped opening in the subbase to fit belt over drive pulley.
Router Cleaning
Warning: To avoid accidents always disconnect the tool from the power supply before cleaning or performing any maintenance.
The tool may be cleaned most effectively with compressed dry air. Always wear safety goggles when cleaning tools with compressed air.
Ventilation openings and switch levers must be kept clean and free of foreign matter. Do not attempt to clean by inserting pointed objects through openings.
Caution: Certain cleaning agents and solvents damage plastic parts. Some of these are: gasoline, carbon tetrachloride, chlorinated cleaning solvents, ammonia and household detergents that contain ammonia.
Is the tool disconnected from the power supply?
Safety goggles worn?
Ventilation openings and switch levers clean and free of foreign matter?
No pointed objects used for cleaning?
Cleaning agent used
Check Subbase Location
Warning: Cutter diameter must be at least 1/4” smaller than opening for the bit and cutter.
Is the bit and its cutter centered in the subbase opening?
If not, follow the steps below to adjust the location of the subbase.
Loosen the four screws that hold the subbase.
Adjust the location of the subbase as needed so that the bit and its cutter are centered in the subbase opening.
Tighten the four screws that hold the subbase.
Note: This subbase is not designed for use with templet guides. See optional PR009 and PR010 Accessories for use of templet guides with the palm router.
Sign off on the subbase location check
Parts for Bosch Router PR20EVS
Access the parts list for your equipment in MaintainX.
Power Supply Cord
1604460308
Self-Locking Nut
2609110253
Warning Plate
2609130778
Stator
2610008119
Type Label
2609131588
Power Supply Cord
1604460308
Self-Locking Nut
2609110253
Warning Plate
2609130778
Stator
2610008119
Type Label
2609131588
Power Supply Cord
1604460308
Self-Locking Nut
2609110253
Warning Plate
2609130778
Stator
2610008119
Type Label
2609131588
Unlock efficiency
with MaintainX CoPilot
MaintainX CoPilot is your expert colleague, on call 24/7, helping your team find the answers they need to keep equipment running.
Reduce Unplanned Downtime
Ensure your team follows consistent procedures to minimize equipment failures and costly delays.
Maximize Asset Availability
Keep your assets running longer and more reliably, with standardized maintenance workflows from OEM manuals.
Lower Maintenance Costs
Turn any technician into an expert to streamline operations, maintain more assets, and reduce overall costs.
Thousands of companies manage their assets with MaintainX

'%3e%3cpath%20fill='url(%23b)'%20d='M66.008%2080.068c-5.084-.786-9.763-3.834-12.442-8.68a16.942%2016.942%200%200%201-1.87-5.18c1.096.19%202.203.476%203.298.87%206.525%202.333%2010.836%207.68%2011.014%2012.99ZM51.47%2061.576c.488-5.524%203.62-10.716%208.847-13.597a17.132%2017.132%200%200%201%2011.335-1.882c-.798%208.145-7.43%2014.848-16.038%2015.599-1.417.119-2.799.07-4.144-.12Zm28.564-11.478a17.513%2017.513%200%200%201%203.727%204.62c4.608%208.335%201.584%2018.813-6.75%2023.409a16.988%2016.988%200%200%201-4.359%201.679%2019.624%2019.624%200%200%201-3.977-12.776c.346-7.561%204.942-13.931%2011.36-16.932Z'/%3e%3cpath%20fill='%23110F0D'%20fill-rule='evenodd'%20d='M142.831%2048.324h4.977V77.03h-4.977V48.324Zm27.278%2013.002c.322%201.048.453%202.263.453%203.62v12.073h-4.787V66.208c0-.75-.047-1.572-.154-2.143-.453-2.382-1.822-3.572-4.215-3.572-2.31%200-3.882%201.274-4.43%203.476-.143.596-.226%201.405-.226%202.25v10.8h-4.787V56.623h4.477v2.989c1.536-2.5%203.906-3.43%206.371-3.43%203.488%200%206.263%201.68%207.298%205.144Zm24.636%207.323c0%203.882-2.358%206.525-5.763%207.727-1.298.453-2.632.643-4.62.643h-10.169V48.324h9.085c1.691%200%203.156.143%204.049.38%203.465.93%205.727%203.68%205.727%207.335%200%202.441-.81%204.156-2.762%205.644%202.905%201.417%204.453%203.727%204.453%206.966Zm-15.634-8.656h4.584c1.024%200%201.917-.143%202.536-.417%201.215-.548%201.905-1.608%201.905-3.167%200-1.548-.643-2.572-1.845-3.132-.691-.31-1.762-.452-2.763-.452h-4.417v7.168Zm10.716%208.465c0-1.536-.893-3.37-3.227-3.893-.428-.095-1.036-.143-1.571-.143h-5.918v8.085h5.501c.56%200%201.429-.048%201.953-.167%201.94-.453%203.262-1.846%203.262-3.882Zm47.747-11.847-8.097%2020.408h-4.429l-8.109-20.408h5.191l5.192%2014.574%205.108-14.574h5.144Zm-20.218%2010.002c0%20.69-.036%201.262-.155%201.94h-15.943c.631%202.87%202.714%204.728%205.882%204.728%202.131%200%203.607-.882%204.703-2.525h4.87c-1.762%204.144-5.204%206.692-9.657%206.692-6.084%200-10.537-4.858-10.537-10.49%200-6.108%204.524-10.776%2010.335-10.776%206.239%200%2010.442%204.954%2010.502%2010.43Zm-4.763-1.405c-.333-2.846-2.643-4.858-5.691-4.858-2.894%200-5.287%201.929-5.621%204.858h11.312Zm-72.667%203.44c0%204.787-3.287%208.371-9.419%208.371H119.363V64.66c-1.917.274-3.87.69-5.811%201.238l4.537%2011.121h-5.418l-3.596-9.585c-5.144%202.084-10.085%205.216-14.217%209.585h-4.786L101.8%2048.312h4.56l5.68%2013.883a44.112%2044.112%200%200%201%207.323-1.774V48.312h9.084c1.703%200%203.156.143%204.061.393%203.453.929%205.727%203.667%205.727%207.323%200%201.917-.738%204.179-2.81%205.691%203.06%201.56%204.501%204.025%204.501%206.93Zm-15.634-8.667a62.664%2062.664%200%200%201%202.06-.036c1.703.012%203.239.131%204.608.37%201.441-.549%202.357-1.727%202.357-3.537%200-1.941-.881-3.144-2.488-3.667-.548-.18-1.358-.286-2.322-.286h-4.215v7.156Zm-16.55%203.905-3.715-9.894-6.394%2016.502c2.833-2.595%206.263-4.858%2010.109-6.608Zm27.254%204.74c0-2.775-3.131-4.347-8.513-4.418-.715%200-1.441.011-2.191.047v8.252h5.918c2.548%200%204.786-1.37%204.786-3.882Z'%20clip-rule='evenodd'/%3e%3c/g%3e%3cdefs%3e%3clinearGradient%20id='b'%20x1='51.47'%20x2='85.916'%20y1='62.946'%20y2='62.946'%20gradientUnits='userSpaceOnUse'%3e%3cstop%20stop-color='%23CD9F28'/%3e%3cstop%20offset='1'%20stop-color='%23ECD80B'/%3e%3c/linearGradient%3e%3cclipPath%20id='a'%3e%3cpath%20fill='%23fff'%20d='M51.47%2045.728h186.104V80.14H51.47z'/%3e%3c/clipPath%3e%3c/defs%3e%3c/svg%3e)


More from Bosch


Explore Other Assets


© 2026 MaintainX. All rights reserved.