


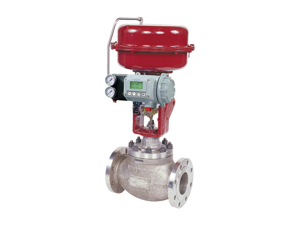
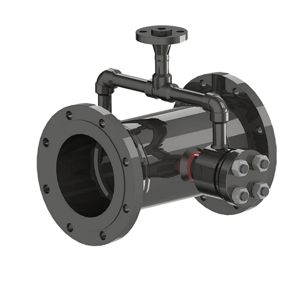
Baker Hughes Valve Regulator Pilots VRP-SB-175-SB-CH
Need answers fast?
Explore the manual using AI.
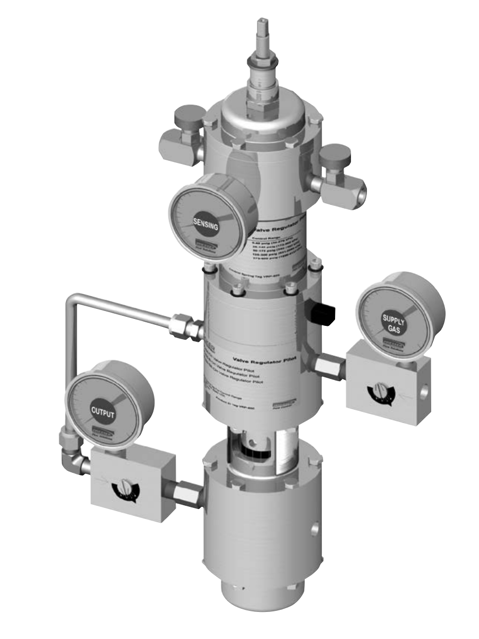
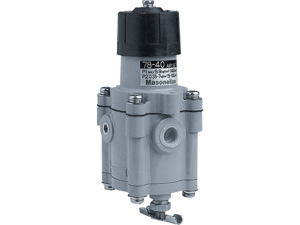
The Baker Hughes Valve Regulator Pilots VRP-SB-175-SB-CH is a high-performance industrial valve designed for precise pressure regulation in various applications. Known for its reliability and efficiency, this model ensures optimal control and safety in fluid systems, making it a preferred choice for professionals in the industry.
Turn manuals into instant answers
with your AI-powered assistantTurn manuals into instant answers
with your AI-powered assistant
Manual for Baker Hughes Valve Regulator Pilots VRP-SB-175-SB-CH
Complete asset maintenance, one click away
Get instant access to all the maintenance information you need. Empower technicians to perform preventive maintenance with asset packages, ready to use right out of the box.

Documents & Manuals
Find all the essential guides in one place.
 Tensioning Guide
- Belt-diagram
- C-120 pulleys
+ 13 more

Work Order Templates
Pre-built workflows to keep your asset running smoothly.
- Daily Electrical System Inspection
- Replace Roller and Pulley
- Install Engine B-120
+ 29 more

Procedures
Integrate maintenance plans directly into your work orders.
- Motion Industries
- Applied Industrial Technologies
- Electrical Brothers
+ 5 more

Parts
Access the parts list for your equipment in MaintainX.
- Drive Motor
- B2 Rollers
- Tensioning System
+ 40 more
Baker Hughes Valve Regulator Pilots VRP-SB-175-SB-CH
Create an account to install this asset package.
Maintenance Plans for Baker Hughes Valve Regulator Pilots Model VRP-SB-175-SB-CH
Integrate maintenance plans directly into your work orders in MaintainX.
1 Yearly Maintenance
Inspection Procedure As with all Becker pilots, it is necessary to periodically test the pilot to ensure optimum performance. We recommend the following procedure once a year.
1. Close the output block valve to prevent the control valve from moving. Close the valve on the measured variable line.
2. If the VRP-SB-CH pilot is equipped with speed control valves, skip this step and go to step 3. Shut off supply pressure and bleed down at pilot. Note settings of the adjustable orifices before removing them from the orifice assembly. Remove the adjustable orifices and clean them thoroughly. Reinstall using new O-rings, being sure to install each orifice in the same hole form which it was removed. Reset the adjustable orifices to original settings noted above. Turn on supply pressure.
3. Balance valve and seat inspection Change the control pressure at least 5 percent above and below the set point using the "false signal" valves found on the bottom of the pilot
In each case soap test the exhaust port: a. For Direct-Acting VRP-SB-CH, exhaust port is P2 When the control pressure is above the setpoint, the supply balance valve is open and the exhaust balance valve (bottom block) is closed. Gas exhausting from port P2 indicates wear and contaminants in the exhaust balance valve assembly (bottom block).
When the control pressure is below the setpoint, the supply balance valve is closed and the exhaust balance valve (bottom block) is open. Gas exhausting from port P2 indicates wear or contaminants in the supply balance valve assembly (top block).
b. For Reverse-Acting VRP-SB-CH, exhaust port is P4 The supply and exhaust balance valves are opposite to direct acting case above.
Note: If a leak is found through one balance valve only, it is not necessary to take apart both top and bottom blocks. Only the block with the damaged balance valve assembly requires disassembly.
4. Soap test around all diaphragms, vents, and orifice Ine proapatfany leak stound around the diaphagnak all rubber goods must be replaced. Take the pilot apart, replace all rubber goods, and reassemble the pilot.

Valve Regulator Pilot Test
Internal Friction Test Friction may occur due to any one, or a combination of the following reasons: a. The diaphragms are not centered properly.
b. The control spring is not seated properly over the spring nut. or defective.
c. Dirt or ice build up inside pilot.
Step 1: Adjust the pilot using INITIAL ADJUSTMENT proce-dure. Keep pilot at the setpoint and close output block valve.
Step 2: Eliminate the dead-band by turning the drum to the right about one or two divisions (turn in the direction of increasing numbers). The VRP-SB-CH pilot must have slight continuous bleed gas. Turn the adjusting screw back and forth.
Observe the output gauge response. If response of the output gauge hesitates or the pressure moves in the opposite direction of the adjusting screw rotation, the VRP-SB-CH pilot has internal friction. For example if the VRP-SB-CH is direct acting, as the adjusting screw is rotated clockwise the output gauge should go down without hesitation. If the gauge goes up or hesitates before going down, internal friction is present.
Step 3: If internal friction is found, take the VRP-SB-CH apart and reassemble it.
The above test procedure precisely indicates the mechanical and pneumatic condition of the Becker VRP-SB-CH pilot.;
Parts for Baker Hughes Valve Regulator Pilots VRP-SB-175-SB-CH
Access the parts list for your equipment in MaintainX.
Sensing Assembly
30-0021
Top Inside Piston
35-1528
Spring Chamber Assembly
30-0012
HPP-SB Bottom Body S.S
35-1545
Repair Kit
30-9302
Sensing Assembly
30-0021
Top Inside Piston
35-1528
Spring Chamber Assembly
30-0012
HPP-SB Bottom Body S.S
35-1545
Repair Kit
30-9302
Sensing Assembly
30-0021
Top Inside Piston
35-1528
Spring Chamber Assembly
30-0012
HPP-SB Bottom Body S.S
35-1545
Repair Kit
30-9302
Unlock efficiency
with MaintainX CoPilot
MaintainX CoPilot is your expert colleague, on call 24/7, helping your team find the answers they need to keep equipment running.
Reduce Unplanned Downtime
Ensure your team follows consistent procedures to minimize equipment failures and costly delays.
Maximize Asset Availability
Keep your assets running longer and more reliably, with standardized maintenance workflows from OEM manuals.
Lower Maintenance Costs
Turn any technician into an expert to streamline operations, maintain more assets, and reduce overall costs.
Thousands of companies manage their assets with MaintainX

'%3e%3cpath%20fill='url(%23b)'%20d='M66.008%2080.068c-5.084-.786-9.763-3.834-12.442-8.68a16.942%2016.942%200%200%201-1.87-5.18c1.096.19%202.203.476%203.298.87%206.525%202.333%2010.836%207.68%2011.014%2012.99ZM51.47%2061.576c.488-5.524%203.62-10.716%208.847-13.597a17.132%2017.132%200%200%201%2011.335-1.882c-.798%208.145-7.43%2014.848-16.038%2015.599-1.417.119-2.799.07-4.144-.12Zm28.564-11.478a17.513%2017.513%200%200%201%203.727%204.62c4.608%208.335%201.584%2018.813-6.75%2023.409a16.988%2016.988%200%200%201-4.359%201.679%2019.624%2019.624%200%200%201-3.977-12.776c.346-7.561%204.942-13.931%2011.36-16.932Z'/%3e%3cpath%20fill='%23110F0D'%20fill-rule='evenodd'%20d='M142.831%2048.324h4.977V77.03h-4.977V48.324Zm27.278%2013.002c.322%201.048.453%202.263.453%203.62v12.073h-4.787V66.208c0-.75-.047-1.572-.154-2.143-.453-2.382-1.822-3.572-4.215-3.572-2.31%200-3.882%201.274-4.43%203.476-.143.596-.226%201.405-.226%202.25v10.8h-4.787V56.623h4.477v2.989c1.536-2.5%203.906-3.43%206.371-3.43%203.488%200%206.263%201.68%207.298%205.144Zm24.636%207.323c0%203.882-2.358%206.525-5.763%207.727-1.298.453-2.632.643-4.62.643h-10.169V48.324h9.085c1.691%200%203.156.143%204.049.38%203.465.93%205.727%203.68%205.727%207.335%200%202.441-.81%204.156-2.762%205.644%202.905%201.417%204.453%203.727%204.453%206.966Zm-15.634-8.656h4.584c1.024%200%201.917-.143%202.536-.417%201.215-.548%201.905-1.608%201.905-3.167%200-1.548-.643-2.572-1.845-3.132-.691-.31-1.762-.452-2.763-.452h-4.417v7.168Zm10.716%208.465c0-1.536-.893-3.37-3.227-3.893-.428-.095-1.036-.143-1.571-.143h-5.918v8.085h5.501c.56%200%201.429-.048%201.953-.167%201.94-.453%203.262-1.846%203.262-3.882Zm47.747-11.847-8.097%2020.408h-4.429l-8.109-20.408h5.191l5.192%2014.574%205.108-14.574h5.144Zm-20.218%2010.002c0%20.69-.036%201.262-.155%201.94h-15.943c.631%202.87%202.714%204.728%205.882%204.728%202.131%200%203.607-.882%204.703-2.525h4.87c-1.762%204.144-5.204%206.692-9.657%206.692-6.084%200-10.537-4.858-10.537-10.49%200-6.108%204.524-10.776%2010.335-10.776%206.239%200%2010.442%204.954%2010.502%2010.43Zm-4.763-1.405c-.333-2.846-2.643-4.858-5.691-4.858-2.894%200-5.287%201.929-5.621%204.858h11.312Zm-72.667%203.44c0%204.787-3.287%208.371-9.419%208.371H119.363V64.66c-1.917.274-3.87.69-5.811%201.238l4.537%2011.121h-5.418l-3.596-9.585c-5.144%202.084-10.085%205.216-14.217%209.585h-4.786L101.8%2048.312h4.56l5.68%2013.883a44.112%2044.112%200%200%201%207.323-1.774V48.312h9.084c1.703%200%203.156.143%204.061.393%203.453.929%205.727%203.667%205.727%207.323%200%201.917-.738%204.179-2.81%205.691%203.06%201.56%204.501%204.025%204.501%206.93Zm-15.634-8.667a62.664%2062.664%200%200%201%202.06-.036c1.703.012%203.239.131%204.608.37%201.441-.549%202.357-1.727%202.357-3.537%200-1.941-.881-3.144-2.488-3.667-.548-.18-1.358-.286-2.322-.286h-4.215v7.156Zm-16.55%203.905-3.715-9.894-6.394%2016.502c2.833-2.595%206.263-4.858%2010.109-6.608Zm27.254%204.74c0-2.775-3.131-4.347-8.513-4.418-.715%200-1.441.011-2.191.047v8.252h5.918c2.548%200%204.786-1.37%204.786-3.882Z'%20clip-rule='evenodd'/%3e%3c/g%3e%3cdefs%3e%3clinearGradient%20id='b'%20x1='51.47'%20x2='85.916'%20y1='62.946'%20y2='62.946'%20gradientUnits='userSpaceOnUse'%3e%3cstop%20stop-color='%23CD9F28'/%3e%3cstop%20offset='1'%20stop-color='%23ECD80B'/%3e%3c/linearGradient%3e%3cclipPath%20id='a'%3e%3cpath%20fill='%23fff'%20d='M51.47%2045.728h186.104V80.14H51.47z'/%3e%3c/clipPath%3e%3c/defs%3e%3c/svg%3e)


More from Baker Hughes


Explore Other Assets


© 2026 MaintainX. All rights reserved.