


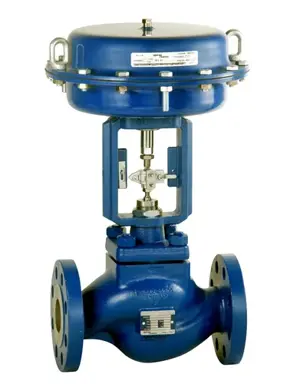
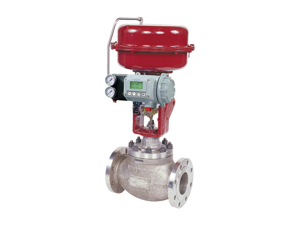
Baker Hughes Cage Guided Globe Valve with Lo-dB Anti-cavitation/API 6A capabilities 41005 Series
Need answers fast?
Explore the manual using AI.
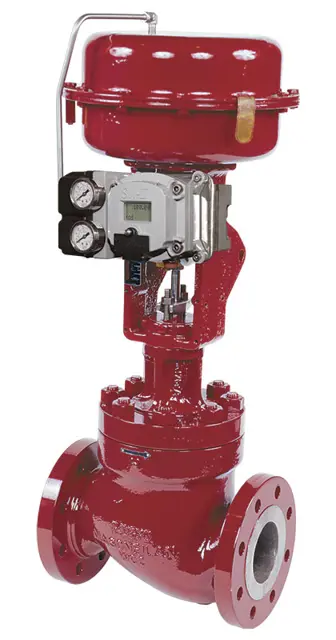
The Baker Hughes Cage Guided Globe Valve, model 41005 Series, features Lo-dB anti-cavitation capabilities and API 6A compliance, making it ideal for high-performance applications. This valve ensures reliable flow control and durability in demanding industrial environments.
Turn manuals into instant answers
with your AI-powered assistantTurn manuals into instant answers
with your AI-powered assistant
Manual for Baker Hughes Cage Guided Globe Valve with Lo-dB Anti-cavitation/API 6A capabilities 41005 Series
Complete asset maintenance, one click away
Get instant access to all the maintenance information you need. Empower technicians to perform preventive maintenance with asset packages, ready to use right out of the box.

Documents & Manuals
Find all the essential guides in one place.
 Tensioning Guide
- Belt-diagram
- C-120 pulleys
+ 13 more

Work Order Templates
Pre-built workflows to keep your asset running smoothly.
- Daily Electrical System Inspection
- Replace Roller and Pulley
- Install Engine B-120
+ 29 more

Procedures
Integrate maintenance plans directly into your work orders.
- Motion Industries
- Applied Industrial Technologies
- Electrical Brothers
+ 5 more

Parts
Access the parts list for your equipment in MaintainX.
- Drive Motor
- B2 Rollers
- Tensioning System
+ 40 more
Baker Hughes Cage Guided Globe Valve with Lo-dB Anti-cavitation/API 6A capabilities 41005 Series
Create an account to install this asset package.
Maintenance Plans for Baker Hughes Cage Guided Globe Valve with Lo-dB Anti-cavitation/API 6A capabilities Model 41005 Series
Integrate maintenance plans directly into your work orders in MaintainX.
Preliminary Controls Maintenance
- Before reassembly, check parts and the materials for conformity to the bill of material call out. Inspect inside of body (B001), Bonnet (B003), Cages (B107, B110) and plug (B112) for cleanliness.
- Remove any foreign matter and clean the gasket surfaces.
- Inspect body (B001), Bonnet (B003), Cages (B107, B110), gaskets (B103, B108, B118, B015), plug (B112), plug stems (B150), and bushings (B203) for nicks, scratches, burrs, sharp corners, etc., on sealing and sliding surfaces including packing box.
- Important: During assembly, care must be exercised to prevent damage to these parts. Since 41005 API 6A are high pressure valves, ensure there is no damage to the sealing surfaces. Performance of gaskets and seal are strongly linked to surface roughness.;

Repair of Parts
Before re-assembly, the parts must be carefully examined in order to eliminate any scratched, worn or damaged parts.
Guiding Surfaces
The guiding surfaces of the cage and valve plug, the guide bushing, and the guiding surfaces of the plug stem and packing box must be checked. Otherwise, the part must be replaced as soon as possible.
Seating Surfaces - Inspect all seating surfaces per Figures 2 and 3 which represents all plug and seat types. The cage (B107), plug (B112) seating surfaces must be completely free of dents, wear and scratches.
- If valve plug (B112) or cage (B107) seating surfaces show signs of slight deterioration, they can be touched up on a lathe.
- For all valve types, when dressing up critical surfaces, no more than 0.25 mm (0.010”) of metal must be removed in the case of an 80 or 100 mm (3” or 4”) valve, and no more than 0.4 mm (0.015”) in the case of a 150 to 250 mm (6” to 10”) valve. Make sure that the seating angle indicated in Figures 2 and 3 is respected.
- If a slight defect exists on any of the above seating surfaces, lapping can be envisaged, in which case the following must be respected: 1. Spread a fine layer of high-quality sealing compound on the seating surface.
2. Put the cage (B107) in the body, noting the angle.
3. Assemble the valve plug (B112) and Stem (B150).
Packing Box Maintenance
Prior to assembly the packing: • Ensure there are no nicks or scratches on the stem and packing box inside diameter packing area.
Violation of any of these requirements is cause for stem or packing box rejection Tightness of the packing box is obtained by compression of the packing rings (B207) and anti-extrusion rings (B208).
- Compression must be achieved by evenly tightening the packing flange nuts (B221) on the packing flange (B219).
- Periodical retightening of the packing flange nuts is required to maintain tightness.
- Make sure that the packing is not over tightened as this could prevent smooth operation of the valve.
- If a leak persists after the packing has been compressed to a maximum, the packing needs to be changed.;
PTFE Based Packing Maintenance
A. Unscrew and remove the packing flange nut (B221) and packing flat washer (B921a)
B. Lift the packing flange (B219) up along the valve stem
C. Extract and remove the packing rings (B207) and anti-extrusion rings (B208), taking care not to damage the sealing surface of the packing box lantern or the valve plug stem.
D. Replace the packing rings, with the cut in each ring placed about 120° from the next, pressing them down one at a time and respecting the table below
E. Install Packing studs (B220)
F. Install the guide bushing (B203) in the bottom of the packing box.
G. Install packing set (B207 and B208)
H. Assemble Packing flange/follower (B219)
I. Screw the packing flange nuts (B221) by hand
Packing Box Maintenance
- Packing box maintenance is one of the principle action items of routine servicing. Tightness of the packing is maintained by packing compression. Compression is achieved by evenly tightening the packing flange nuts (3) against the packing flange (4). Care must be taken not to over tighten as this could prevent smooth operation of the valve. If all compression is used up and the valve leaks, then new packing is required.
- Braided PTFE with Carbon or Aramid Core
A. Loosen and remove packing flange nuts (3).
B. Lift the packing flange (4) and packing follower (23) up the valve stem.
C. By means of a hooked instrument, remove packing rings ensuring not to damage the sealing surfaces of the packing box or plug stem.
D. Replace packing rings.
E. Replace packing follower (23) and packing flange (4).
F. Replace and tighten packing stud nuts (3).
G. Place valve back in service and only tighten packing as necessary to stop external leakage.
Parts for Baker Hughes Cage Guided Globe Valve with Lo-dB Anti-cavitation/API 6A capabilities 41005 Series
Access the parts list for your equipment in MaintainX.
Cage Washer
-
Bonnet
-
Spring Washer
-
Seal Ring And Backup Ring
-
Graphite Seal Ring
-
Cage Washer
-
Bonnet
-
Spring Washer
-
Seal Ring And Backup Ring
-
Graphite Seal Ring
-
Cage Washer
-
Bonnet
-
Spring Washer
-
Seal Ring And Backup Ring
-
Graphite Seal Ring
-
Unlock efficiency
with MaintainX CoPilot
MaintainX CoPilot is your expert colleague, on call 24/7, helping your team find the answers they need to keep equipment running.
Reduce Unplanned Downtime
Ensure your team follows consistent procedures to minimize equipment failures and costly delays.
Maximize Asset Availability
Keep your assets running longer and more reliably, with standardized maintenance workflows from OEM manuals.
Lower Maintenance Costs
Turn any technician into an expert to streamline operations, maintain more assets, and reduce overall costs.
Thousands of companies manage their assets with MaintainX

'%3e%3cpath%20fill='url(%23b)'%20d='M66.008%2080.068c-5.084-.786-9.763-3.834-12.442-8.68a16.942%2016.942%200%200%201-1.87-5.18c1.096.19%202.203.476%203.298.87%206.525%202.333%2010.836%207.68%2011.014%2012.99ZM51.47%2061.576c.488-5.524%203.62-10.716%208.847-13.597a17.132%2017.132%200%200%201%2011.335-1.882c-.798%208.145-7.43%2014.848-16.038%2015.599-1.417.119-2.799.07-4.144-.12Zm28.564-11.478a17.513%2017.513%200%200%201%203.727%204.62c4.608%208.335%201.584%2018.813-6.75%2023.409a16.988%2016.988%200%200%201-4.359%201.679%2019.624%2019.624%200%200%201-3.977-12.776c.346-7.561%204.942-13.931%2011.36-16.932Z'/%3e%3cpath%20fill='%23110F0D'%20fill-rule='evenodd'%20d='M142.831%2048.324h4.977V77.03h-4.977V48.324Zm27.278%2013.002c.322%201.048.453%202.263.453%203.62v12.073h-4.787V66.208c0-.75-.047-1.572-.154-2.143-.453-2.382-1.822-3.572-4.215-3.572-2.31%200-3.882%201.274-4.43%203.476-.143.596-.226%201.405-.226%202.25v10.8h-4.787V56.623h4.477v2.989c1.536-2.5%203.906-3.43%206.371-3.43%203.488%200%206.263%201.68%207.298%205.144Zm24.636%207.323c0%203.882-2.358%206.525-5.763%207.727-1.298.453-2.632.643-4.62.643h-10.169V48.324h9.085c1.691%200%203.156.143%204.049.38%203.465.93%205.727%203.68%205.727%207.335%200%202.441-.81%204.156-2.762%205.644%202.905%201.417%204.453%203.727%204.453%206.966Zm-15.634-8.656h4.584c1.024%200%201.917-.143%202.536-.417%201.215-.548%201.905-1.608%201.905-3.167%200-1.548-.643-2.572-1.845-3.132-.691-.31-1.762-.452-2.763-.452h-4.417v7.168Zm10.716%208.465c0-1.536-.893-3.37-3.227-3.893-.428-.095-1.036-.143-1.571-.143h-5.918v8.085h5.501c.56%200%201.429-.048%201.953-.167%201.94-.453%203.262-1.846%203.262-3.882Zm47.747-11.847-8.097%2020.408h-4.429l-8.109-20.408h5.191l5.192%2014.574%205.108-14.574h5.144Zm-20.218%2010.002c0%20.69-.036%201.262-.155%201.94h-15.943c.631%202.87%202.714%204.728%205.882%204.728%202.131%200%203.607-.882%204.703-2.525h4.87c-1.762%204.144-5.204%206.692-9.657%206.692-6.084%200-10.537-4.858-10.537-10.49%200-6.108%204.524-10.776%2010.335-10.776%206.239%200%2010.442%204.954%2010.502%2010.43Zm-4.763-1.405c-.333-2.846-2.643-4.858-5.691-4.858-2.894%200-5.287%201.929-5.621%204.858h11.312Zm-72.667%203.44c0%204.787-3.287%208.371-9.419%208.371H119.363V64.66c-1.917.274-3.87.69-5.811%201.238l4.537%2011.121h-5.418l-3.596-9.585c-5.144%202.084-10.085%205.216-14.217%209.585h-4.786L101.8%2048.312h4.56l5.68%2013.883a44.112%2044.112%200%200%201%207.323-1.774V48.312h9.084c1.703%200%203.156.143%204.061.393%203.453.929%205.727%203.667%205.727%207.323%200%201.917-.738%204.179-2.81%205.691%203.06%201.56%204.501%204.025%204.501%206.93Zm-15.634-8.667a62.664%2062.664%200%200%201%202.06-.036c1.703.012%203.239.131%204.608.37%201.441-.549%202.357-1.727%202.357-3.537%200-1.941-.881-3.144-2.488-3.667-.548-.18-1.358-.286-2.322-.286h-4.215v7.156Zm-16.55%203.905-3.715-9.894-6.394%2016.502c2.833-2.595%206.263-4.858%2010.109-6.608Zm27.254%204.74c0-2.775-3.131-4.347-8.513-4.418-.715%200-1.441.011-2.191.047v8.252h5.918c2.548%200%204.786-1.37%204.786-3.882Z'%20clip-rule='evenodd'/%3e%3c/g%3e%3cdefs%3e%3clinearGradient%20id='b'%20x1='51.47'%20x2='85.916'%20y1='62.946'%20y2='62.946'%20gradientUnits='userSpaceOnUse'%3e%3cstop%20stop-color='%23CD9F28'/%3e%3cstop%20offset='1'%20stop-color='%23ECD80B'/%3e%3c/linearGradient%3e%3cclipPath%20id='a'%3e%3cpath%20fill='%23fff'%20d='M51.47%2045.728h186.104V80.14H51.47z'/%3e%3c/clipPath%3e%3c/defs%3e%3c/svg%3e)


More from Baker Hughes


Explore Other Assets


© 2026 MaintainX. All rights reserved.