


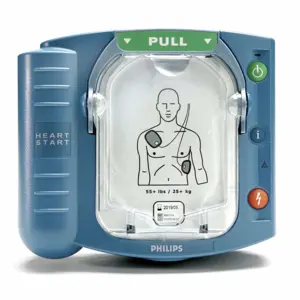
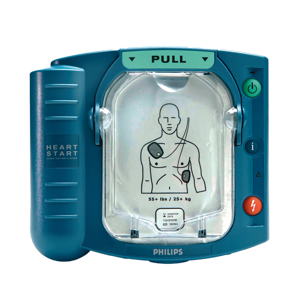
Philips Defibrillator M5066A
Need answers fast?
Explore the manual using AI.

Turn manuals into instant answers
with your AI-powered assistantTurn manuals into instant answers
with your AI-powered assistant
Manual for Philips Defibrillator M5066A
Complete asset maintenance, one click away
Get instant access to all the maintenance information you need. Empower technicians to perform preventive maintenance with asset packages, ready to use right out of the box.

Documents & Manuals
Find all the essential guides in one place.
 Tensioning Guide
- Belt-diagram
- C-120 pulleys
+ 13 more

Work Order Templates
Pre-built workflows to keep your asset running smoothly.
- Daily Electrical System Inspection
- Replace Roller and Pulley
- Install Engine B-120
+ 29 more

Procedures
Integrate maintenance plans directly into your work orders.
- Motion Industries
- Applied Industrial Technologies
- Electrical Brothers
+ 5 more

Parts
Access the parts list for your equipment in MaintainX.
- Drive Motor
- B2 Rollers
- Tensioning System
+ 40 more
Philips Defibrillator M5066A
Create an account to install this asset package.
Maintenance Plans for Philips Defibrillator Model M5066A
Integrate maintenance plans directly into your work orders in MaintainX.
Defibrillator Maintenance
Green Ready light is blinking
If the green Ready light is not blinking, see Troubleshooting Tips
Replace any used, damaged or expired supplies and accessories
Check the outside of the defibrillator for cracks or other signs of damage
If you see cracks or other signs of damage, contact Philips for technical support.
Sign off on the defibrillator maintenance

Defibrillator Test
WARNING: Electrical shock hazard. Do not open the HeartStart, remove its covers, or attempt repair. There are no user-serviceable components in the HeartStart. If repair is required, return the HeartStart to Philips for service.
Do not leave the HeartStart without a pads cartridge installed; the defibrillator will start chirping and the i-button will start flashing.
The HeartStart runs daily self-tests. As long as the green Ready light is blinking, it is not necessary to test the defibrillator by initiating a battery insertion self-test. This uses battery power and risks draining the battery prematurely.
Is the green Ready light blinking?
You can also test the defibrillator at any time by removing the battery for five seconds then reinstalling it. This test takes about one minute.
Did the defibrillator pass the battery insertion self-test?
Because the battery insertion self-test is very detailed and uses battery power, running it more often than necessary will drain the battery prematurely. It is recommended that you run the battery insertion self-test only when the defibrillator is first put into service, after each time the defibrillator is used to treat a patient, when the battery is replaced, or when the defibrillator may have been damaged.
Is the defibrillator first put into service?
Has the defibrillator been used to treat a patient?
Defibrillator Check
Check the outside of the HeartStart for signs of damage, dirt, or contamination
If you see signs of damage, contact Philips for technical support. If the defibrillator is dirty or contaminated, clean it according to the guidelines in Chapter 5, “Maintaining the HeartStart.”
Upload a photo of the new SMART Pads cartridge inserted into the HeartStart
Check supplies and accessories for damage and expiration dates
Replace any used, damaged or expired items. For directions on changing the pads and replacing the battery, please see Chapter 2, “Setting up the HeartStart.” The single-use pads must be replaced after being used.
Unless your protocol requires that the battery remain installed, remove the battery for five seconds, then reinstall it to run the battery insertion self-test to check the operation of the defibrillator.
When the test is complete, check that the green Ready light is blinking
Return the HeartStart to its storage location so it will be ready for use when needed.
If you leave the battery in the HeartStart after using the defibrillator, then transfer the last-use data to a computer running HeartStart Event Review software, the software will calculate the local date and time of the device use. However, if you remove the battery prior to transferring the data, the software will only show elapsed time.
Defibrillator Cleaning
Warning: Only use a soft cloth dampened in soapy water, chlorine bleach (2 tablespoons per quart or liter of water), or ammonia-based cleaners.
Is the outside of the HeartStart and its carry case clean?
Reminder: Do not use isopropyl (rubbing) alcohol, strong solvents such as acetone or acetone-based cleaners, abrasive materials, or enzymatic cleaners to clean your HeartStart.
Did you avoid using prohibited cleaning materials?
Reminder: Do not immerse the HeartStart in fluids or allow fluids to spill onto it. Do not sterilize the defibrillator or its accessories.
Did you avoid immersing the HeartStart in fluids or allowing fluids to spill onto it?
Sign off on the defibrillator cleaning
Unlock efficiency
with MaintainX CoPilot
MaintainX CoPilot is your expert colleague, on call 24/7, helping your team find the answers they need to keep equipment running.
Reduce Unplanned Downtime
Ensure your team follows consistent procedures to minimize equipment failures and costly delays.
Maximize Asset Availability
Keep your assets running longer and more reliably, with standardized maintenance workflows from OEM manuals.
Lower Maintenance Costs
Turn any technician into an expert to streamline operations, maintain more assets, and reduce overall costs.
Thousands of companies manage their assets with MaintainX

'%3e%3cpath%20fill='url(%23b)'%20d='M66.008%2080.068c-5.084-.786-9.763-3.834-12.442-8.68a16.942%2016.942%200%200%201-1.87-5.18c1.096.19%202.203.476%203.298.87%206.525%202.333%2010.836%207.68%2011.014%2012.99ZM51.47%2061.576c.488-5.524%203.62-10.716%208.847-13.597a17.132%2017.132%200%200%201%2011.335-1.882c-.798%208.145-7.43%2014.848-16.038%2015.599-1.417.119-2.799.07-4.144-.12Zm28.564-11.478a17.513%2017.513%200%200%201%203.727%204.62c4.608%208.335%201.584%2018.813-6.75%2023.409a16.988%2016.988%200%200%201-4.359%201.679%2019.624%2019.624%200%200%201-3.977-12.776c.346-7.561%204.942-13.931%2011.36-16.932Z'/%3e%3cpath%20fill='%23110F0D'%20fill-rule='evenodd'%20d='M142.831%2048.324h4.977V77.03h-4.977V48.324Zm27.278%2013.002c.322%201.048.453%202.263.453%203.62v12.073h-4.787V66.208c0-.75-.047-1.572-.154-2.143-.453-2.382-1.822-3.572-4.215-3.572-2.31%200-3.882%201.274-4.43%203.476-.143.596-.226%201.405-.226%202.25v10.8h-4.787V56.623h4.477v2.989c1.536-2.5%203.906-3.43%206.371-3.43%203.488%200%206.263%201.68%207.298%205.144Zm24.636%207.323c0%203.882-2.358%206.525-5.763%207.727-1.298.453-2.632.643-4.62.643h-10.169V48.324h9.085c1.691%200%203.156.143%204.049.38%203.465.93%205.727%203.68%205.727%207.335%200%202.441-.81%204.156-2.762%205.644%202.905%201.417%204.453%203.727%204.453%206.966Zm-15.634-8.656h4.584c1.024%200%201.917-.143%202.536-.417%201.215-.548%201.905-1.608%201.905-3.167%200-1.548-.643-2.572-1.845-3.132-.691-.31-1.762-.452-2.763-.452h-4.417v7.168Zm10.716%208.465c0-1.536-.893-3.37-3.227-3.893-.428-.095-1.036-.143-1.571-.143h-5.918v8.085h5.501c.56%200%201.429-.048%201.953-.167%201.94-.453%203.262-1.846%203.262-3.882Zm47.747-11.847-8.097%2020.408h-4.429l-8.109-20.408h5.191l5.192%2014.574%205.108-14.574h5.144Zm-20.218%2010.002c0%20.69-.036%201.262-.155%201.94h-15.943c.631%202.87%202.714%204.728%205.882%204.728%202.131%200%203.607-.882%204.703-2.525h4.87c-1.762%204.144-5.204%206.692-9.657%206.692-6.084%200-10.537-4.858-10.537-10.49%200-6.108%204.524-10.776%2010.335-10.776%206.239%200%2010.442%204.954%2010.502%2010.43Zm-4.763-1.405c-.333-2.846-2.643-4.858-5.691-4.858-2.894%200-5.287%201.929-5.621%204.858h11.312Zm-72.667%203.44c0%204.787-3.287%208.371-9.419%208.371H119.363V64.66c-1.917.274-3.87.69-5.811%201.238l4.537%2011.121h-5.418l-3.596-9.585c-5.144%202.084-10.085%205.216-14.217%209.585h-4.786L101.8%2048.312h4.56l5.68%2013.883a44.112%2044.112%200%200%201%207.323-1.774V48.312h9.084c1.703%200%203.156.143%204.061.393%203.453.929%205.727%203.667%205.727%207.323%200%201.917-.738%204.179-2.81%205.691%203.06%201.56%204.501%204.025%204.501%206.93Zm-15.634-8.667a62.664%2062.664%200%200%201%202.06-.036c1.703.012%203.239.131%204.608.37%201.441-.549%202.357-1.727%202.357-3.537%200-1.941-.881-3.144-2.488-3.667-.548-.18-1.358-.286-2.322-.286h-4.215v7.156Zm-16.55%203.905-3.715-9.894-6.394%2016.502c2.833-2.595%206.263-4.858%2010.109-6.608Zm27.254%204.74c0-2.775-3.131-4.347-8.513-4.418-.715%200-1.441.011-2.191.047v8.252h5.918c2.548%200%204.786-1.37%204.786-3.882Z'%20clip-rule='evenodd'/%3e%3c/g%3e%3cdefs%3e%3clinearGradient%20id='b'%20x1='51.47'%20x2='85.916'%20y1='62.946'%20y2='62.946'%20gradientUnits='userSpaceOnUse'%3e%3cstop%20stop-color='%23CD9F28'/%3e%3cstop%20offset='1'%20stop-color='%23ECD80B'/%3e%3c/linearGradient%3e%3cclipPath%20id='a'%3e%3cpath%20fill='%23fff'%20d='M51.47%2045.728h186.104V80.14H51.47z'/%3e%3c/clipPath%3e%3c/defs%3e%3c/svg%3e)


More from Philips
Explore Other Assets


© 2026 MaintainX. All rights reserved.