


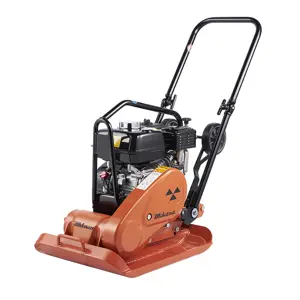
Mikasa Forward Plate Compactor MVC-T100D
Need answers fast?
Explore the manual using AI.

The Mikasa Forward Plate Compactor MVC-T100D is a robust and efficient compaction solution designed for construction and landscaping applications. Known for its durability and performance, this model ensures optimal soil compaction with minimal effort, making it a preferred choice among professionals.
Turn manuals into instant answers
with your AI-powered assistantTurn manuals into instant answers
with your AI-powered assistant
Manual for Mikasa Forward Plate Compactor MVC-T100D
Complete asset maintenance, one click away
Get instant access to all the maintenance information you need. Empower technicians to perform preventive maintenance with asset packages, ready to use right out of the box.

Documents & Manuals
Find all the essential guides in one place.
 Tensioning Guide
- Belt-diagram
- C-120 pulleys
+ 13 more

Work Order Templates
Pre-built workflows to keep your asset running smoothly.
- Daily Electrical System Inspection
- Replace Roller and Pulley
- Install Engine B-120
+ 29 more

Procedures
Integrate maintenance plans directly into your work orders.
- Motion Industries
- Applied Industrial Technologies
- Electrical Brothers
+ 5 more

Parts
Access the parts list for your equipment in MaintainX.
- Drive Motor
- B2 Rollers
- Tensioning System
+ 40 more
Mikasa Forward Plate Compactor MVC-T100D
Create an account to install this asset package.
Maintenance Plans for Mikasa Forward Plate Compactor Model MVC-T100D
Integrate maintenance plans directly into your work orders in MaintainX.
200 Hourly Bolt & Engine Check
CAUTION! Always stop the engine before inspection and adjustment. If you are caught in a rotating part, serious injury might occur.
Vibration weakens during operation or machine does not vibrate at all though the engine rotates normally
If the above check fails, conduct the inspection or change of the V-belt and clutch without regard to the regular inspection of every 200 hours.
Bolt, Engine part made of rubber material shows signs of fatigue or wear
If the above check fails, inspect this part for the reason as well as Shock Absorbing Rubber.
Wear, deformation or degradation of elastic rubber material found
If the above check fails, replace immediately. This may cause V-belt come off or the engine to vibration damage directly and excessively.
Sign off on the 200 Hourly Bolt & Engine Check

1 Daily Forward Plate Compactor
Check appearance flaw and deformation
Check fuel tank leakage
Check fuel system leakage
Check engine oil leakage, oil level, dirt
Check shock absorber crack, damage, wear
Check Vibrator Oil leakage
Check air cleaner element deformation, dust
Check guard frame breakage, flaw, loosened or missing bolts and nuts
Check bolts and nuts looseness, missing
Air Cleaner Replacement
Warning: Ensure the engine is off before starting the procedure
Engine starts smoothly
Sufficient engine output
Air cleaner element dirty?
If the element is dirty, clean it as per the engine operation manual
Element cleaned successfully?
If the element cannot be cleaned, replace it with a new one
Sign off on the air cleaner replacement
200 Hourly / 1 Monthly Vibrator Oil Maintenance
Make sure the machine is level before starting the procedure.
Is the machine level?
Remove the oil level plug off the vibrator.
Is the vibrator oil up to the mouth level?
The oil level plug is on the right side of the vibrator case (opposite to the belt side).
Did you use the engine oil #10W-30 for vibrator oil?
Refer to page 8 for the amount.
Did you drain the vibrator oil completely by removing the plug and tilting the body?
This should be done once a month or every 200 hours’ operation.
200 Hourly Clutch Check
CAUTION! Always stop the engine before inspection and adjustment. If you are caught in a rotating part, serious injury might occur.
Inspect Clutch concurrently with the inspection of V-belt.
Check visually for burning of each clutch-shoe.
Check for wear the lining shoe or the like, in the operation check.
If the shoe wears, power transmission is not performed properly and Clutch slips.
Check wear or any damage to V-groove also.
If V-groove is stained, clean it thoroughly.
Sign off on the 200 Hourly Clutch Check
Unlock efficiency
with MaintainX CoPilot
MaintainX CoPilot is your expert colleague, on call 24/7, helping your team find the answers they need to keep equipment running.
Reduce Unplanned Downtime
Ensure your team follows consistent procedures to minimize equipment failures and costly delays.
Maximize Asset Availability
Keep your assets running longer and more reliably, with standardized maintenance workflows from OEM manuals.
Lower Maintenance Costs
Turn any technician into an expert to streamline operations, maintain more assets, and reduce overall costs.
Thousands of companies manage their assets with MaintainX

'%3e%3cpath%20fill='url(%23b)'%20d='M66.008%2080.068c-5.084-.786-9.763-3.834-12.442-8.68a16.942%2016.942%200%200%201-1.87-5.18c1.096.19%202.203.476%203.298.87%206.525%202.333%2010.836%207.68%2011.014%2012.99ZM51.47%2061.576c.488-5.524%203.62-10.716%208.847-13.597a17.132%2017.132%200%200%201%2011.335-1.882c-.798%208.145-7.43%2014.848-16.038%2015.599-1.417.119-2.799.07-4.144-.12Zm28.564-11.478a17.513%2017.513%200%200%201%203.727%204.62c4.608%208.335%201.584%2018.813-6.75%2023.409a16.988%2016.988%200%200%201-4.359%201.679%2019.624%2019.624%200%200%201-3.977-12.776c.346-7.561%204.942-13.931%2011.36-16.932Z'/%3e%3cpath%20fill='%23110F0D'%20fill-rule='evenodd'%20d='M142.831%2048.324h4.977V77.03h-4.977V48.324Zm27.278%2013.002c.322%201.048.453%202.263.453%203.62v12.073h-4.787V66.208c0-.75-.047-1.572-.154-2.143-.453-2.382-1.822-3.572-4.215-3.572-2.31%200-3.882%201.274-4.43%203.476-.143.596-.226%201.405-.226%202.25v10.8h-4.787V56.623h4.477v2.989c1.536-2.5%203.906-3.43%206.371-3.43%203.488%200%206.263%201.68%207.298%205.144Zm24.636%207.323c0%203.882-2.358%206.525-5.763%207.727-1.298.453-2.632.643-4.62.643h-10.169V48.324h9.085c1.691%200%203.156.143%204.049.38%203.465.93%205.727%203.68%205.727%207.335%200%202.441-.81%204.156-2.762%205.644%202.905%201.417%204.453%203.727%204.453%206.966Zm-15.634-8.656h4.584c1.024%200%201.917-.143%202.536-.417%201.215-.548%201.905-1.608%201.905-3.167%200-1.548-.643-2.572-1.845-3.132-.691-.31-1.762-.452-2.763-.452h-4.417v7.168Zm10.716%208.465c0-1.536-.893-3.37-3.227-3.893-.428-.095-1.036-.143-1.571-.143h-5.918v8.085h5.501c.56%200%201.429-.048%201.953-.167%201.94-.453%203.262-1.846%203.262-3.882Zm47.747-11.847-8.097%2020.408h-4.429l-8.109-20.408h5.191l5.192%2014.574%205.108-14.574h5.144Zm-20.218%2010.002c0%20.69-.036%201.262-.155%201.94h-15.943c.631%202.87%202.714%204.728%205.882%204.728%202.131%200%203.607-.882%204.703-2.525h4.87c-1.762%204.144-5.204%206.692-9.657%206.692-6.084%200-10.537-4.858-10.537-10.49%200-6.108%204.524-10.776%2010.335-10.776%206.239%200%2010.442%204.954%2010.502%2010.43Zm-4.763-1.405c-.333-2.846-2.643-4.858-5.691-4.858-2.894%200-5.287%201.929-5.621%204.858h11.312Zm-72.667%203.44c0%204.787-3.287%208.371-9.419%208.371H119.363V64.66c-1.917.274-3.87.69-5.811%201.238l4.537%2011.121h-5.418l-3.596-9.585c-5.144%202.084-10.085%205.216-14.217%209.585h-4.786L101.8%2048.312h4.56l5.68%2013.883a44.112%2044.112%200%200%201%207.323-1.774V48.312h9.084c1.703%200%203.156.143%204.061.393%203.453.929%205.727%203.667%205.727%207.323%200%201.917-.738%204.179-2.81%205.691%203.06%201.56%204.501%204.025%204.501%206.93Zm-15.634-8.667a62.664%2062.664%200%200%201%202.06-.036c1.703.012%203.239.131%204.608.37%201.441-.549%202.357-1.727%202.357-3.537%200-1.941-.881-3.144-2.488-3.667-.548-.18-1.358-.286-2.322-.286h-4.215v7.156Zm-16.55%203.905-3.715-9.894-6.394%2016.502c2.833-2.595%206.263-4.858%2010.109-6.608Zm27.254%204.74c0-2.775-3.131-4.347-8.513-4.418-.715%200-1.441.011-2.191.047v8.252h5.918c2.548%200%204.786-1.37%204.786-3.882Z'%20clip-rule='evenodd'/%3e%3c/g%3e%3cdefs%3e%3clinearGradient%20id='b'%20x1='51.47'%20x2='85.916'%20y1='62.946'%20y2='62.946'%20gradientUnits='userSpaceOnUse'%3e%3cstop%20stop-color='%23CD9F28'/%3e%3cstop%20offset='1'%20stop-color='%23ECD80B'/%3e%3c/linearGradient%3e%3cclipPath%20id='a'%3e%3cpath%20fill='%23fff'%20d='M51.47%2045.728h186.104V80.14H51.47z'/%3e%3c/clipPath%3e%3c/defs%3e%3c/svg%3e)


More from Mikasa


Explore Other Assets


© 2026 MaintainX. All rights reserved.