


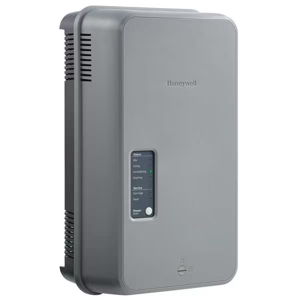
Honeywell BW GasAlert MicroClip XL
Need answers fast?
Explore the manual using AI.
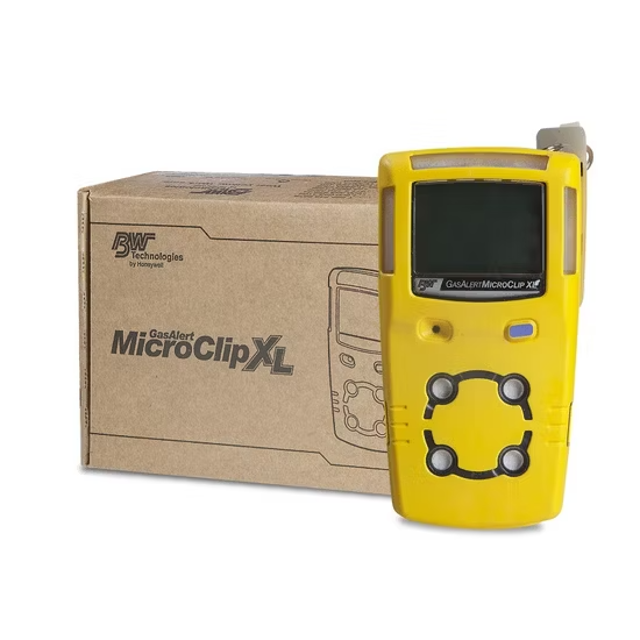
The Honeywell BW GasAlert MicroClip XL is a reliable portable gas detector designed for safety in hazardous environments. This advanced model offers multi-gas detection capabilities, ensuring optimal protection for workers in various industrial applications. Regular maintenance and calibration are essential for its performance and longevity.
Turn manuals into instant answers
with your AI-powered assistantTurn manuals into instant answers
with your AI-powered assistant
Manual for Honeywell BW GasAlert MicroClip XL
Complete asset maintenance, one click away
Get instant access to all the maintenance information you need. Empower technicians to perform preventive maintenance with asset packages, ready to use right out of the box.

Documents & Manuals
Find all the essential guides in one place.
 Tensioning Guide
- Belt-diagram
- C-120 pulleys
+ 13 more

Work Order Templates
Pre-built workflows to keep your asset running smoothly.
- Daily Electrical System Inspection
- Replace Roller and Pulley
- Install Engine B-120
+ 29 more

Procedures
Integrate maintenance plans directly into your work orders.
- Motion Industries
- Applied Industrial Technologies
- Electrical Brothers
+ 5 more

Parts
Access the parts list for your equipment in MaintainX.
- Drive Motor
- B2 Rollers
- Tensioning System
+ 40 more
Honeywell BW GasAlert MicroClip XL
Create an account to install this asset package.
Maintenance Plans for Honeywell BW GasAlert Model MicroClip XL
Integrate maintenance plans directly into your work orders in MaintainX.
GasAlert Maintenance
Warning: This maintenance check requires trained personnel with PPE!
Calibrate the detector
Bump check the detector
Inspect the detector
Upload the operations log
Clean the exterior with a soft damp cloth
Did you use solvents, soaps, or polishes?
Did you immerse the detector in liquids?
Sign off on the GasAlert maintenance

H2S, CO, and LEL Sensor Replacement
Removing the back shell
Deactivate the detector and place it face down on a clean surface
Remove the six machine screws on the rear shell
Remove the back cover by lifting the top and the bottom upwards simultaneously to prevent damaging the charger pins
Replacing the H2S, CO, and LEL sensor
Note the placement of the PCB to ensure it is replaced correctly. Remove the two screws on the PCB. Remove the PCB carefully
Slide the sensors out
Insert the new sensor(s)
Reassembling the detector
Sensor Filter Replacement
Deactivate the detector
Place the detector face down on a clean surface
Remove the six machine screws on the rear shell
Remove the back cover by lifting the top and the bottom upwards simultaneously
Note the placement of the PCB
Remove the two screws on the PCB
Remove the PCB carefully
Remove the old sensor filter
Pull the liner tab to remove the liner from the sensor filter
Oxygen Sensor Replacement
Deactivating the detector
Detector deactivated and placed face down on a clean surface
Removing the back shell
Six machine screws on the rear shell removed
Back cover removed without damaging the charger pins
Replacing the Oxygen Sensor X3
Circular rigidified flex PCB gently removed from the metal sensor posts without tearing the flex cable
Two screws on the PCB removed without damaging the battery
PCB lifted straight up and oxygen sensor removed from the front shell
Battery Charging
WARNING! The detector must be charged in a safe area that is free of hazardous gas in temperatures of 32°F to 113°F (0°C to 45°C).
Deactivate the detector
Plug the charging adapter into an AC outlet
CAUTION! The charging adapter is voltage specific to your region. Use of the charging adapter outside your region will damage the charger and the detector.
Attach the charging adapter to the charger interface
Allow the battery to charge per battery specifications. The charging indicator flashes on the LCD while the detector is being charged.
When charging is complete, the charging indicator stops flashing and displays to indicate a full charge. Remove the charging adapter and activate the detector.
If the battery indicator does not display, refer to Troubleshooting.
Charge the battery after each workday.
Parts for Honeywell BW GasAlert MicroClip XL
Access the parts list for your equipment in MaintainX.
MICROpeL Combustible Sensor
SR-W-MP75C
Replacement Dummy O2 Sensor
SR-DUMM1
MICROceL Carbon Monoxide Sensor
SR-M-MC
Replacement Dummy CO or H2S Sensor
SR-TOX-MC-DUMM
Calibration Cap
MC-TC-1
MICROpeL Combustible Sensor
SR-W-MP75C
Replacement Dummy O2 Sensor
SR-DUMM1
MICROceL Carbon Monoxide Sensor
SR-M-MC
Replacement Dummy CO or H2S Sensor
SR-TOX-MC-DUMM
Calibration Cap
MC-TC-1
MICROpeL Combustible Sensor
SR-W-MP75C
Replacement Dummy O2 Sensor
SR-DUMM1
MICROceL Carbon Monoxide Sensor
SR-M-MC
Replacement Dummy CO or H2S Sensor
SR-TOX-MC-DUMM
Calibration Cap
MC-TC-1
Unlock efficiency
with MaintainX CoPilot
MaintainX CoPilot is your expert colleague, on call 24/7, helping your team find the answers they need to keep equipment running.
Reduce Unplanned Downtime
Ensure your team follows consistent procedures to minimize equipment failures and costly delays.
Maximize Asset Availability
Keep your assets running longer and more reliably, with standardized maintenance workflows from OEM manuals.
Lower Maintenance Costs
Turn any technician into an expert to streamline operations, maintain more assets, and reduce overall costs.
Thousands of companies manage their assets with MaintainX

'%3e%3cpath%20fill='url(%23b)'%20d='M66.008%2080.068c-5.084-.786-9.763-3.834-12.442-8.68a16.942%2016.942%200%200%201-1.87-5.18c1.096.19%202.203.476%203.298.87%206.525%202.333%2010.836%207.68%2011.014%2012.99ZM51.47%2061.576c.488-5.524%203.62-10.716%208.847-13.597a17.132%2017.132%200%200%201%2011.335-1.882c-.798%208.145-7.43%2014.848-16.038%2015.599-1.417.119-2.799.07-4.144-.12Zm28.564-11.478a17.513%2017.513%200%200%201%203.727%204.62c4.608%208.335%201.584%2018.813-6.75%2023.409a16.988%2016.988%200%200%201-4.359%201.679%2019.624%2019.624%200%200%201-3.977-12.776c.346-7.561%204.942-13.931%2011.36-16.932Z'/%3e%3cpath%20fill='%23110F0D'%20fill-rule='evenodd'%20d='M142.831%2048.324h4.977V77.03h-4.977V48.324Zm27.278%2013.002c.322%201.048.453%202.263.453%203.62v12.073h-4.787V66.208c0-.75-.047-1.572-.154-2.143-.453-2.382-1.822-3.572-4.215-3.572-2.31%200-3.882%201.274-4.43%203.476-.143.596-.226%201.405-.226%202.25v10.8h-4.787V56.623h4.477v2.989c1.536-2.5%203.906-3.43%206.371-3.43%203.488%200%206.263%201.68%207.298%205.144Zm24.636%207.323c0%203.882-2.358%206.525-5.763%207.727-1.298.453-2.632.643-4.62.643h-10.169V48.324h9.085c1.691%200%203.156.143%204.049.38%203.465.93%205.727%203.68%205.727%207.335%200%202.441-.81%204.156-2.762%205.644%202.905%201.417%204.453%203.727%204.453%206.966Zm-15.634-8.656h4.584c1.024%200%201.917-.143%202.536-.417%201.215-.548%201.905-1.608%201.905-3.167%200-1.548-.643-2.572-1.845-3.132-.691-.31-1.762-.452-2.763-.452h-4.417v7.168Zm10.716%208.465c0-1.536-.893-3.37-3.227-3.893-.428-.095-1.036-.143-1.571-.143h-5.918v8.085h5.501c.56%200%201.429-.048%201.953-.167%201.94-.453%203.262-1.846%203.262-3.882Zm47.747-11.847-8.097%2020.408h-4.429l-8.109-20.408h5.191l5.192%2014.574%205.108-14.574h5.144Zm-20.218%2010.002c0%20.69-.036%201.262-.155%201.94h-15.943c.631%202.87%202.714%204.728%205.882%204.728%202.131%200%203.607-.882%204.703-2.525h4.87c-1.762%204.144-5.204%206.692-9.657%206.692-6.084%200-10.537-4.858-10.537-10.49%200-6.108%204.524-10.776%2010.335-10.776%206.239%200%2010.442%204.954%2010.502%2010.43Zm-4.763-1.405c-.333-2.846-2.643-4.858-5.691-4.858-2.894%200-5.287%201.929-5.621%204.858h11.312Zm-72.667%203.44c0%204.787-3.287%208.371-9.419%208.371H119.363V64.66c-1.917.274-3.87.69-5.811%201.238l4.537%2011.121h-5.418l-3.596-9.585c-5.144%202.084-10.085%205.216-14.217%209.585h-4.786L101.8%2048.312h4.56l5.68%2013.883a44.112%2044.112%200%200%201%207.323-1.774V48.312h9.084c1.703%200%203.156.143%204.061.393%203.453.929%205.727%203.667%205.727%207.323%200%201.917-.738%204.179-2.81%205.691%203.06%201.56%204.501%204.025%204.501%206.93Zm-15.634-8.667a62.664%2062.664%200%200%201%202.06-.036c1.703.012%203.239.131%204.608.37%201.441-.549%202.357-1.727%202.357-3.537%200-1.941-.881-3.144-2.488-3.667-.548-.18-1.358-.286-2.322-.286h-4.215v7.156Zm-16.55%203.905-3.715-9.894-6.394%2016.502c2.833-2.595%206.263-4.858%2010.109-6.608Zm27.254%204.74c0-2.775-3.131-4.347-8.513-4.418-.715%200-1.441.011-2.191.047v8.252h5.918c2.548%200%204.786-1.37%204.786-3.882Z'%20clip-rule='evenodd'/%3e%3c/g%3e%3cdefs%3e%3clinearGradient%20id='b'%20x1='51.47'%20x2='85.916'%20y1='62.946'%20y2='62.946'%20gradientUnits='userSpaceOnUse'%3e%3cstop%20stop-color='%23CD9F28'/%3e%3cstop%20offset='1'%20stop-color='%23ECD80B'/%3e%3c/linearGradient%3e%3cclipPath%20id='a'%3e%3cpath%20fill='%23fff'%20d='M51.47%2045.728h186.104V80.14H51.47z'/%3e%3c/clipPath%3e%3c/defs%3e%3c/svg%3e)


More from Honeywell


Explore Other Assets


© 2026 MaintainX. All rights reserved.