


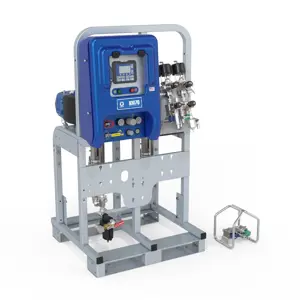
Graco Sprayer XM1E00
Need answers fast?
Explore the manual using AI.

Turn manuals into instant answers
with your AI-powered assistantTurn manuals into instant answers
with your AI-powered assistant
Manual for Graco Sprayer XM1E00
Complete asset maintenance, one click away
Get instant access to all the maintenance information you need. Empower technicians to perform preventive maintenance with asset packages, ready to use right out of the box.

Documents & Manuals
Find all the essential guides in one place.
 Tensioning Guide
- Belt-diagram
- C-120 pulleys
+ 13 more

Work Order Templates
Pre-built workflows to keep your asset running smoothly.
- Daily Electrical System Inspection
- Replace Roller and Pulley
- Install Engine B-120
+ 29 more

Procedures
Integrate maintenance plans directly into your work orders.
- Motion Industries
- Applied Industrial Technologies
- Electrical Brothers
+ 5 more

Parts
Access the parts list for your equipment in MaintainX.
- Drive Motor
- B2 Rollers
- Tensioning System
+ 40 more
Graco Sprayer XM1E00
Create an account to install this asset package.
Maintenance Plans for Graco Sprayer Model XM1E00
Integrate maintenance plans directly into your work orders in MaintainX.
Initial 100 Hours/2 Weeks Gear Reducer Oil Change
NOTICE: To prevent air motor failure and possible damage to equipment, always keep the air motor properly lubricated using Air Motor Lubricant.
After the first 100 hours, or two weeks of operation, change the gear reducer oil.
Air motor properly lubricated?
Enter the number of operation hours
Enter the date of operation start
Gear reducer oil changed?
Sign off on the gear reducer oil change

1 Daily Inlet Strainer Screen Cleaning
Ensure that all pumps are shut off and close the Y-strainer valve (ES)
Place a container under the strainer base to catch drain off when removing the strainer plug
Remove the screen from the strainer manifold. Thoroughly flush the mesh screen (MS) with compatible solvent and shake it dry
Inspect the screen. No more than 25% of the mesh should be restricted. If more than 25% of the mesh is blocked, replace the screen. Inspect the gasket and replace as needed
Ensure that the pipe plug (PP) is screwed into the strainer plug (SP). Install the strainer plug (SP) with the mesh screen (MS) and gasket (SG) in place and tighten. Do not over tighten the strainer plug--let the gasket make the seal
Open the Y-strainer valve (ES). Ensure that there are no leaks and wipe the equipment clean
1 Monthly Heating Fluid Level Check
NOTICE: Freezing temperatures can cause damage that may result in the heating fluid leaking into the terminal enclosure. To avoid damage, do not expose the unit to freezing conditions.
Current heating fluid level
Is the heating fluid level within the acceptable range?
Amount of fluid added
Sign off on the heating fluid level check
1 Weekly Sprayer Maintenance
Filters
Once a week check, clean, and replace (if needed) the following filters. Be sure to follow the Flush, page 44, prior to performing filter maintenance.
• Both pump filters; see your pump manual for instructions.
• Main air inlet manifold filter; see your sprayer repair manual, Replace Air Filter Element section, for instructions.
• Air regulator filter (5 micron) on air control assembly; see your sprayer repair manual, Replace Air Filter Element section, for instructions.
• B side mix manifold strainer; see your mix manifold manual.
Seals
Once a week, check and tighten throat seals on both pumps and dosing valves. Be sure to follow Flush Mixed Manifold, Hose, and Spray Gun, page 44, priorto tightening seals.
Adjust the packing nut weekly so it is just tight enough to prevent leakage. Use a spanner wrench or a 0.25 in. (6.3 mm) diameter rod to tighten the nut. Do not over-tighten.;
2500 Hourly/6 Monthly Sprayer Maintenance
NOTICE: To prevent air motor failure and possible damage to equipment, always keep the air motor properly lubricated using Air Motor Lubricant.
Change the gear reducer oil every 2500 hours, or six months (whichever comes first) of operation under normal conditions. More frequent oil changes are needed under severe operating conditions or in atmospheres containing excessive moisture or abrasives.
Was the gear reducer oil changed?
Every 2500 hours, or six months (whichever comes first) of operation, inspect the bearing block.
Was the bearing block inspected?
Sign off on the 2500 Hourly/6 Monthly Sprayer Maintenance
Parts for Graco Sprayer XM1E00
Access the parts list for your equipment in MaintainX.
20-Gallon Hopper Kit
255963
Hopper Heater Kit, 240V
256257
Universal Hopper Fluid Inlet Kit
256170
Universal Hopper Mounting Kit
256259
Twistork Agitator Kit
256274
20-Gallon Hopper Kit
255963
Hopper Heater Kit, 240V
256257
Universal Hopper Fluid Inlet Kit
256170
Universal Hopper Mounting Kit
256259
Twistork Agitator Kit
256274
20-Gallon Hopper Kit
255963
Hopper Heater Kit, 240V
256257
Universal Hopper Fluid Inlet Kit
256170
Universal Hopper Mounting Kit
256259
Twistork Agitator Kit
256274
Unlock efficiency
with MaintainX CoPilot
MaintainX CoPilot is your expert colleague, on call 24/7, helping your team find the answers they need to keep equipment running.
Reduce Unplanned Downtime
Ensure your team follows consistent procedures to minimize equipment failures and costly delays.
Maximize Asset Availability
Keep your assets running longer and more reliably, with standardized maintenance workflows from OEM manuals.
Lower Maintenance Costs
Turn any technician into an expert to streamline operations, maintain more assets, and reduce overall costs.
Thousands of companies manage their assets with MaintainX

'%3e%3cpath%20fill='url(%23b)'%20d='M66.008%2080.068c-5.084-.786-9.763-3.834-12.442-8.68a16.942%2016.942%200%200%201-1.87-5.18c1.096.19%202.203.476%203.298.87%206.525%202.333%2010.836%207.68%2011.014%2012.99ZM51.47%2061.576c.488-5.524%203.62-10.716%208.847-13.597a17.132%2017.132%200%200%201%2011.335-1.882c-.798%208.145-7.43%2014.848-16.038%2015.599-1.417.119-2.799.07-4.144-.12Zm28.564-11.478a17.513%2017.513%200%200%201%203.727%204.62c4.608%208.335%201.584%2018.813-6.75%2023.409a16.988%2016.988%200%200%201-4.359%201.679%2019.624%2019.624%200%200%201-3.977-12.776c.346-7.561%204.942-13.931%2011.36-16.932Z'/%3e%3cpath%20fill='%23110F0D'%20fill-rule='evenodd'%20d='M142.831%2048.324h4.977V77.03h-4.977V48.324Zm27.278%2013.002c.322%201.048.453%202.263.453%203.62v12.073h-4.787V66.208c0-.75-.047-1.572-.154-2.143-.453-2.382-1.822-3.572-4.215-3.572-2.31%200-3.882%201.274-4.43%203.476-.143.596-.226%201.405-.226%202.25v10.8h-4.787V56.623h4.477v2.989c1.536-2.5%203.906-3.43%206.371-3.43%203.488%200%206.263%201.68%207.298%205.144Zm24.636%207.323c0%203.882-2.358%206.525-5.763%207.727-1.298.453-2.632.643-4.62.643h-10.169V48.324h9.085c1.691%200%203.156.143%204.049.38%203.465.93%205.727%203.68%205.727%207.335%200%202.441-.81%204.156-2.762%205.644%202.905%201.417%204.453%203.727%204.453%206.966Zm-15.634-8.656h4.584c1.024%200%201.917-.143%202.536-.417%201.215-.548%201.905-1.608%201.905-3.167%200-1.548-.643-2.572-1.845-3.132-.691-.31-1.762-.452-2.763-.452h-4.417v7.168Zm10.716%208.465c0-1.536-.893-3.37-3.227-3.893-.428-.095-1.036-.143-1.571-.143h-5.918v8.085h5.501c.56%200%201.429-.048%201.953-.167%201.94-.453%203.262-1.846%203.262-3.882Zm47.747-11.847-8.097%2020.408h-4.429l-8.109-20.408h5.191l5.192%2014.574%205.108-14.574h5.144Zm-20.218%2010.002c0%20.69-.036%201.262-.155%201.94h-15.943c.631%202.87%202.714%204.728%205.882%204.728%202.131%200%203.607-.882%204.703-2.525h4.87c-1.762%204.144-5.204%206.692-9.657%206.692-6.084%200-10.537-4.858-10.537-10.49%200-6.108%204.524-10.776%2010.335-10.776%206.239%200%2010.442%204.954%2010.502%2010.43Zm-4.763-1.405c-.333-2.846-2.643-4.858-5.691-4.858-2.894%200-5.287%201.929-5.621%204.858h11.312Zm-72.667%203.44c0%204.787-3.287%208.371-9.419%208.371H119.363V64.66c-1.917.274-3.87.69-5.811%201.238l4.537%2011.121h-5.418l-3.596-9.585c-5.144%202.084-10.085%205.216-14.217%209.585h-4.786L101.8%2048.312h4.56l5.68%2013.883a44.112%2044.112%200%200%201%207.323-1.774V48.312h9.084c1.703%200%203.156.143%204.061.393%203.453.929%205.727%203.667%205.727%207.323%200%201.917-.738%204.179-2.81%205.691%203.06%201.56%204.501%204.025%204.501%206.93Zm-15.634-8.667a62.664%2062.664%200%200%201%202.06-.036c1.703.012%203.239.131%204.608.37%201.441-.549%202.357-1.727%202.357-3.537%200-1.941-.881-3.144-2.488-3.667-.548-.18-1.358-.286-2.322-.286h-4.215v7.156Zm-16.55%203.905-3.715-9.894-6.394%2016.502c2.833-2.595%206.263-4.858%2010.109-6.608Zm27.254%204.74c0-2.775-3.131-4.347-8.513-4.418-.715%200-1.441.011-2.191.047v8.252h5.918c2.548%200%204.786-1.37%204.786-3.882Z'%20clip-rule='evenodd'/%3e%3c/g%3e%3cdefs%3e%3clinearGradient%20id='b'%20x1='51.47'%20x2='85.916'%20y1='62.946'%20y2='62.946'%20gradientUnits='userSpaceOnUse'%3e%3cstop%20stop-color='%23CD9F28'/%3e%3cstop%20offset='1'%20stop-color='%23ECD80B'/%3e%3c/linearGradient%3e%3cclipPath%20id='a'%3e%3cpath%20fill='%23fff'%20d='M51.47%2045.728h186.104V80.14H51.47z'/%3e%3c/clipPath%3e%3c/defs%3e%3c/svg%3e)


More from Graco


Explore Other Assets


© 2026 MaintainX. All rights reserved.