


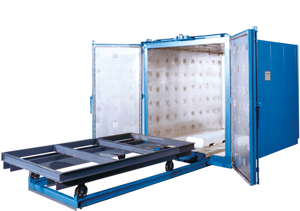
Global Finishing Solutions Batch Burn-Off Oven BBO-8808
Need answers fast?
Explore the manual using AI.

Turn manuals into instant answers
with your AI-powered assistantTurn manuals into instant answers
with your AI-powered assistant
Manual for Global Finishing Solutions Batch Burn-Off Oven BBO-8808
Complete asset maintenance, one click away
Get instant access to all the maintenance information you need. Empower technicians to perform preventive maintenance with asset packages, ready to use right out of the box.

Documents & Manuals
Find all the essential guides in one place.
 Tensioning Guide
- Belt-diagram
- C-120 pulleys
+ 13 more

Work Order Templates
Pre-built workflows to keep your asset running smoothly.
- Daily Electrical System Inspection
- Replace Roller and Pulley
- Install Engine B-120
+ 29 more

Procedures
Integrate maintenance plans directly into your work orders.
- Motion Industries
- Applied Industrial Technologies
- Electrical Brothers
+ 5 more

Parts
Access the parts list for your equipment in MaintainX.
- Drive Motor
- B2 Rollers
- Tensioning System
+ 40 more
Global Finishing Solutions Batch Burn-Off Oven BBO-8808
Create an account to install this asset package.
Maintenance Plans for Global Finishing Solutions Batch Burn-Off Oven Model BBO-8808
Integrate maintenance plans directly into your work orders in MaintainX.
1 Daily Oven Maintenance
CAUTION! All personnel involved with this equipment must be instructed in the safe conduct and operation of this unit
Reference: Refer to the Midco Burner Installation and Service Instructions
NOTICE! Per NFPA 86, the product must be installed and serviced only by a trained, qualified service technician. Incorrect installation may void the warranty
Clean ash residue from inside the oven after each cycle
Clean ash from under the burner tubes (if needed)
Press the Test Cooling Water button to test the spray nozzles and the functionality of the button. If the spray nozzles do not work properly, clean or replace them
If applicable: Check hand valves, manual dampers, and secondary air openings/adjustable bypasses for proper positions
Check blowers for unusual bearing noise and shaft vibration
If applicable: Verify proper operation of ventilation equipment

1 Yearly Oven Calibration
CAUTION! All personnel involved with this equipment must be instructed in the safe conduct and operation of this unit
Reference: Refer to the Midco Burner Installation and Service Instructions
NOTICE! Per NFPA 86, the product must be installed and serviced only by a trained, qualified service technician. Incorrect installation may void the warranty
Calibrate all instrumentation to ensure proper readings
1 Monthly Oven Maintenance
CAUTION! All personnel involved with this equipment must be instructed in the safe conduct and operation of this unit
Reference: Refer to the Midco Burner Installation and Service Instructions
NOTICE! Per NFPA 86, the product must be installed and serviced only by a trained, qualified service technician. Incorrect installation may void the warranty
Test the automatic or manual turndown equipment
Take apart the castors to clean and decontaminate them
NOTE! GFS does not recommend greasing the casters
Test the interlock sequence of all safety equipment
Force each interlock to fail manually
Verify that the related equipment closes or stops as specified by the manufacturer
1 Weekly Oven Maintenance
CAUTION! All personnel involved with this equipment must be instructed in the safe conduct and operation of this unit
NOTICE! Per NFPA 86, the product must be installed and serviced only by a trained, qualified service technician. Incorrect installation may void the warranty
Test thermocouples and lead wire for shorts and loose connections
Check setting and operation of high temperature limit device(s)
NOTE! Refer to “Safety checklist” (page 15) for instructions
Test visual and/or audible alarm systems for proper signals
NOTE! Refer to “Safety checklist” (page 15) for instructions
Check all pressure switches for proper pressure settings, as defined in the Design Drawings
NOTE! Refer to “Gas train components” (page 17) for information on switch settings
1 Yearly Valve Leak Test
CAUTION! All personnel involved with this equipment must be instructed in the safe conduct and operation of this unit
NOTICE! Per NFPA 86, the product must be installed and serviced only by a trained, qualified service technician. Incorrect installation may void the warranty
SCOPE! This task checks the closure tightness of a gas safety shutoff valve and should be performed by qualified personnel during the initial startup of a burner system, at least annually thereafter, and whenever the valve or valve bonnet is replaced
PREREQUISITES! Prior to performing the valve leak test, and with the appliance running, apply an all-purpose liquid leak detector and bubble test all gas train components and fittings downstream of the main shut-off valve (G). The presence of bubbles indicates a leak. Tighten the fittings before proceeding
Disable the burner system and make sure the safety shut-off valves are closed via the visual indicators
Close the upstream shut-off valve (G) and both downstream manual test ball valves (L)
Remove the cap on the valve 1 test port (H) and connect the test apparatus to the test port
Open the upstream shut-off valve (G)
Allow some time for potential leakage to charge the plumbing before measuring the valve seat leakage
Unlock efficiency
with MaintainX CoPilot
MaintainX CoPilot is your expert colleague, on call 24/7, helping your team find the answers they need to keep equipment running.
Reduce Unplanned Downtime
Ensure your team follows consistent procedures to minimize equipment failures and costly delays.
Maximize Asset Availability
Keep your assets running longer and more reliably, with standardized maintenance workflows from OEM manuals.
Lower Maintenance Costs
Turn any technician into an expert to streamline operations, maintain more assets, and reduce overall costs.
Thousands of companies manage their assets with MaintainX

'%3e%3cpath%20fill='url(%23b)'%20d='M66.008%2080.068c-5.084-.786-9.763-3.834-12.442-8.68a16.942%2016.942%200%200%201-1.87-5.18c1.096.19%202.203.476%203.298.87%206.525%202.333%2010.836%207.68%2011.014%2012.99ZM51.47%2061.576c.488-5.524%203.62-10.716%208.847-13.597a17.132%2017.132%200%200%201%2011.335-1.882c-.798%208.145-7.43%2014.848-16.038%2015.599-1.417.119-2.799.07-4.144-.12Zm28.564-11.478a17.513%2017.513%200%200%201%203.727%204.62c4.608%208.335%201.584%2018.813-6.75%2023.409a16.988%2016.988%200%200%201-4.359%201.679%2019.624%2019.624%200%200%201-3.977-12.776c.346-7.561%204.942-13.931%2011.36-16.932Z'/%3e%3cpath%20fill='%23110F0D'%20fill-rule='evenodd'%20d='M142.831%2048.324h4.977V77.03h-4.977V48.324Zm27.278%2013.002c.322%201.048.453%202.263.453%203.62v12.073h-4.787V66.208c0-.75-.047-1.572-.154-2.143-.453-2.382-1.822-3.572-4.215-3.572-2.31%200-3.882%201.274-4.43%203.476-.143.596-.226%201.405-.226%202.25v10.8h-4.787V56.623h4.477v2.989c1.536-2.5%203.906-3.43%206.371-3.43%203.488%200%206.263%201.68%207.298%205.144Zm24.636%207.323c0%203.882-2.358%206.525-5.763%207.727-1.298.453-2.632.643-4.62.643h-10.169V48.324h9.085c1.691%200%203.156.143%204.049.38%203.465.93%205.727%203.68%205.727%207.335%200%202.441-.81%204.156-2.762%205.644%202.905%201.417%204.453%203.727%204.453%206.966Zm-15.634-8.656h4.584c1.024%200%201.917-.143%202.536-.417%201.215-.548%201.905-1.608%201.905-3.167%200-1.548-.643-2.572-1.845-3.132-.691-.31-1.762-.452-2.763-.452h-4.417v7.168Zm10.716%208.465c0-1.536-.893-3.37-3.227-3.893-.428-.095-1.036-.143-1.571-.143h-5.918v8.085h5.501c.56%200%201.429-.048%201.953-.167%201.94-.453%203.262-1.846%203.262-3.882Zm47.747-11.847-8.097%2020.408h-4.429l-8.109-20.408h5.191l5.192%2014.574%205.108-14.574h5.144Zm-20.218%2010.002c0%20.69-.036%201.262-.155%201.94h-15.943c.631%202.87%202.714%204.728%205.882%204.728%202.131%200%203.607-.882%204.703-2.525h4.87c-1.762%204.144-5.204%206.692-9.657%206.692-6.084%200-10.537-4.858-10.537-10.49%200-6.108%204.524-10.776%2010.335-10.776%206.239%200%2010.442%204.954%2010.502%2010.43Zm-4.763-1.405c-.333-2.846-2.643-4.858-5.691-4.858-2.894%200-5.287%201.929-5.621%204.858h11.312Zm-72.667%203.44c0%204.787-3.287%208.371-9.419%208.371H119.363V64.66c-1.917.274-3.87.69-5.811%201.238l4.537%2011.121h-5.418l-3.596-9.585c-5.144%202.084-10.085%205.216-14.217%209.585h-4.786L101.8%2048.312h4.56l5.68%2013.883a44.112%2044.112%200%200%201%207.323-1.774V48.312h9.084c1.703%200%203.156.143%204.061.393%203.453.929%205.727%203.667%205.727%207.323%200%201.917-.738%204.179-2.81%205.691%203.06%201.56%204.501%204.025%204.501%206.93Zm-15.634-8.667a62.664%2062.664%200%200%201%202.06-.036c1.703.012%203.239.131%204.608.37%201.441-.549%202.357-1.727%202.357-3.537%200-1.941-.881-3.144-2.488-3.667-.548-.18-1.358-.286-2.322-.286h-4.215v7.156Zm-16.55%203.905-3.715-9.894-6.394%2016.502c2.833-2.595%206.263-4.858%2010.109-6.608Zm27.254%204.74c0-2.775-3.131-4.347-8.513-4.418-.715%200-1.441.011-2.191.047v8.252h5.918c2.548%200%204.786-1.37%204.786-3.882Z'%20clip-rule='evenodd'/%3e%3c/g%3e%3cdefs%3e%3clinearGradient%20id='b'%20x1='51.47'%20x2='85.916'%20y1='62.946'%20y2='62.946'%20gradientUnits='userSpaceOnUse'%3e%3cstop%20stop-color='%23CD9F28'/%3e%3cstop%20offset='1'%20stop-color='%23ECD80B'/%3e%3c/linearGradient%3e%3cclipPath%20id='a'%3e%3cpath%20fill='%23fff'%20d='M51.47%2045.728h186.104V80.14H51.47z'/%3e%3c/clipPath%3e%3c/defs%3e%3c/svg%3e)


More from Global Finishing Solutions


Explore Other Assets


© 2026 MaintainX. All rights reserved.