


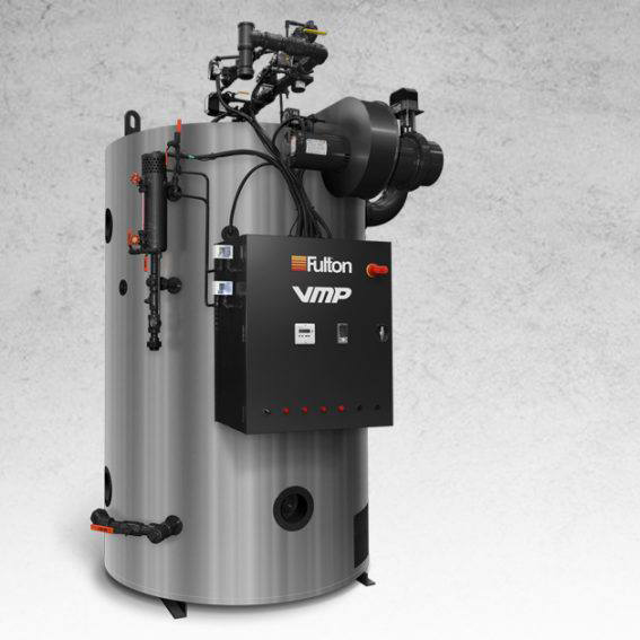
Fulton Companies Gas Fired Steam Boiler VMP-60
Need answers fast?
Explore the manual using AI.
Turn manuals into instant answers
with your AI-powered assistantTurn manuals into instant answers
with your AI-powered assistant
Manual for Fulton Companies Gas Fired Steam Boiler VMP-60
Complete asset maintenance, one click away
Get instant access to all the maintenance information you need. Empower technicians to perform preventive maintenance with asset packages, ready to use right out of the box.

Documents & Manuals
Find all the essential guides in one place.
 Tensioning Guide
- Belt-diagram
- C-120 pulleys
+ 13 more

Work Order Templates
Pre-built workflows to keep your asset running smoothly.
- Daily Electrical System Inspection
- Replace Roller and Pulley
- Install Engine B-120
+ 29 more

Procedures
Integrate maintenance plans directly into your work orders.
- Motion Industries
- Applied Industrial Technologies
- Electrical Brothers
+ 5 more

Parts
Access the parts list for your equipment in MaintainX.
- Drive Motor
- B2 Rollers
- Tensioning System
+ 40 more
Fulton Companies Gas Fired Steam Boiler VMP-60
Create an account to install this asset package.
Maintenance Plans for Fulton Companies Gas Fired Steam Boiler Model VMP-60
Integrate maintenance plans directly into your work orders in MaintainX.
LE Model Burner Tile Replacement
Scroll assembly removed
Top holding clips broken off
Ceramic fiber burner tile removed
Burner tile bottom holding clips need replacement?
New burner tile replaced
Scroll assembly carefully replaced without damaging the ceramic fiber burner tile
Sign off on the burner tile replacement

1 Yearly Boiler Maintenance
1. Have combustion (CO2, O2, CO) and input checked by responsible personnel
2. Dirty flues can cause air flow restrictions resulting in poor combustion and loss of efficiency. Clean flues as follows
a. Remove the outer flue cover plate
b. Remove inner plate and turbultors
c. Remove clean out plugs at lowest part of unit and clean the bottom of combustion chamber
d. Remove all soot from the top, and from the clean out plugs at the bottom with a vacuum cleaner
e. Replace clean out plugs carefully so as not to damage insulation and replace burner and flue cover plates
3. Flush boiler out if necessary. See Section 2 for proper procedure for "Cleaning the Pressure Vessel."
4. Provide annual inspection by a qualified ASME Boiler inspector;
LE Model Servo Motor Replacement
NOTE: If it is determined that a servo motor needs to be replaced, the first step in this process is to verify the model number of the new servo motor is the same as the old servo motor
NOTE: The model number starts with the letters SQM and is displayed on a label on the side of the motor. Once the new motor has been verified to be correct, turn power to the boiler off
Turn off all electricity to the boiler
Remove the cover on the servo motor to be changed
Remove the green wiring plugs and the conduit termination point from the motor by pulling them towards you. A black grounding wire runs from the motor to the conduit termination point. Pull it off from the conduit termination point
Also note the location of the jumper on the left side of the motor
Loosen the allen screws on the motor end of the motor to valve coupling
Unbolt the motor from the mounting bracket and remove the motor
Turn the valve so it is in the closed position and can rotate clockwise to open
6 Monthly Boiler Maintenance
1. Cleaning the gas burner assembly
a. Disconnect the gas head from the burner by disconnecting the union. Remove the burner plate screws. Withdraw the burner assembly and clean the flame rod and ignition electrode
b. Check that the settings of the flame rod, if applicable, and ignition electrode correspond to those in the illustration below
c. Reassemble the burner assembly and check the flame rod setting or scanner setting
d. Check the combustion efficiency of the burner and adjust if necessary
e. Clean probe on top of boiler shell and probes in water column. There must be no pressure on the boiler during the removal of the probes
f. Check refractories for soot or breakage and inspect the stainless steel ring (50-100 HP only)
g. With the boiler under no more than 15 PSI pressure, check that the steam safety valve is operating by lifting the lever
2. Drain condensate tank and clean tank by flushing with hose. Check float valve operation
Furnace Refractory Replacement
Remove the burner plate and top plate assembly up and out of the air to air heat exchanger
Remove the stainless steel combustion ring from the furnace
Remove the clean-out plugs from the bottom sides of the boiler
Break off the top holding clips that were used to keep the refractory in position during shipping
Break up the top and/or bottom refractories and remove the pieces from the boiler through the clean-out plugs
Round and bevel the outer edges of the new refractories
Lower the bottom refractory down the furnace with wire fastened around the refractory in three positions
Install the top refractory in the same manner as the bottom refractory
Seal the outer edges of the top refractory with insulcrete
Parts for Fulton Companies Gas Fired Steam Boiler VMP-60
Access the parts list for your equipment in MaintainX.
Furnace Refractory 24" OD x 8" ID (40 - 60 HP Top)
5-12-2015
Furnace Refractory 24" OD x 10" ID (40 - 60 HP Bottom)
5-12-2016
Furnace Cement - 2 lb. Can
2-12-2000
Furnace Cement - 8 lb. Can
2-12-2001
Furnace Cement - 15 lb. Can
2-12-002
Furnace Refractory 24" OD x 8" ID (40 - 60 HP Top)
5-12-2015
Furnace Refractory 24" OD x 10" ID (40 - 60 HP Bottom)
5-12-2016
Furnace Cement - 2 lb. Can
2-12-2000
Furnace Cement - 8 lb. Can
2-12-2001
Furnace Cement - 15 lb. Can
2-12-002
Furnace Refractory 24" OD x 8" ID (40 - 60 HP Top)
5-12-2015
Furnace Refractory 24" OD x 10" ID (40 - 60 HP Bottom)
5-12-2016
Furnace Cement - 2 lb. Can
2-12-2000
Furnace Cement - 8 lb. Can
2-12-2001
Furnace Cement - 15 lb. Can
2-12-002
Unlock efficiency
with MaintainX CoPilot
MaintainX CoPilot is your expert colleague, on call 24/7, helping your team find the answers they need to keep equipment running.
Reduce Unplanned Downtime
Ensure your team follows consistent procedures to minimize equipment failures and costly delays.
Maximize Asset Availability
Keep your assets running longer and more reliably, with standardized maintenance workflows from OEM manuals.
Lower Maintenance Costs
Turn any technician into an expert to streamline operations, maintain more assets, and reduce overall costs.
Thousands of companies manage their assets with MaintainX

'%3e%3cpath%20fill='url(%23b)'%20d='M66.008%2080.068c-5.084-.786-9.763-3.834-12.442-8.68a16.942%2016.942%200%200%201-1.87-5.18c1.096.19%202.203.476%203.298.87%206.525%202.333%2010.836%207.68%2011.014%2012.99ZM51.47%2061.576c.488-5.524%203.62-10.716%208.847-13.597a17.132%2017.132%200%200%201%2011.335-1.882c-.798%208.145-7.43%2014.848-16.038%2015.599-1.417.119-2.799.07-4.144-.12Zm28.564-11.478a17.513%2017.513%200%200%201%203.727%204.62c4.608%208.335%201.584%2018.813-6.75%2023.409a16.988%2016.988%200%200%201-4.359%201.679%2019.624%2019.624%200%200%201-3.977-12.776c.346-7.561%204.942-13.931%2011.36-16.932Z'/%3e%3cpath%20fill='%23110F0D'%20fill-rule='evenodd'%20d='M142.831%2048.324h4.977V77.03h-4.977V48.324Zm27.278%2013.002c.322%201.048.453%202.263.453%203.62v12.073h-4.787V66.208c0-.75-.047-1.572-.154-2.143-.453-2.382-1.822-3.572-4.215-3.572-2.31%200-3.882%201.274-4.43%203.476-.143.596-.226%201.405-.226%202.25v10.8h-4.787V56.623h4.477v2.989c1.536-2.5%203.906-3.43%206.371-3.43%203.488%200%206.263%201.68%207.298%205.144Zm24.636%207.323c0%203.882-2.358%206.525-5.763%207.727-1.298.453-2.632.643-4.62.643h-10.169V48.324h9.085c1.691%200%203.156.143%204.049.38%203.465.93%205.727%203.68%205.727%207.335%200%202.441-.81%204.156-2.762%205.644%202.905%201.417%204.453%203.727%204.453%206.966Zm-15.634-8.656h4.584c1.024%200%201.917-.143%202.536-.417%201.215-.548%201.905-1.608%201.905-3.167%200-1.548-.643-2.572-1.845-3.132-.691-.31-1.762-.452-2.763-.452h-4.417v7.168Zm10.716%208.465c0-1.536-.893-3.37-3.227-3.893-.428-.095-1.036-.143-1.571-.143h-5.918v8.085h5.501c.56%200%201.429-.048%201.953-.167%201.94-.453%203.262-1.846%203.262-3.882Zm47.747-11.847-8.097%2020.408h-4.429l-8.109-20.408h5.191l5.192%2014.574%205.108-14.574h5.144Zm-20.218%2010.002c0%20.69-.036%201.262-.155%201.94h-15.943c.631%202.87%202.714%204.728%205.882%204.728%202.131%200%203.607-.882%204.703-2.525h4.87c-1.762%204.144-5.204%206.692-9.657%206.692-6.084%200-10.537-4.858-10.537-10.49%200-6.108%204.524-10.776%2010.335-10.776%206.239%200%2010.442%204.954%2010.502%2010.43Zm-4.763-1.405c-.333-2.846-2.643-4.858-5.691-4.858-2.894%200-5.287%201.929-5.621%204.858h11.312Zm-72.667%203.44c0%204.787-3.287%208.371-9.419%208.371H119.363V64.66c-1.917.274-3.87.69-5.811%201.238l4.537%2011.121h-5.418l-3.596-9.585c-5.144%202.084-10.085%205.216-14.217%209.585h-4.786L101.8%2048.312h4.56l5.68%2013.883a44.112%2044.112%200%200%201%207.323-1.774V48.312h9.084c1.703%200%203.156.143%204.061.393%203.453.929%205.727%203.667%205.727%207.323%200%201.917-.738%204.179-2.81%205.691%203.06%201.56%204.501%204.025%204.501%206.93Zm-15.634-8.667a62.664%2062.664%200%200%201%202.06-.036c1.703.012%203.239.131%204.608.37%201.441-.549%202.357-1.727%202.357-3.537%200-1.941-.881-3.144-2.488-3.667-.548-.18-1.358-.286-2.322-.286h-4.215v7.156Zm-16.55%203.905-3.715-9.894-6.394%2016.502c2.833-2.595%206.263-4.858%2010.109-6.608Zm27.254%204.74c0-2.775-3.131-4.347-8.513-4.418-.715%200-1.441.011-2.191.047v8.252h5.918c2.548%200%204.786-1.37%204.786-3.882Z'%20clip-rule='evenodd'/%3e%3c/g%3e%3cdefs%3e%3clinearGradient%20id='b'%20x1='51.47'%20x2='85.916'%20y1='62.946'%20y2='62.946'%20gradientUnits='userSpaceOnUse'%3e%3cstop%20stop-color='%23CD9F28'/%3e%3cstop%20offset='1'%20stop-color='%23ECD80B'/%3e%3c/linearGradient%3e%3cclipPath%20id='a'%3e%3cpath%20fill='%23fff'%20d='M51.47%2045.728h186.104V80.14H51.47z'/%3e%3c/clipPath%3e%3c/defs%3e%3c/svg%3e)


More from Fulton Companies


Explore Other Assets


© 2026 MaintainX. All rights reserved.