


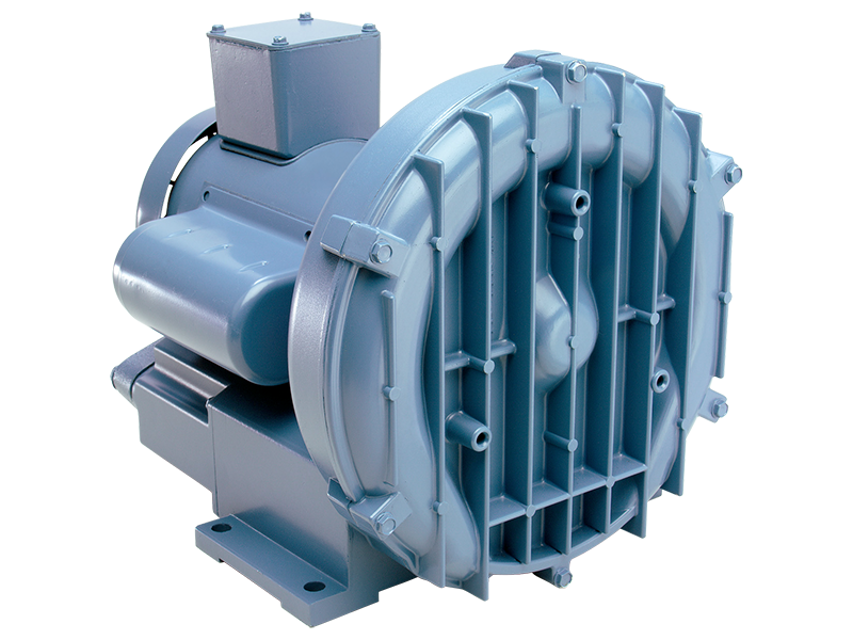
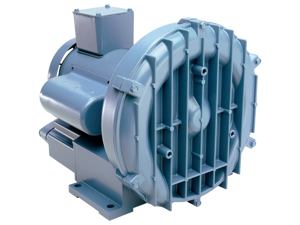
Ametek Direct Drive Regenerative Blower HiE858BB72W
Need answers fast?
Explore the manual using AI.
Turn manuals into instant answers
with your AI-powered assistantTurn manuals into instant answers
with your AI-powered assistant
Manual for Ametek Direct Drive Regenerative Blower HiE858BB72W
Complete asset maintenance, one click away
Get instant access to all the maintenance information you need. Empower technicians to perform preventive maintenance with asset packages, ready to use right out of the box.

Documents & Manuals
Find all the essential guides in one place.
 Tensioning Guide
- Belt-diagram
- C-120 pulleys
+ 13 more

Work Order Templates
Pre-built workflows to keep your asset running smoothly.
- Daily Electrical System Inspection
- Replace Roller and Pulley
- Install Engine B-120
+ 29 more

Procedures
Integrate maintenance plans directly into your work orders.
- Motion Industries
- Applied Industrial Technologies
- Electrical Brothers
+ 5 more

Parts
Access the parts list for your equipment in MaintainX.
- Drive Motor
- B2 Rollers
- Tensioning System
+ 40 more
Ametek Direct Drive Regenerative Blower HiE858BB72W
Create an account to install this asset package.
Maintenance Plans for Ametek Direct Drive Regenerative Blower Model HiE858BB72W
Integrate maintenance plans directly into your work orders in MaintainX.
Blower Disassembly
Blower Disassembly:
WARNING: Attempting to repair or diagnose a blower may void Rotron’s warranty. It may also be difficult to successfully disassemble and reassemble the unit.
1) Disconnect the power leads. CAUTION: Be sure the power is disconnected before doing any work whatsoever on the unit.
2) Remove or separate piping and/or mufflers and filters from the unit.
3) Remove the cover bolts and then the cover. NOTE: Some units are equipped with seals. It is mandatory that these seals be replaced once the unit has been opened.
4) Remove the impeller bolt and washers and then remove the impeller. NOTE: Never pry on the edges of the impeller. Use a puller as necessary.
5) Carefully note the number and location of the shims. Remove and set them aside. NOTE: If the disassembly was for inspection and cleaning the unit may now be reassembled by reversing the above steps. If motor servicing or replacement and/or impeller replacement is required the same shims may not be used. It will be necessary to re-shim the impeller according to the procedure explained under assembly.
6) Remove the housing bolts and remove the motor assembly (arbor/.housing on remote drive models).
7) Arbor disassembly (Applicable on remote drive models only):

Impeller Shimming
WARNING: This unit may be difficult to shim. Extreme care may be exercised.
Tools Needed: Machinist’s Parallel Bar, Vernier Caliper with depth measuring capability, Feeler gauges or depth gauge
Distance from the flange face to the housing (A)
Distance from the flange face to the motor shaft shoulder (B)
Impeller Thickness (C)
Measurements (A) and (B) are made by laying the parallel bar across the housing flange face and measuring to the proper points. Each measurement should be made at three points, and the average of the readings should be used.
Shim Thickness = B – (A+C)/2
After the impeller installation (step #4 below) the impeller/cover clearance can be checked with feeler gauges, laying the parallel bar across the housing flange face. This clearance should nominally be (A-C)/2.
Place the impeller onto the shaft making sure the shaft key is in place and fasten with the bolt, washer and spacer as applicable. Torque the impeller bolt per the table on page 5. Once fastened carefully rotate the impeller to be sure it turns freely.
Muffler Material Replacement
Remove the manifold cover bolts and them manifold cover
Remove and replace the muffler material if necessary. On blowers with fiberglass acoustical wrap the tubular retaining screens with the fiberglass matting before sliding the muffler pads over the screens
Reassemble by reversing the procedure
Sign off on the muffler material replacement
Blower Reassembling
Blower Reassembly
Place the assembled motor against the rear of the housing and fasten with the bolts and washer
Re-shim the impeller according to the Impeller Shimming Procedure
Did the blower have a seal?
Replace the seal with a new one
Place the impeller onto the shaft making sure the shaft key is in place and fasten with the bolt, washer and spacer as applicable
Torque the impeller bolt per the table on page 5
Rotate the impeller to be sure it turns freely
Replace the cover and fasten with bolts
Parts for Ametek Direct Drive Regenerative Blower HiE858BB72W
Access the parts list for your equipment in MaintainX.
Key Motor Shaft
511532
Screw, Flange
155067
Flange
511614
Housing
515410
Screw, Hsg /Motor
155034
Key Motor Shaft
511532
Screw, Flange
155067
Flange
511614
Housing
515410
Screw, Hsg /Motor
155034
Key Motor Shaft
511532
Screw, Flange
155067
Flange
511614
Housing
515410
Screw, Hsg /Motor
155034
Unlock efficiency
with MaintainX CoPilot
MaintainX CoPilot is your expert colleague, on call 24/7, helping your team find the answers they need to keep equipment running.
Reduce Unplanned Downtime
Ensure your team follows consistent procedures to minimize equipment failures and costly delays.
Maximize Asset Availability
Keep your assets running longer and more reliably, with standardized maintenance workflows from OEM manuals.
Lower Maintenance Costs
Turn any technician into an expert to streamline operations, maintain more assets, and reduce overall costs.
Thousands of companies manage their assets with MaintainX

'%3e%3cpath%20fill='url(%23b)'%20d='M66.008%2080.068c-5.084-.786-9.763-3.834-12.442-8.68a16.942%2016.942%200%200%201-1.87-5.18c1.096.19%202.203.476%203.298.87%206.525%202.333%2010.836%207.68%2011.014%2012.99ZM51.47%2061.576c.488-5.524%203.62-10.716%208.847-13.597a17.132%2017.132%200%200%201%2011.335-1.882c-.798%208.145-7.43%2014.848-16.038%2015.599-1.417.119-2.799.07-4.144-.12Zm28.564-11.478a17.513%2017.513%200%200%201%203.727%204.62c4.608%208.335%201.584%2018.813-6.75%2023.409a16.988%2016.988%200%200%201-4.359%201.679%2019.624%2019.624%200%200%201-3.977-12.776c.346-7.561%204.942-13.931%2011.36-16.932Z'/%3e%3cpath%20fill='%23110F0D'%20fill-rule='evenodd'%20d='M142.831%2048.324h4.977V77.03h-4.977V48.324Zm27.278%2013.002c.322%201.048.453%202.263.453%203.62v12.073h-4.787V66.208c0-.75-.047-1.572-.154-2.143-.453-2.382-1.822-3.572-4.215-3.572-2.31%200-3.882%201.274-4.43%203.476-.143.596-.226%201.405-.226%202.25v10.8h-4.787V56.623h4.477v2.989c1.536-2.5%203.906-3.43%206.371-3.43%203.488%200%206.263%201.68%207.298%205.144Zm24.636%207.323c0%203.882-2.358%206.525-5.763%207.727-1.298.453-2.632.643-4.62.643h-10.169V48.324h9.085c1.691%200%203.156.143%204.049.38%203.465.93%205.727%203.68%205.727%207.335%200%202.441-.81%204.156-2.762%205.644%202.905%201.417%204.453%203.727%204.453%206.966Zm-15.634-8.656h4.584c1.024%200%201.917-.143%202.536-.417%201.215-.548%201.905-1.608%201.905-3.167%200-1.548-.643-2.572-1.845-3.132-.691-.31-1.762-.452-2.763-.452h-4.417v7.168Zm10.716%208.465c0-1.536-.893-3.37-3.227-3.893-.428-.095-1.036-.143-1.571-.143h-5.918v8.085h5.501c.56%200%201.429-.048%201.953-.167%201.94-.453%203.262-1.846%203.262-3.882Zm47.747-11.847-8.097%2020.408h-4.429l-8.109-20.408h5.191l5.192%2014.574%205.108-14.574h5.144Zm-20.218%2010.002c0%20.69-.036%201.262-.155%201.94h-15.943c.631%202.87%202.714%204.728%205.882%204.728%202.131%200%203.607-.882%204.703-2.525h4.87c-1.762%204.144-5.204%206.692-9.657%206.692-6.084%200-10.537-4.858-10.537-10.49%200-6.108%204.524-10.776%2010.335-10.776%206.239%200%2010.442%204.954%2010.502%2010.43Zm-4.763-1.405c-.333-2.846-2.643-4.858-5.691-4.858-2.894%200-5.287%201.929-5.621%204.858h11.312Zm-72.667%203.44c0%204.787-3.287%208.371-9.419%208.371H119.363V64.66c-1.917.274-3.87.69-5.811%201.238l4.537%2011.121h-5.418l-3.596-9.585c-5.144%202.084-10.085%205.216-14.217%209.585h-4.786L101.8%2048.312h4.56l5.68%2013.883a44.112%2044.112%200%200%201%207.323-1.774V48.312h9.084c1.703%200%203.156.143%204.061.393%203.453.929%205.727%203.667%205.727%207.323%200%201.917-.738%204.179-2.81%205.691%203.06%201.56%204.501%204.025%204.501%206.93Zm-15.634-8.667a62.664%2062.664%200%200%201%202.06-.036c1.703.012%203.239.131%204.608.37%201.441-.549%202.357-1.727%202.357-3.537%200-1.941-.881-3.144-2.488-3.667-.548-.18-1.358-.286-2.322-.286h-4.215v7.156Zm-16.55%203.905-3.715-9.894-6.394%2016.502c2.833-2.595%206.263-4.858%2010.109-6.608Zm27.254%204.74c0-2.775-3.131-4.347-8.513-4.418-.715%200-1.441.011-2.191.047v8.252h5.918c2.548%200%204.786-1.37%204.786-3.882Z'%20clip-rule='evenodd'/%3e%3c/g%3e%3cdefs%3e%3clinearGradient%20id='b'%20x1='51.47'%20x2='85.916'%20y1='62.946'%20y2='62.946'%20gradientUnits='userSpaceOnUse'%3e%3cstop%20stop-color='%23CD9F28'/%3e%3cstop%20offset='1'%20stop-color='%23ECD80B'/%3e%3c/linearGradient%3e%3cclipPath%20id='a'%3e%3cpath%20fill='%23fff'%20d='M51.47%2045.728h186.104V80.14H51.47z'/%3e%3c/clipPath%3e%3c/defs%3e%3c/svg%3e)


More from Ametek


Explore Other Assets


© 2026 MaintainX. All rights reserved.