


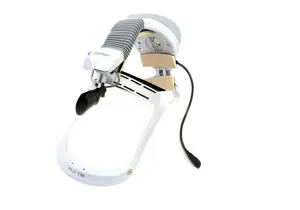
Stryker Stretcher MX-PRO
Need answers fast?
Explore the manual using AI.
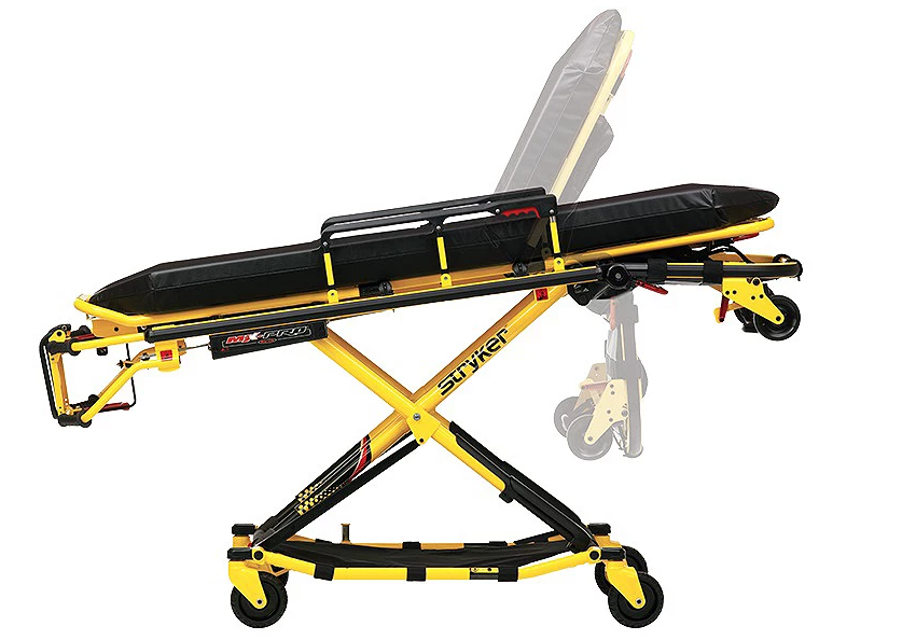
The Stryker Stretcher MX-PRO is a high-performance medical stretcher designed for optimal patient transport. Known for its durability and advanced features, this stretcher model ensures safety and comfort in emergency situations, making it an essential asset for healthcare providers.
Turn manuals into instant answers
with your AI-powered assistantTurn manuals into instant answers
with your AI-powered assistant
Manual for Stryker Stretcher MX-PRO
Complete asset maintenance, one click away
Get instant access to all the maintenance information you need. Empower technicians to perform preventive maintenance with asset packages, ready to use right out of the box.

Documents & Manuals
Find all the essential guides in one place.
 Tensioning Guide
- Belt-diagram
- C-120 pulleys
+ 13 more

Work Order Templates
Pre-built workflows to keep your asset running smoothly.
- Daily Electrical System Inspection
- Replace Roller and Pulley
- Install Engine B-120
+ 29 more

Procedures
Integrate maintenance plans directly into your work orders.
- Motion Industries
- Applied Industrial Technologies
- Electrical Brothers
+ 5 more

Parts
Access the parts list for your equipment in MaintainX.
- Drive Motor
- B2 Rollers
- Tensioning System
+ 40 more
Stryker Stretcher MX-PRO
Create an account to install this asset package.
Maintenance Plans for Stryker Stretcher Model MX-PRO
Integrate maintenance plans directly into your work orders in MaintainX.
The 2-Stage I.V. Pole Maintenance
Pole lifted and pivoted from the storage position and pushed down until it is locked into receptacle (A)
Lock actuator (B) turned counterclockwise and telescoping portion (C) of the pole pulled up to raise it to the desired height
Lock actuator (B) turned clockwise to lock the telescoping portion in place
I.V. bags hanged on the I.V. hook (D)
Sign off on the I.V. Pole Maintenance

Base Lubrication
Place the cot in the highest position.
Turn the cot upside down with the base legs facing up.
Spray Tri−FlowTM with Teflon® lubricant in the gap between the upper and lower lift tubes on both foot end legs.
Apply Tri−FlowTM to right and left height adjustment racks providing an even application.
Apply Tri−FlowTM to the right and left slide plates providing an even application.
Let the cot sit for 5 minutes.
Turn the cot back over. Raise and lower the cot a few times to work the lubricant throughout the applied areas.
Wipe any excess lubricant from the base tubes.
Sign off on the base lubrication
Pneumatic Backrest Adjustment
Move the backrest to 75 degrees
Loosen the hex nut (item F) on the backrest pivot (item J) while holding the set screw (item H) fixed in the pivot
Turn the set screw (item H) until there is no play between the backrest release handle (item K) and the pneumatic cylinder release button
Ensure the backrest will travel from flat to at least 75 degrees
Lower the backrest to a 5−10 degree angle and release the handle. Apply approximately 50 pounds downward force to the end of the backrest
Tighten the hex nut (item F) while holding the set screw (item H) fixed in the pivot
Sign off on the pneumatic backrest adjustment
Pedi-MateTM Infant Restraint System Attachment Maintenance
Remove any restraints already attached to the cot
Raise the cot backrest to the full upright position
Position the Pedi-MateTM pad flat on the backrest with the black backrest straps out
Wrap the straps around the backrest and insert the ends of the straps through the brackets. Securely fasten the buckle
Pull firmly on the end of the adjustable backrest strap and tighten it securely
Insert the mainframe straps between the cot frame and the mattress. To ensure the release button is toward the foot end of the cot, insert the buckle behind the litter crossbrace and bring it up in front of the crossbrace.Secure the buckle around the crossbrace, leaving a little slack in the strap for final adjustment
Verify all the straps are snug and fastened securely
Sign off on the Pedi-MateTM Infant Restraint System Attachment Maintenance
The Safety Hook Replacement
Cot removed from the fastener and unloaded from the vehicle
Position of the load wheels and the safety bar noted
Safety hook centered on the cot safety bar, with the hook facing the front of the vehicle
Distance of the safety hook face from the leading edge of the door sill
Position of the safety hook marked on the patient compartment floor
Vehicle doors can close and load wheels remain on the patient compartment floor when the cot is loaded and unloaded
Bumper and bumper step do not interfere with the operation of the cot
Holes for the socket head cap screws drilled
Safety hook fastened to the patient compartment floor
Parts for Stryker Stretcher MX-PRO
Access the parts list for your equipment in MaintainX.
Part Name
6082-101-011
Base Assembly
6082-205-050
Outer Rail End Cap
6082-037-010
Hex Nut
0016-028-000
Washer
0011-448-000
Part Name
6082-101-011
Base Assembly
6082-205-050
Outer Rail End Cap
6082-037-010
Hex Nut
0016-028-000
Washer
0011-448-000
Part Name
6082-101-011
Base Assembly
6082-205-050
Outer Rail End Cap
6082-037-010
Hex Nut
0016-028-000
Washer
0011-448-000
Unlock efficiency
with MaintainX CoPilot
MaintainX CoPilot is your expert colleague, on call 24/7, helping your team find the answers they need to keep equipment running.
Reduce Unplanned Downtime
Ensure your team follows consistent procedures to minimize equipment failures and costly delays.
Maximize Asset Availability
Keep your assets running longer and more reliably, with standardized maintenance workflows from OEM manuals.
Lower Maintenance Costs
Turn any technician into an expert to streamline operations, maintain more assets, and reduce overall costs.
Thousands of companies manage their assets with MaintainX

'%3e%3cpath%20fill='url(%23b)'%20d='M66.008%2080.068c-5.084-.786-9.763-3.834-12.442-8.68a16.942%2016.942%200%200%201-1.87-5.18c1.096.19%202.203.476%203.298.87%206.525%202.333%2010.836%207.68%2011.014%2012.99ZM51.47%2061.576c.488-5.524%203.62-10.716%208.847-13.597a17.132%2017.132%200%200%201%2011.335-1.882c-.798%208.145-7.43%2014.848-16.038%2015.599-1.417.119-2.799.07-4.144-.12Zm28.564-11.478a17.513%2017.513%200%200%201%203.727%204.62c4.608%208.335%201.584%2018.813-6.75%2023.409a16.988%2016.988%200%200%201-4.359%201.679%2019.624%2019.624%200%200%201-3.977-12.776c.346-7.561%204.942-13.931%2011.36-16.932Z'/%3e%3cpath%20fill='%23110F0D'%20fill-rule='evenodd'%20d='M142.831%2048.324h4.977V77.03h-4.977V48.324Zm27.278%2013.002c.322%201.048.453%202.263.453%203.62v12.073h-4.787V66.208c0-.75-.047-1.572-.154-2.143-.453-2.382-1.822-3.572-4.215-3.572-2.31%200-3.882%201.274-4.43%203.476-.143.596-.226%201.405-.226%202.25v10.8h-4.787V56.623h4.477v2.989c1.536-2.5%203.906-3.43%206.371-3.43%203.488%200%206.263%201.68%207.298%205.144Zm24.636%207.323c0%203.882-2.358%206.525-5.763%207.727-1.298.453-2.632.643-4.62.643h-10.169V48.324h9.085c1.691%200%203.156.143%204.049.38%203.465.93%205.727%203.68%205.727%207.335%200%202.441-.81%204.156-2.762%205.644%202.905%201.417%204.453%203.727%204.453%206.966Zm-15.634-8.656h4.584c1.024%200%201.917-.143%202.536-.417%201.215-.548%201.905-1.608%201.905-3.167%200-1.548-.643-2.572-1.845-3.132-.691-.31-1.762-.452-2.763-.452h-4.417v7.168Zm10.716%208.465c0-1.536-.893-3.37-3.227-3.893-.428-.095-1.036-.143-1.571-.143h-5.918v8.085h5.501c.56%200%201.429-.048%201.953-.167%201.94-.453%203.262-1.846%203.262-3.882Zm47.747-11.847-8.097%2020.408h-4.429l-8.109-20.408h5.191l5.192%2014.574%205.108-14.574h5.144Zm-20.218%2010.002c0%20.69-.036%201.262-.155%201.94h-15.943c.631%202.87%202.714%204.728%205.882%204.728%202.131%200%203.607-.882%204.703-2.525h4.87c-1.762%204.144-5.204%206.692-9.657%206.692-6.084%200-10.537-4.858-10.537-10.49%200-6.108%204.524-10.776%2010.335-10.776%206.239%200%2010.442%204.954%2010.502%2010.43Zm-4.763-1.405c-.333-2.846-2.643-4.858-5.691-4.858-2.894%200-5.287%201.929-5.621%204.858h11.312Zm-72.667%203.44c0%204.787-3.287%208.371-9.419%208.371H119.363V64.66c-1.917.274-3.87.69-5.811%201.238l4.537%2011.121h-5.418l-3.596-9.585c-5.144%202.084-10.085%205.216-14.217%209.585h-4.786L101.8%2048.312h4.56l5.68%2013.883a44.112%2044.112%200%200%201%207.323-1.774V48.312h9.084c1.703%200%203.156.143%204.061.393%203.453.929%205.727%203.667%205.727%207.323%200%201.917-.738%204.179-2.81%205.691%203.06%201.56%204.501%204.025%204.501%206.93Zm-15.634-8.667a62.664%2062.664%200%200%201%202.06-.036c1.703.012%203.239.131%204.608.37%201.441-.549%202.357-1.727%202.357-3.537%200-1.941-.881-3.144-2.488-3.667-.548-.18-1.358-.286-2.322-.286h-4.215v7.156Zm-16.55%203.905-3.715-9.894-6.394%2016.502c2.833-2.595%206.263-4.858%2010.109-6.608Zm27.254%204.74c0-2.775-3.131-4.347-8.513-4.418-.715%200-1.441.011-2.191.047v8.252h5.918c2.548%200%204.786-1.37%204.786-3.882Z'%20clip-rule='evenodd'/%3e%3c/g%3e%3cdefs%3e%3clinearGradient%20id='b'%20x1='51.47'%20x2='85.916'%20y1='62.946'%20y2='62.946'%20gradientUnits='userSpaceOnUse'%3e%3cstop%20stop-color='%23CD9F28'/%3e%3cstop%20offset='1'%20stop-color='%23ECD80B'/%3e%3c/linearGradient%3e%3cclipPath%20id='a'%3e%3cpath%20fill='%23fff'%20d='M51.47%2045.728h186.104V80.14H51.47z'/%3e%3c/clipPath%3e%3c/defs%3e%3c/svg%3e)


More from Stryker


Explore Other Assets


© 2026 MaintainX. All rights reserved.