


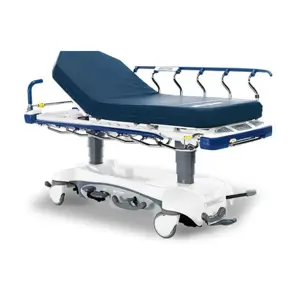
Stryker Stretcher 6500-201-000
Need answers fast?
Explore the manual using AI.

The Stryker Stretcher 6500-201-000 is a high-quality medical transport solution designed for patient safety and comfort. This stretcher features advanced hydraulic systems and durable construction, making it ideal for emergency and hospital settings. Regular maintenance ensures optimal performance and longevity of this essential equipment.
Turn manuals into instant answers
with your AI-powered assistantTurn manuals into instant answers
with your AI-powered assistant
Manual for Stryker Stretcher 6500-201-000
Complete asset maintenance, one click away
Get instant access to all the maintenance information you need. Empower technicians to perform preventive maintenance with asset packages, ready to use right out of the box.

Documents & Manuals
Find all the essential guides in one place.
 Tensioning Guide
- Belt-diagram
- C-120 pulleys
+ 13 more

Work Order Templates
Pre-built workflows to keep your asset running smoothly.
- Daily Electrical System Inspection
- Replace Roller and Pulley
- Install Engine B-120
+ 29 more

Procedures
Integrate maintenance plans directly into your work orders.
- Motion Industries
- Applied Industrial Technologies
- Electrical Brothers
+ 5 more

Parts
Access the parts list for your equipment in MaintainX.
- Drive Motor
- B2 Rollers
- Tensioning System
+ 40 more
Stryker Stretcher 6500-201-000
Create an account to install this asset package.
Maintenance Plans for Stryker Stretcher Model 6500-201-000
Integrate maintenance plans directly into your work orders in MaintainX.
Positioning And Installing The Safety Hook
Place the cot in the cot fastener
Remove the cot from the fastener and unload it from the vehicle
Note the position of the load wheels and the safety bar
Center the safety hook on the cot safety bar
Mark the position of the safety hook on the patient compartment floor
Ensure the safety hook is installed as close as possible to the rear of the vehicle while allowing the vehicle doors to close
Ensure the bumper and bumper step don’t interfere with the operation of the cot
Drill the holes for the socket head cap screws
Attach the safety hook to the patient compartment floor

Ambulance Cot Motion Maintenance
All the restraint straps are securely buckled around the patient
The cot can be in any position for rolling
When rolling the cot with a patient on it, position an operator at the foot end and one at the head end of the cot at all times
During transport, approach door sills and/or other low obstacles squarely and lift each set of wheels over the obstacle separately
Sign off on the ambulance cot motion maintenance
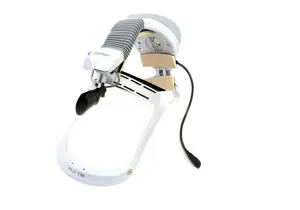
Pedi-Matetm Infant Restraint System Maintenance
Remove any restraints already attached to the cot
Raise the cot backrest to the full upright position
Position the Pedi-MateTM pad flat on the backrest with the black backrest straps out
Wrap the straps around the backrest and insert the ends of the straps through the brackets. Securely fasten the buckle
Pull firmly on the end of the adjustable backrest strap and tighten it securely
Insert the mainframe straps between the cot frame and the mattress. To ensure the release button is toward the foot end of the cot, insert the buckle behind the litter cross brace and bring it up in front of the cross brace
Verify all the straps are snug and fastened securely
Sign off on the Pedi-Matetm Infant Restraint System Maintenance
24 Hourly / 12 Monthly Maintenance
Ambulance cot and fastener fit and function properly
Safety bar engages the vehicle safety hook properly
Cylinder is adjusted so the lock nut is tight and the cot stops moving when it hits the dead stops
Release handle returns to the stowed position
All welds intact, not cracked or broken
Warning labels present, legible
Tires in good condition
Optional wheel locks checked and adjusted as necessary
Sign off on the maintenance check
6 Hourly / 3 Monthly Maintenance
All fasteners are secure
No hydraulic fluid (red) leaks
Motor mount fasteners are secure
No hydraulic fluid leaks
No leaks in the reservoir
No damage or pinching of wiring harness, cables or lines
No damaged connectors
Base extends/retracts smoothly when the manual release is engaged
With 100 lbs or more on the cot, the cot does not lower when the manual release is pulled
Parts for Stryker Stretcher 6500-201-000
Access the parts list for your equipment in MaintainX.
Stryker Label
6082-090-043
Nylock Hex Nut
0016-035-000
Head Section Assembly
6500-001-020
Foot End Assembly
6500-001-015
Outer Rail Bumper
6500-001-127
Stryker Label
6082-090-043
Nylock Hex Nut
0016-035-000
Head Section Assembly
6500-001-020
Foot End Assembly
6500-001-015
Outer Rail Bumper
6500-001-127
Stryker Label
6082-090-043
Nylock Hex Nut
0016-035-000
Head Section Assembly
6500-001-020
Foot End Assembly
6500-001-015
Outer Rail Bumper
6500-001-127
Unlock efficiency
with MaintainX CoPilot
MaintainX CoPilot is your expert colleague, on call 24/7, helping your team find the answers they need to keep equipment running.
Reduce Unplanned Downtime
Ensure your team follows consistent procedures to minimize equipment failures and costly delays.
Maximize Asset Availability
Keep your assets running longer and more reliably, with standardized maintenance workflows from OEM manuals.
Lower Maintenance Costs
Turn any technician into an expert to streamline operations, maintain more assets, and reduce overall costs.
Thousands of companies manage their assets with MaintainX

'%3e%3cpath%20fill='url(%23b)'%20d='M66.008%2080.068c-5.084-.786-9.763-3.834-12.442-8.68a16.942%2016.942%200%200%201-1.87-5.18c1.096.19%202.203.476%203.298.87%206.525%202.333%2010.836%207.68%2011.014%2012.99ZM51.47%2061.576c.488-5.524%203.62-10.716%208.847-13.597a17.132%2017.132%200%200%201%2011.335-1.882c-.798%208.145-7.43%2014.848-16.038%2015.599-1.417.119-2.799.07-4.144-.12Zm28.564-11.478a17.513%2017.513%200%200%201%203.727%204.62c4.608%208.335%201.584%2018.813-6.75%2023.409a16.988%2016.988%200%200%201-4.359%201.679%2019.624%2019.624%200%200%201-3.977-12.776c.346-7.561%204.942-13.931%2011.36-16.932Z'/%3e%3cpath%20fill='%23110F0D'%20fill-rule='evenodd'%20d='M142.831%2048.324h4.977V77.03h-4.977V48.324Zm27.278%2013.002c.322%201.048.453%202.263.453%203.62v12.073h-4.787V66.208c0-.75-.047-1.572-.154-2.143-.453-2.382-1.822-3.572-4.215-3.572-2.31%200-3.882%201.274-4.43%203.476-.143.596-.226%201.405-.226%202.25v10.8h-4.787V56.623h4.477v2.989c1.536-2.5%203.906-3.43%206.371-3.43%203.488%200%206.263%201.68%207.298%205.144Zm24.636%207.323c0%203.882-2.358%206.525-5.763%207.727-1.298.453-2.632.643-4.62.643h-10.169V48.324h9.085c1.691%200%203.156.143%204.049.38%203.465.93%205.727%203.68%205.727%207.335%200%202.441-.81%204.156-2.762%205.644%202.905%201.417%204.453%203.727%204.453%206.966Zm-15.634-8.656h4.584c1.024%200%201.917-.143%202.536-.417%201.215-.548%201.905-1.608%201.905-3.167%200-1.548-.643-2.572-1.845-3.132-.691-.31-1.762-.452-2.763-.452h-4.417v7.168Zm10.716%208.465c0-1.536-.893-3.37-3.227-3.893-.428-.095-1.036-.143-1.571-.143h-5.918v8.085h5.501c.56%200%201.429-.048%201.953-.167%201.94-.453%203.262-1.846%203.262-3.882Zm47.747-11.847-8.097%2020.408h-4.429l-8.109-20.408h5.191l5.192%2014.574%205.108-14.574h5.144Zm-20.218%2010.002c0%20.69-.036%201.262-.155%201.94h-15.943c.631%202.87%202.714%204.728%205.882%204.728%202.131%200%203.607-.882%204.703-2.525h4.87c-1.762%204.144-5.204%206.692-9.657%206.692-6.084%200-10.537-4.858-10.537-10.49%200-6.108%204.524-10.776%2010.335-10.776%206.239%200%2010.442%204.954%2010.502%2010.43Zm-4.763-1.405c-.333-2.846-2.643-4.858-5.691-4.858-2.894%200-5.287%201.929-5.621%204.858h11.312Zm-72.667%203.44c0%204.787-3.287%208.371-9.419%208.371H119.363V64.66c-1.917.274-3.87.69-5.811%201.238l4.537%2011.121h-5.418l-3.596-9.585c-5.144%202.084-10.085%205.216-14.217%209.585h-4.786L101.8%2048.312h4.56l5.68%2013.883a44.112%2044.112%200%200%201%207.323-1.774V48.312h9.084c1.703%200%203.156.143%204.061.393%203.453.929%205.727%203.667%205.727%207.323%200%201.917-.738%204.179-2.81%205.691%203.06%201.56%204.501%204.025%204.501%206.93Zm-15.634-8.667a62.664%2062.664%200%200%201%202.06-.036c1.703.012%203.239.131%204.608.37%201.441-.549%202.357-1.727%202.357-3.537%200-1.941-.881-3.144-2.488-3.667-.548-.18-1.358-.286-2.322-.286h-4.215v7.156Zm-16.55%203.905-3.715-9.894-6.394%2016.502c2.833-2.595%206.263-4.858%2010.109-6.608Zm27.254%204.74c0-2.775-3.131-4.347-8.513-4.418-.715%200-1.441.011-2.191.047v8.252h5.918c2.548%200%204.786-1.37%204.786-3.882Z'%20clip-rule='evenodd'/%3e%3c/g%3e%3cdefs%3e%3clinearGradient%20id='b'%20x1='51.47'%20x2='85.916'%20y1='62.946'%20y2='62.946'%20gradientUnits='userSpaceOnUse'%3e%3cstop%20stop-color='%23CD9F28'/%3e%3cstop%20offset='1'%20stop-color='%23ECD80B'/%3e%3c/linearGradient%3e%3cclipPath%20id='a'%3e%3cpath%20fill='%23fff'%20d='M51.47%2045.728h186.104V80.14H51.47z'/%3e%3c/clipPath%3e%3c/defs%3e%3c/svg%3e)


More from Stryker


Explore Other Assets


© 2026 MaintainX. All rights reserved.