


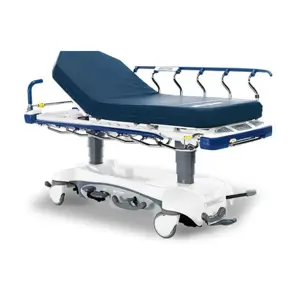
Stryker Stretcher 6252 Stair-PRO
Need answers fast?
Explore the manual using AI.
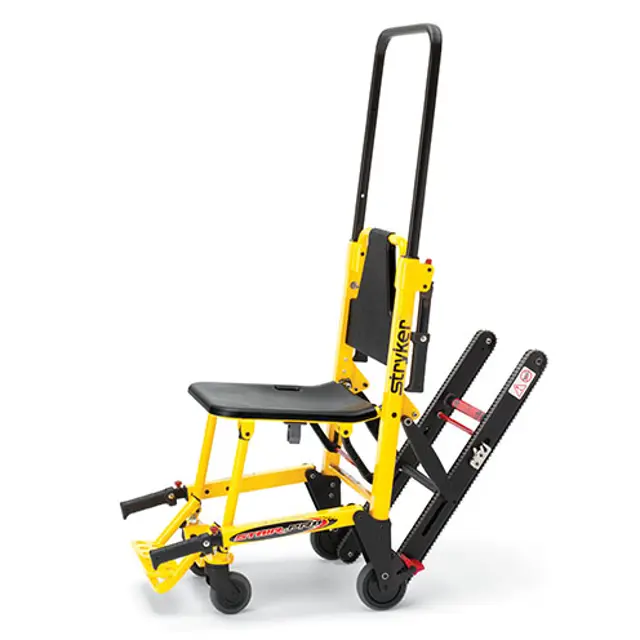
The Stryker Stretcher 6252 Stair-PRO is a high-performance medical transport solution designed for safe and efficient patient handling. This stretcher features advanced hydraulic systems and durable construction, ensuring reliability in emergency and non-emergency situations. Ideal for healthcare facilities, it enhances mobility and safety during patient transfers.
Turn manuals into instant answers
with your AI-powered assistantTurn manuals into instant answers
with your AI-powered assistant
Manual for Stryker Stretcher 6252 Stair-PRO
Complete asset maintenance, one click away
Get instant access to all the maintenance information you need. Empower technicians to perform preventive maintenance with asset packages, ready to use right out of the box.

Documents & Manuals
Find all the essential guides in one place.
 Tensioning Guide
- Belt-diagram
- C-120 pulleys
+ 13 more

Work Order Templates
Pre-built workflows to keep your asset running smoothly.
- Daily Electrical System Inspection
- Replace Roller and Pulley
- Install Engine B-120
+ 29 more

Procedures
Integrate maintenance plans directly into your work orders.
- Motion Industries
- Applied Industrial Technologies
- Electrical Brothers
+ 5 more

Parts
Access the parts list for your equipment in MaintainX.
- Drive Motor
- B2 Rollers
- Tensioning System
+ 40 more
Stryker Stretcher 6252 Stair-PRO
Create an account to install this asset package.
Maintenance Plans for Stryker Stretcher Model 6252 Stair-PRO
Integrate maintenance plans directly into your work orders in MaintainX.
Track Belt Replacement
Warning: This procedure requires trained personnel with PPE!
Using a 7/16” wrench and a 3/16” hex key, remove the socket head cap screw, nut and washer from the track support bracket on only one side of the chair.
Turn the chair upside down so it is resting on the seat frame and back frame.
Using a 1/2” wrench and a 3/16” hex key, remove the button head cap screw, nut, spacers and wheel from the frame on the same side as the parts removed in step one.
Using a 5/32” hex key, remove the two button head cap screws from the track spacer pivots and remove the pivots.
Using two 7/16” wrenches, remove the hex head cap screw, nut and washers from both head end track rollers and remove the rollers.
Remove the belts by threading them through the wheel support plate on the side where the parts were removed.
Thread the new belts through the wheel support plate.
Replace the track rollers, washers, hex head cap screws and nuts.

Vinyl Seat Replacement
Seat section placed on the frame and fitted over the clips
Chair tipped on its back for access to the bottom of the seat tube
Both ends of the front strap inserted through the loops and pulled tight
End of the back strap threaded through the buckle and pulled tight
Chair tipped back up on its wheels
Back section wrapped around the back tube
Both ends of the top strap inserted through the loops and pulled tight
End of the bottom strap threaded through the buckle and pulled tight
Sign off on the vinyl seat replacement
Track Belt Maintenance
Extend the upper control handle, open the Stair-TREADTM system tracks and tip the chair forward until it rests on the handle and the seat section
Using two 7/16” wrenches, remove the hex head bolt, hex nut, two washers, spacer and wheel from both sides of the track frame. Remove the wheel and spacer down in the direction of the floor
Turn both belts over so the small internal teeth are on the outside. Put the belts on the track frame for support while sanding them
For a start/end point reference while sanding, use a permanent marker to color a tooth on the belt
Using a sanding block with 50 Grit sandpaper, sand both wear surfaces on the outside edges of each belt. The purpose is to roughen the surface of the belt just enough to remove the shiny spots caused by normal wear. Do not over sand the belts
Remove all sanding debris from the belts and the track frame
Turn both belts back over so the large teeth are on the outside
Replace the hex head bolt, hex nut, two washers, spacer and wheel on both sides of the track frame
Use two 7/16” wrenches to apply the desired tension to each belt and tighten securely
Restraint Straps Maintenance
Chest Straps Configuration
Wrap each strap around the chair frame, insert the end through the loop on the end of the strap and pull it tight.
Pull the strap across the patient’s chest, lengthening the strap as necessary.
Buckle the strap.
Pull the loose end of the strap to tighten it securely around the patient.
Repeat for the second strap and the lap belt.
Ankle Strap Configuration
Remove the three plastic pieces from the strap.
Thread the strap through one of the plastic “D” rings and slide the ring down to the end of the strap up to the white label.
Checklist
All fasteners secure (reference all assembly drawings)
All welds intact, not cracked or broken
No bent or broken tubing or sheet metal
No debris in wheels
All wheels secure and rolling properly
Front casters secure, rolling and swiveling properly (if equipped)
Wheel locks hold wheels securely when on and clear the wheels when off
Chair unfolds and locks properly
No rips or cracks in seat or back rest
Parts for Stryker Stretcher 6252 Stair-PRO
Access the parts list for your equipment in MaintainX.
Restraint, Ankle
6250-001-127
Pivot Spacer
6250-001-098
Back Rest, Molded ABS
6250-001-116
Foot Support Assembly (page 62)
6251-001-012
Washer
0011-159-000
Restraint, Ankle
6250-001-127
Pivot Spacer
6250-001-098
Back Rest, Molded ABS
6250-001-116
Foot Support Assembly (page 62)
6251-001-012
Washer
0011-159-000
Restraint, Ankle
6250-001-127
Pivot Spacer
6250-001-098
Back Rest, Molded ABS
6250-001-116
Foot Support Assembly (page 62)
6251-001-012
Washer
0011-159-000
Unlock efficiency
with MaintainX CoPilot
MaintainX CoPilot is your expert colleague, on call 24/7, helping your team find the answers they need to keep equipment running.
Reduce Unplanned Downtime
Ensure your team follows consistent procedures to minimize equipment failures and costly delays.
Maximize Asset Availability
Keep your assets running longer and more reliably, with standardized maintenance workflows from OEM manuals.
Lower Maintenance Costs
Turn any technician into an expert to streamline operations, maintain more assets, and reduce overall costs.
Thousands of companies manage their assets with MaintainX

'%3e%3cpath%20fill='url(%23b)'%20d='M66.008%2080.068c-5.084-.786-9.763-3.834-12.442-8.68a16.942%2016.942%200%200%201-1.87-5.18c1.096.19%202.203.476%203.298.87%206.525%202.333%2010.836%207.68%2011.014%2012.99ZM51.47%2061.576c.488-5.524%203.62-10.716%208.847-13.597a17.132%2017.132%200%200%201%2011.335-1.882c-.798%208.145-7.43%2014.848-16.038%2015.599-1.417.119-2.799.07-4.144-.12Zm28.564-11.478a17.513%2017.513%200%200%201%203.727%204.62c4.608%208.335%201.584%2018.813-6.75%2023.409a16.988%2016.988%200%200%201-4.359%201.679%2019.624%2019.624%200%200%201-3.977-12.776c.346-7.561%204.942-13.931%2011.36-16.932Z'/%3e%3cpath%20fill='%23110F0D'%20fill-rule='evenodd'%20d='M142.831%2048.324h4.977V77.03h-4.977V48.324Zm27.278%2013.002c.322%201.048.453%202.263.453%203.62v12.073h-4.787V66.208c0-.75-.047-1.572-.154-2.143-.453-2.382-1.822-3.572-4.215-3.572-2.31%200-3.882%201.274-4.43%203.476-.143.596-.226%201.405-.226%202.25v10.8h-4.787V56.623h4.477v2.989c1.536-2.5%203.906-3.43%206.371-3.43%203.488%200%206.263%201.68%207.298%205.144Zm24.636%207.323c0%203.882-2.358%206.525-5.763%207.727-1.298.453-2.632.643-4.62.643h-10.169V48.324h9.085c1.691%200%203.156.143%204.049.38%203.465.93%205.727%203.68%205.727%207.335%200%202.441-.81%204.156-2.762%205.644%202.905%201.417%204.453%203.727%204.453%206.966Zm-15.634-8.656h4.584c1.024%200%201.917-.143%202.536-.417%201.215-.548%201.905-1.608%201.905-3.167%200-1.548-.643-2.572-1.845-3.132-.691-.31-1.762-.452-2.763-.452h-4.417v7.168Zm10.716%208.465c0-1.536-.893-3.37-3.227-3.893-.428-.095-1.036-.143-1.571-.143h-5.918v8.085h5.501c.56%200%201.429-.048%201.953-.167%201.94-.453%203.262-1.846%203.262-3.882Zm47.747-11.847-8.097%2020.408h-4.429l-8.109-20.408h5.191l5.192%2014.574%205.108-14.574h5.144Zm-20.218%2010.002c0%20.69-.036%201.262-.155%201.94h-15.943c.631%202.87%202.714%204.728%205.882%204.728%202.131%200%203.607-.882%204.703-2.525h4.87c-1.762%204.144-5.204%206.692-9.657%206.692-6.084%200-10.537-4.858-10.537-10.49%200-6.108%204.524-10.776%2010.335-10.776%206.239%200%2010.442%204.954%2010.502%2010.43Zm-4.763-1.405c-.333-2.846-2.643-4.858-5.691-4.858-2.894%200-5.287%201.929-5.621%204.858h11.312Zm-72.667%203.44c0%204.787-3.287%208.371-9.419%208.371H119.363V64.66c-1.917.274-3.87.69-5.811%201.238l4.537%2011.121h-5.418l-3.596-9.585c-5.144%202.084-10.085%205.216-14.217%209.585h-4.786L101.8%2048.312h4.56l5.68%2013.883a44.112%2044.112%200%200%201%207.323-1.774V48.312h9.084c1.703%200%203.156.143%204.061.393%203.453.929%205.727%203.667%205.727%207.323%200%201.917-.738%204.179-2.81%205.691%203.06%201.56%204.501%204.025%204.501%206.93Zm-15.634-8.667a62.664%2062.664%200%200%201%202.06-.036c1.703.012%203.239.131%204.608.37%201.441-.549%202.357-1.727%202.357-3.537%200-1.941-.881-3.144-2.488-3.667-.548-.18-1.358-.286-2.322-.286h-4.215v7.156Zm-16.55%203.905-3.715-9.894-6.394%2016.502c2.833-2.595%206.263-4.858%2010.109-6.608Zm27.254%204.74c0-2.775-3.131-4.347-8.513-4.418-.715%200-1.441.011-2.191.047v8.252h5.918c2.548%200%204.786-1.37%204.786-3.882Z'%20clip-rule='evenodd'/%3e%3c/g%3e%3cdefs%3e%3clinearGradient%20id='b'%20x1='51.47'%20x2='85.916'%20y1='62.946'%20y2='62.946'%20gradientUnits='userSpaceOnUse'%3e%3cstop%20stop-color='%23CD9F28'/%3e%3cstop%20offset='1'%20stop-color='%23ECD80B'/%3e%3c/linearGradient%3e%3cclipPath%20id='a'%3e%3cpath%20fill='%23fff'%20d='M51.47%2045.728h186.104V80.14H51.47z'/%3e%3c/clipPath%3e%3c/defs%3e%3c/svg%3e)


More from Stryker


Explore Other Assets


© 2026 MaintainX. All rights reserved.