


Schneider Electric Low Voltage Capacitor Bank VLVAF5N03519AB
Need answers fast?
Explore the manual using AI.
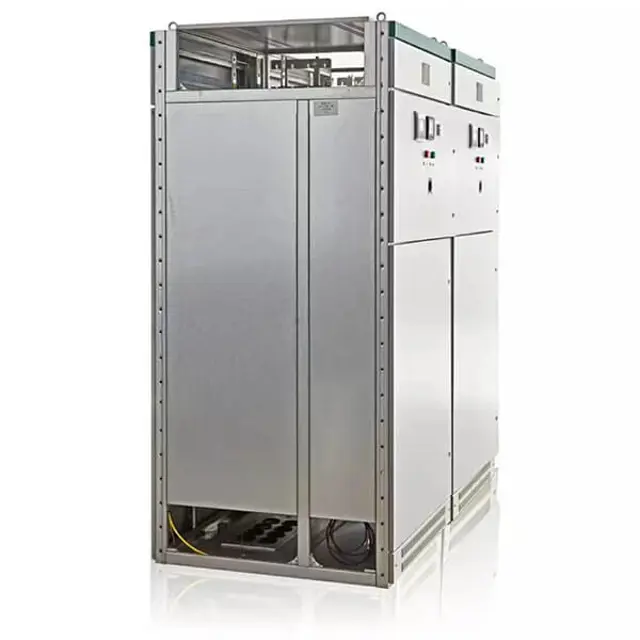
The Schneider Electric Low Voltage Capacitor Bank VLVAF5N03519AB is designed for efficient power factor correction in industrial applications. This model enhances energy efficiency and reduces utility costs, making it an essential component for optimizing electrical systems in various settings.
Turn manuals into instant answers
with your AI-powered assistantTurn manuals into instant answers
with your AI-powered assistant
Manual for Schneider Electric Low Voltage Capacitor Bank VLVAF5N03519AB
Complete asset maintenance, one click away
Get instant access to all the maintenance information you need. Empower technicians to perform preventive maintenance with asset packages, ready to use right out of the box.

Documents & Manuals
Find all the essential guides in one place.
 Tensioning Guide
- Belt-diagram
- C-120 pulleys
+ 13 more

Work Order Templates
Pre-built workflows to keep your asset running smoothly.
- Daily Electrical System Inspection
- Replace Roller and Pulley
- Install Engine B-120
+ 29 more

Procedures
Integrate maintenance plans directly into your work orders.
- Motion Industries
- Applied Industrial Technologies
- Electrical Brothers
+ 5 more

Parts
Access the parts list for your equipment in MaintainX.
- Drive Motor
- B2 Rollers
- Tensioning System
+ 40 more
Schneider Electric Low Voltage Capacitor Bank VLVAF5N03519AB
Create an account to install this asset package.
Maintenance Plans for Schneider Electric Low Voltage Capacitor Bank Model VLVAF5N03519AB
Integrate maintenance plans directly into your work orders in MaintainX.
Initial 3 Monthly Maintenance
- Check the controller display to confirm it is active and there are no alarm conditions (refer to the VarPlus Logic user manual for alarm details)
- Check alarms such as: - Alarm A9: Indicates internal temperature exceeded the thermal limit of 122°F (50°C)
- Alarm A10: Indicates the maximum THD (7%) has been exceeded
- Check that the cubicle ventilation fans are active. If not, verify by adjusting the thermostat (ST1) after powering down the main breaker and wait for 5 minutes before re-engaging
- Check that all ventilation openings are clear
- Listen for any loud noise (>50 dB) with the unit in full operation. Investigate identified noise sources or contact Schneider Electric if unresolved
- De-energize the capacitor bank by opening the disconnect and ensure the external upstream main breaker is open. Follow lock-out, tag-out procedures and wait five minutes before opening the door
- Open the front door and test for line voltage at the bottom of F1, F2, and F3 (control fuses), which should be 0 V
- Manually trip all stage breakers, then reset to ON

Yearly Maintenance
- Repeat all steps outlined in the first scheduled PM
- Use the procedure in "STEP.TST" (page 58) to manually turn the first stage on. Measure and record line-to-line voltage
- Use the procedure in "STEP.TST" to manually turn on each stage one at a time, measuring the stage’s 3-phase line currents and recording results. Turn off the stage before moving to the next
- De-energize the capacitor bank by opening the main disconnect device and wait five minutes
- Test for line AC voltage at the bottom of F1, F2, and F3, which should be 0 V, then repeat the test at the top of F1, F2, and F3
- Use a DC voltage meter to test each capacitor stage for residual DC voltage. Isolate the capacitor if any reading is higher than 1V
- Inspect the capacitor bank for signs of overheating, such as discoloration or flaking
- Check all field-installed bus bar connections and torque values listed on page 55
- Inspect terminal lugs for damage and replace if necessary
Parts for Schneider Electric Low Voltage Capacitor Bank VLVAF5N03519AB
Access the parts list for your equipment in MaintainX.
Circuit Breaker
NS800 N/H
Circuit Breaker
NS1000 N/H
Circuit Breaker
NS1600 N/H
Circuit Breaker
NS1250 N/H
Circuit Breaker
NS800 N/H
Circuit Breaker
NS1000 N/H
Circuit Breaker
NS1600 N/H
Circuit Breaker
NS1250 N/H
Circuit Breaker
NS800 N/H
Circuit Breaker
NS1000 N/H
Circuit Breaker
NS1600 N/H
Circuit Breaker
NS1250 N/H
Unlock efficiency
with MaintainX CoPilot
MaintainX CoPilot is your expert colleague, on call 24/7, helping your team find the answers they need to keep equipment running.
Reduce Unplanned Downtime
Ensure your team follows consistent procedures to minimize equipment failures and costly delays.
Maximize Asset Availability
Keep your assets running longer and more reliably, with standardized maintenance workflows from OEM manuals.
Lower Maintenance Costs
Turn any technician into an expert to streamline operations, maintain more assets, and reduce overall costs.
Thousands of companies manage their assets with MaintainX

'%3e%3cpath%20fill='url(%23b)'%20d='M66.008%2080.068c-5.084-.786-9.763-3.834-12.442-8.68a16.942%2016.942%200%200%201-1.87-5.18c1.096.19%202.203.476%203.298.87%206.525%202.333%2010.836%207.68%2011.014%2012.99ZM51.47%2061.576c.488-5.524%203.62-10.716%208.847-13.597a17.132%2017.132%200%200%201%2011.335-1.882c-.798%208.145-7.43%2014.848-16.038%2015.599-1.417.119-2.799.07-4.144-.12Zm28.564-11.478a17.513%2017.513%200%200%201%203.727%204.62c4.608%208.335%201.584%2018.813-6.75%2023.409a16.988%2016.988%200%200%201-4.359%201.679%2019.624%2019.624%200%200%201-3.977-12.776c.346-7.561%204.942-13.931%2011.36-16.932Z'/%3e%3cpath%20fill='%23110F0D'%20fill-rule='evenodd'%20d='M142.831%2048.324h4.977V77.03h-4.977V48.324Zm27.278%2013.002c.322%201.048.453%202.263.453%203.62v12.073h-4.787V66.208c0-.75-.047-1.572-.154-2.143-.453-2.382-1.822-3.572-4.215-3.572-2.31%200-3.882%201.274-4.43%203.476-.143.596-.226%201.405-.226%202.25v10.8h-4.787V56.623h4.477v2.989c1.536-2.5%203.906-3.43%206.371-3.43%203.488%200%206.263%201.68%207.298%205.144Zm24.636%207.323c0%203.882-2.358%206.525-5.763%207.727-1.298.453-2.632.643-4.62.643h-10.169V48.324h9.085c1.691%200%203.156.143%204.049.38%203.465.93%205.727%203.68%205.727%207.335%200%202.441-.81%204.156-2.762%205.644%202.905%201.417%204.453%203.727%204.453%206.966Zm-15.634-8.656h4.584c1.024%200%201.917-.143%202.536-.417%201.215-.548%201.905-1.608%201.905-3.167%200-1.548-.643-2.572-1.845-3.132-.691-.31-1.762-.452-2.763-.452h-4.417v7.168Zm10.716%208.465c0-1.536-.893-3.37-3.227-3.893-.428-.095-1.036-.143-1.571-.143h-5.918v8.085h5.501c.56%200%201.429-.048%201.953-.167%201.94-.453%203.262-1.846%203.262-3.882Zm47.747-11.847-8.097%2020.408h-4.429l-8.109-20.408h5.191l5.192%2014.574%205.108-14.574h5.144Zm-20.218%2010.002c0%20.69-.036%201.262-.155%201.94h-15.943c.631%202.87%202.714%204.728%205.882%204.728%202.131%200%203.607-.882%204.703-2.525h4.87c-1.762%204.144-5.204%206.692-9.657%206.692-6.084%200-10.537-4.858-10.537-10.49%200-6.108%204.524-10.776%2010.335-10.776%206.239%200%2010.442%204.954%2010.502%2010.43Zm-4.763-1.405c-.333-2.846-2.643-4.858-5.691-4.858-2.894%200-5.287%201.929-5.621%204.858h11.312Zm-72.667%203.44c0%204.787-3.287%208.371-9.419%208.371H119.363V64.66c-1.917.274-3.87.69-5.811%201.238l4.537%2011.121h-5.418l-3.596-9.585c-5.144%202.084-10.085%205.216-14.217%209.585h-4.786L101.8%2048.312h4.56l5.68%2013.883a44.112%2044.112%200%200%201%207.323-1.774V48.312h9.084c1.703%200%203.156.143%204.061.393%203.453.929%205.727%203.667%205.727%207.323%200%201.917-.738%204.179-2.81%205.691%203.06%201.56%204.501%204.025%204.501%206.93Zm-15.634-8.667a62.664%2062.664%200%200%201%202.06-.036c1.703.012%203.239.131%204.608.37%201.441-.549%202.357-1.727%202.357-3.537%200-1.941-.881-3.144-2.488-3.667-.548-.18-1.358-.286-2.322-.286h-4.215v7.156Zm-16.55%203.905-3.715-9.894-6.394%2016.502c2.833-2.595%206.263-4.858%2010.109-6.608Zm27.254%204.74c0-2.775-3.131-4.347-8.513-4.418-.715%200-1.441.011-2.191.047v8.252h5.918c2.548%200%204.786-1.37%204.786-3.882Z'%20clip-rule='evenodd'/%3e%3c/g%3e%3cdefs%3e%3clinearGradient%20id='b'%20x1='51.47'%20x2='85.916'%20y1='62.946'%20y2='62.946'%20gradientUnits='userSpaceOnUse'%3e%3cstop%20stop-color='%23CD9F28'/%3e%3cstop%20offset='1'%20stop-color='%23ECD80B'/%3e%3c/linearGradient%3e%3cclipPath%20id='a'%3e%3cpath%20fill='%23fff'%20d='M51.47%2045.728h186.104V80.14H51.47z'/%3e%3c/clipPath%3e%3c/defs%3e%3c/svg%3e)


More from Schneider Electric


Explore Other Assets


© 2026 MaintainX. All rights reserved.