


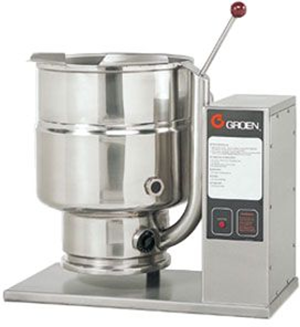
Groen Steam Jacketed Kettle TDB-40
Need answers fast?
Explore the manual using AI.

Turn manuals into instant answers
with your AI-powered assistantTurn manuals into instant answers
with your AI-powered assistant
Complete asset maintenance, one click away
Get instant access to all the maintenance information you need. Empower technicians to perform preventive maintenance with asset packages, ready to use right out of the box.

Documents & Manuals
Find all the essential guides in one place.
 Tensioning Guide
- Belt-diagram
- C-120 pulleys
+ 13 more

Work Order Templates
Pre-built workflows to keep your asset running smoothly.
- Daily Electrical System Inspection
- Replace Roller and Pulley
- Install Engine B-120
+ 29 more

Procedures
Integrate maintenance plans directly into your work orders.
- Motion Industries
- Applied Industrial Technologies
- Electrical Brothers
+ 5 more

Parts
Access the parts list for your equipment in MaintainX.
- Drive Motor
- B2 Rollers
- Tensioning System
+ 40 more
Groen Steam Jacketed Kettle TDB-40
Create an account to install this asset package.
Maintenance Plans for Groen Steam Jacketed Kettle Model TDB-40
Integrate maintenance plans directly into your work orders in MaintainX.
2 Weekly Safety Valve Test
NOTICE: Contact Groen or an authorized Groen representative when repairs are required
Test the safety valve at least twice each month
Enter the kettle operating pressure
Test the valve by pulling up the test chain for at least five seconds
Release the chain and let the valve snap shut
Did the valve activate?
Is there any evidence of discharge or valve leaks?
If the valve does not activate, (there is no evidence of discharge, or the valve leaks) stop using the kettle immediately and contact a qualified Groen service representative
Sign off on the safety valve test

Jacket Vacuum Service
NOTE! When the kettle is cold, a positive pressure reading or a reading around zero on the pressure/vacuum gauge indicates the presence of air in the jacket. Air in the jacket slows down the heating of the kettle. To remove air
1. Start the unit. (See the “Operation” section of this manual.) (Be sure there is water or product in the kettle when heating)
2. When the pressure/vacuum gauge reaches a positive pressure reading of five PSI, release the trapped air and steam by pulling up on the safety valve for about 1 second. Repeat this step, then let the chain snap back into the closed position;
1 Daily Steam Jacketed Kettle Cleaning
WARNING! KEEP WATER AND SOLUTIONS AWAY FROM CONTROLS AND ELECTRICAL EQUIPMENT. NEVER SPRAY THE SUPPORT HOUSING OR ELECTRICAL CONNECTIONS
CAUTION! MOST CLEANERS ARE HARMFUL TO THE SKIN, EYES, MUCOUS MEMBRANES, AND CLOTHING. PRECAUTIONS SHOULD BE TAKEN. WEAR RUBBER GLOVES, GOGGLES OR FACE SHIELD, AND PROTECTIVE CLOTHING. READ THE WARNINGS AND FOLLOW THE DIRECTIONS ON THE LABEL OF THE CLEANER CAREFULLY
Clean food-contact surfaces as soon as possible after use. If the unit is in continuous use, thoroughly clean and sanitize the interior and exterior at least once every 12 hours
WARNING! AVOID ANY DIRECT CONTACT WITH HOT SURFACES. DIRECT SKIN CONTACT COULD RESULT IN SEVERE BURNS
Scrape and flush out food residues. Be careful not to scratch the kettle with metal implements
Prepare a hot solution of the detergent/ cleaning compound as instructed by the supplier. Clean the unit thoroughly. A cloth moistened with cleaning solution can be used to clean controls, housings, and electrical conduits
Rinse the kettle thoroughly with hot water, then drain completely
As part of the daily cleaning program, clean soiled external and internal surfaces. Remember to check the sides of the unit and control housing
To remove stuck materials, use a brush, sponge, cloth, plastic or rubber scraper, or plastic wool with the cleaning solution. To reduce effort required in washing, let the detergent solution sit in the kettle and soak into the residue. Do NOT use abrasive materials or metal tools that might scratch the surface. Scratches make the surface harder to clean and provide places for bacteria to grow. Do NOT use steel wool, which may leave particles in the surface and cause eventual corrosion and pitting
1 Daily Steam Jacketed Kettle Check
NOTICE: Contact Groen or an authorized Groen representative when repairs are required
Pressure/vacuum gauge reading
Is the pressure/vacuum gauge showing a vacuum of 20 to 30 inches when the kettle is cold?
Is the jacket water level above mid point of the round sight glass?
Sign off on the daily steam jacketed kettle check
6 Monthly Steam Jacketed Kettle Lubrication
NOTICE: Contact Groen or an authorized Groen representative when repairs are required
1. At least twice a year, grease the two trunnion bearings
2. The bearings are located within the kettle support housing
3. Remove the access panels from the support housing with a screwdriver to gain access to the grease fittings. Use a lithium-based, multipurpose grease. When the access panels are removed, the mounting bolts for the trunnion bearings and tilt switch can also be checked for tightness
4. On the crank-tilt models, the gear housing has fittings for proper lubrication of moving parts. Because the gears do not run in oil, periodic lubrication with grease is necessary
5. Frequency of lubrication will depend on operating conditions, but the service should be performed at least once every six months
NOTE! Add grease through the Zerk fittings on the gear housing until you see grease flow out of the bearings around the trunnion shaft. Also place a liberal amount of grease on the gear to cover the arc that is in contact with the worm gear. When finished, reassemble access panels to support housing. Electrical wiring should be kept securely connected and in good condition;
Parts for Groen Steam Jacketed Kettle TDB-40
Access the parts list for your equipment in MaintainX.
Cover, Thermostat
114830
Knob, Thermostat
122054
Nut, hex 1/2-13 ss
005603
Washer lock 1/2 ss
005657
Weldment, Pedestal - TDB
122388
Cover, Thermostat
114830
Knob, Thermostat
122054
Nut, hex 1/2-13 ss
005603
Washer lock 1/2 ss
005657
Weldment, Pedestal - TDB
122388
Cover, Thermostat
114830
Knob, Thermostat
122054
Nut, hex 1/2-13 ss
005603
Washer lock 1/2 ss
005657
Weldment, Pedestal - TDB
122388
Unlock efficiency
with MaintainX CoPilot
MaintainX CoPilot is your expert colleague, on call 24/7, helping your team find the answers they need to keep equipment running.
Reduce Unplanned Downtime
Ensure your team follows consistent procedures to minimize equipment failures and costly delays.
Maximize Asset Availability
Keep your assets running longer and more reliably, with standardized maintenance workflows from OEM manuals.
Lower Maintenance Costs
Turn any technician into an expert to streamline operations, maintain more assets, and reduce overall costs.
Thousands of companies manage their assets with MaintainX

'%3e%3cpath%20fill='url(%23b)'%20d='M66.008%2080.068c-5.084-.786-9.763-3.834-12.442-8.68a16.942%2016.942%200%200%201-1.87-5.18c1.096.19%202.203.476%203.298.87%206.525%202.333%2010.836%207.68%2011.014%2012.99ZM51.47%2061.576c.488-5.524%203.62-10.716%208.847-13.597a17.132%2017.132%200%200%201%2011.335-1.882c-.798%208.145-7.43%2014.848-16.038%2015.599-1.417.119-2.799.07-4.144-.12Zm28.564-11.478a17.513%2017.513%200%200%201%203.727%204.62c4.608%208.335%201.584%2018.813-6.75%2023.409a16.988%2016.988%200%200%201-4.359%201.679%2019.624%2019.624%200%200%201-3.977-12.776c.346-7.561%204.942-13.931%2011.36-16.932Z'/%3e%3cpath%20fill='%23110F0D'%20fill-rule='evenodd'%20d='M142.831%2048.324h4.977V77.03h-4.977V48.324Zm27.278%2013.002c.322%201.048.453%202.263.453%203.62v12.073h-4.787V66.208c0-.75-.047-1.572-.154-2.143-.453-2.382-1.822-3.572-4.215-3.572-2.31%200-3.882%201.274-4.43%203.476-.143.596-.226%201.405-.226%202.25v10.8h-4.787V56.623h4.477v2.989c1.536-2.5%203.906-3.43%206.371-3.43%203.488%200%206.263%201.68%207.298%205.144Zm24.636%207.323c0%203.882-2.358%206.525-5.763%207.727-1.298.453-2.632.643-4.62.643h-10.169V48.324h9.085c1.691%200%203.156.143%204.049.38%203.465.93%205.727%203.68%205.727%207.335%200%202.441-.81%204.156-2.762%205.644%202.905%201.417%204.453%203.727%204.453%206.966Zm-15.634-8.656h4.584c1.024%200%201.917-.143%202.536-.417%201.215-.548%201.905-1.608%201.905-3.167%200-1.548-.643-2.572-1.845-3.132-.691-.31-1.762-.452-2.763-.452h-4.417v7.168Zm10.716%208.465c0-1.536-.893-3.37-3.227-3.893-.428-.095-1.036-.143-1.571-.143h-5.918v8.085h5.501c.56%200%201.429-.048%201.953-.167%201.94-.453%203.262-1.846%203.262-3.882Zm47.747-11.847-8.097%2020.408h-4.429l-8.109-20.408h5.191l5.192%2014.574%205.108-14.574h5.144Zm-20.218%2010.002c0%20.69-.036%201.262-.155%201.94h-15.943c.631%202.87%202.714%204.728%205.882%204.728%202.131%200%203.607-.882%204.703-2.525h4.87c-1.762%204.144-5.204%206.692-9.657%206.692-6.084%200-10.537-4.858-10.537-10.49%200-6.108%204.524-10.776%2010.335-10.776%206.239%200%2010.442%204.954%2010.502%2010.43Zm-4.763-1.405c-.333-2.846-2.643-4.858-5.691-4.858-2.894%200-5.287%201.929-5.621%204.858h11.312Zm-72.667%203.44c0%204.787-3.287%208.371-9.419%208.371H119.363V64.66c-1.917.274-3.87.69-5.811%201.238l4.537%2011.121h-5.418l-3.596-9.585c-5.144%202.084-10.085%205.216-14.217%209.585h-4.786L101.8%2048.312h4.56l5.68%2013.883a44.112%2044.112%200%200%201%207.323-1.774V48.312h9.084c1.703%200%203.156.143%204.061.393%203.453.929%205.727%203.667%205.727%207.323%200%201.917-.738%204.179-2.81%205.691%203.06%201.56%204.501%204.025%204.501%206.93Zm-15.634-8.667a62.664%2062.664%200%200%201%202.06-.036c1.703.012%203.239.131%204.608.37%201.441-.549%202.357-1.727%202.357-3.537%200-1.941-.881-3.144-2.488-3.667-.548-.18-1.358-.286-2.322-.286h-4.215v7.156Zm-16.55%203.905-3.715-9.894-6.394%2016.502c2.833-2.595%206.263-4.858%2010.109-6.608Zm27.254%204.74c0-2.775-3.131-4.347-8.513-4.418-.715%200-1.441.011-2.191.047v8.252h5.918c2.548%200%204.786-1.37%204.786-3.882Z'%20clip-rule='evenodd'/%3e%3c/g%3e%3cdefs%3e%3clinearGradient%20id='b'%20x1='51.47'%20x2='85.916'%20y1='62.946'%20y2='62.946'%20gradientUnits='userSpaceOnUse'%3e%3cstop%20stop-color='%23CD9F28'/%3e%3cstop%20offset='1'%20stop-color='%23ECD80B'/%3e%3c/linearGradient%3e%3cclipPath%20id='a'%3e%3cpath%20fill='%23fff'%20d='M51.47%2045.728h186.104V80.14H51.47z'/%3e%3c/clipPath%3e%3c/defs%3e%3c/svg%3e)


More from Groen


Explore Other Assets


© 2026 MaintainX. All rights reserved.