


Turn manuals into instant answers
with your AI-powered assistantTurn manuals into instant answers
with your AI-powered assistant
Complete asset maintenance, one click away
Get instant access to all the maintenance information you need. Empower technicians to perform preventive maintenance with asset packages, ready to use right out of the box.

Documents & Manuals
Find all the essential guides in one place.
 Tensioning Guide
- Belt-diagram
- C-120 pulleys
+ 13 more

Work Order Templates
Pre-built workflows to keep your asset running smoothly.
- Daily Electrical System Inspection
- Replace Roller and Pulley
- Install Engine B-120
+ 29 more

Procedures
Integrate maintenance plans directly into your work orders.
- Motion Industries
- Applied Industrial Technologies
- Electrical Brothers
+ 5 more

Parts
Access the parts list for your equipment in MaintainX.
- Drive Motor
- B2 Rollers
- Tensioning System
+ 40 more
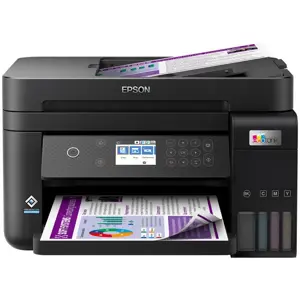
Epson Printer L6270
Create an account to install this asset package.
Maintenance Plans for Epson Printer Model L6270
Integrate maintenance plans directly into your work orders in MaintainX.
Nozzple Clogging Prevention
Power button used for turning the printer on and off
Power light off before disconnecting the power cord
Ink properly covered to prevent drying
Print head properly capped to prevent ink from drying
Power cord unplugged or power outage occurred while printer was in operation
If power cord was unplugged or power outage occurred, turn the printer on and off again as soon as possible to cap the print head
Sign off on the nozzle clogging prevention procedure

ADF Cleaning
Warning: Never use alcohol or thinner to clean the printer. These chemicals can damage the printer.
Open the ADF cover
Use a soft, moist cloth to clean the roller and the interior of the ADF
Warning: Using a dry cloth may damage the surface of the roller. Use the ADF after the roller has dried.
Close the ADF cover, and then open the document cover
Clean the part that is shown in the illustration
Warning: If the glass surface is stained with grease or some other hard-to-remove material, use a small amount of glass cleaner and a soft cloth to remove it. Wipe off all remaining liquid. Do not press the glass surface too hard. Be careful not to scratch or damage the surface of the glass. A damaged glass surface can decrease the scan quality.
If the problem cannot be cleared, turn off the printer by pressing the U button, open the ADF cover, and then raise the ADF input tray
Clean the part that is shown in the illustration
Translucent Film Cleaning
Warning: Do not use cleaning liquid other than water with a few drops of detergent
Items required: Cotton swabs (several), Water with a few drops of detergent (2 to 3 drops of detergent in 1/4 cup of tap water), Light for checking smears
Turn off the printer by pressing the 'power' button
Close the document cover if it is open
Open the scanner unit with both hands until it locks
Check if the translucent film is smeared. Smears are easier to see if you use a light
If there are smears (such as finger marks or grease) on the translucent film (A), go to the next step. Be careful not to touch the rail (B). Do not wipe off the grease on the rail, because this is necessary for operations
Moisten a cotton swab with the water with a few drops of detergent so that it is not dripping water, and then wipe the smeared part. Wipe off the smear gently
Use a new dry cotton swab to wipe the film. Do not leave any fibers on the film
Consumables Status Check
You can check the approximate service life of the maintenance box from the printer's control panel
Select (droplet) on the home screen
To confirm the actual ink remaining, visually check the ink levels in all of the printer's tanks
Important
Prolonged use of the printer when the ink level is below the lower line could damage the printer
Note
You can also check the approximate ink levels and the approximate service life of the maintenance box from the status monitor on the printer driver
Windows
Click EPSON Status Monitor 3 on the Maintenance tab
Power Cleaning
The Power Cleaning utility allows you to replace all of the ink inside the ink tubes
In the following situations, you may need to use this feature to improve the print quality
You printed or performed head cleaning when the ink levels were too low to be seen in the ink tank windows
You performed the nozzle check and head cleaning 3 times and then waited for at least 12 hours without printing, but print quality still did not improve
Before running this feature, read the following instructions
Important
Make sure that there is enough ink in the ink tanks
Visually check all ink tanks are at least a third full
Low ink levels during Power Cleaning could damage the product
Unlock efficiency
with MaintainX CoPilot
MaintainX CoPilot is your expert colleague, on call 24/7, helping your team find the answers they need to keep equipment running.
Reduce Unplanned Downtime
Ensure your team follows consistent procedures to minimize equipment failures and costly delays.
Maximize Asset Availability
Keep your assets running longer and more reliably, with standardized maintenance workflows from OEM manuals.
Lower Maintenance Costs
Turn any technician into an expert to streamline operations, maintain more assets, and reduce overall costs.
Thousands of companies manage their assets with MaintainX

'%3e%3cpath%20fill='url(%23b)'%20d='M66.008%2080.068c-5.084-.786-9.763-3.834-12.442-8.68a16.942%2016.942%200%200%201-1.87-5.18c1.096.19%202.203.476%203.298.87%206.525%202.333%2010.836%207.68%2011.014%2012.99ZM51.47%2061.576c.488-5.524%203.62-10.716%208.847-13.597a17.132%2017.132%200%200%201%2011.335-1.882c-.798%208.145-7.43%2014.848-16.038%2015.599-1.417.119-2.799.07-4.144-.12Zm28.564-11.478a17.513%2017.513%200%200%201%203.727%204.62c4.608%208.335%201.584%2018.813-6.75%2023.409a16.988%2016.988%200%200%201-4.359%201.679%2019.624%2019.624%200%200%201-3.977-12.776c.346-7.561%204.942-13.931%2011.36-16.932Z'/%3e%3cpath%20fill='%23110F0D'%20fill-rule='evenodd'%20d='M142.831%2048.324h4.977V77.03h-4.977V48.324Zm27.278%2013.002c.322%201.048.453%202.263.453%203.62v12.073h-4.787V66.208c0-.75-.047-1.572-.154-2.143-.453-2.382-1.822-3.572-4.215-3.572-2.31%200-3.882%201.274-4.43%203.476-.143.596-.226%201.405-.226%202.25v10.8h-4.787V56.623h4.477v2.989c1.536-2.5%203.906-3.43%206.371-3.43%203.488%200%206.263%201.68%207.298%205.144Zm24.636%207.323c0%203.882-2.358%206.525-5.763%207.727-1.298.453-2.632.643-4.62.643h-10.169V48.324h9.085c1.691%200%203.156.143%204.049.38%203.465.93%205.727%203.68%205.727%207.335%200%202.441-.81%204.156-2.762%205.644%202.905%201.417%204.453%203.727%204.453%206.966Zm-15.634-8.656h4.584c1.024%200%201.917-.143%202.536-.417%201.215-.548%201.905-1.608%201.905-3.167%200-1.548-.643-2.572-1.845-3.132-.691-.31-1.762-.452-2.763-.452h-4.417v7.168Zm10.716%208.465c0-1.536-.893-3.37-3.227-3.893-.428-.095-1.036-.143-1.571-.143h-5.918v8.085h5.501c.56%200%201.429-.048%201.953-.167%201.94-.453%203.262-1.846%203.262-3.882Zm47.747-11.847-8.097%2020.408h-4.429l-8.109-20.408h5.191l5.192%2014.574%205.108-14.574h5.144Zm-20.218%2010.002c0%20.69-.036%201.262-.155%201.94h-15.943c.631%202.87%202.714%204.728%205.882%204.728%202.131%200%203.607-.882%204.703-2.525h4.87c-1.762%204.144-5.204%206.692-9.657%206.692-6.084%200-10.537-4.858-10.537-10.49%200-6.108%204.524-10.776%2010.335-10.776%206.239%200%2010.442%204.954%2010.502%2010.43Zm-4.763-1.405c-.333-2.846-2.643-4.858-5.691-4.858-2.894%200-5.287%201.929-5.621%204.858h11.312Zm-72.667%203.44c0%204.787-3.287%208.371-9.419%208.371H119.363V64.66c-1.917.274-3.87.69-5.811%201.238l4.537%2011.121h-5.418l-3.596-9.585c-5.144%202.084-10.085%205.216-14.217%209.585h-4.786L101.8%2048.312h4.56l5.68%2013.883a44.112%2044.112%200%200%201%207.323-1.774V48.312h9.084c1.703%200%203.156.143%204.061.393%203.453.929%205.727%203.667%205.727%207.323%200%201.917-.738%204.179-2.81%205.691%203.06%201.56%204.501%204.025%204.501%206.93Zm-15.634-8.667a62.664%2062.664%200%200%201%202.06-.036c1.703.012%203.239.131%204.608.37%201.441-.549%202.357-1.727%202.357-3.537%200-1.941-.881-3.144-2.488-3.667-.548-.18-1.358-.286-2.322-.286h-4.215v7.156Zm-16.55%203.905-3.715-9.894-6.394%2016.502c2.833-2.595%206.263-4.858%2010.109-6.608Zm27.254%204.74c0-2.775-3.131-4.347-8.513-4.418-.715%200-1.441.011-2.191.047v8.252h5.918c2.548%200%204.786-1.37%204.786-3.882Z'%20clip-rule='evenodd'/%3e%3c/g%3e%3cdefs%3e%3clinearGradient%20id='b'%20x1='51.47'%20x2='85.916'%20y1='62.946'%20y2='62.946'%20gradientUnits='userSpaceOnUse'%3e%3cstop%20stop-color='%23CD9F28'/%3e%3cstop%20offset='1'%20stop-color='%23ECD80B'/%3e%3c/linearGradient%3e%3cclipPath%20id='a'%3e%3cpath%20fill='%23fff'%20d='M51.47%2045.728h186.104V80.14H51.47z'/%3e%3c/clipPath%3e%3c/defs%3e%3c/svg%3e)


More from Epson


Explore Other Assets


© 2026 MaintainX. All rights reserved.