


Lincoln Electric Welder Ranger 330MPX
Need answers fast?
Explore the manual using AI.
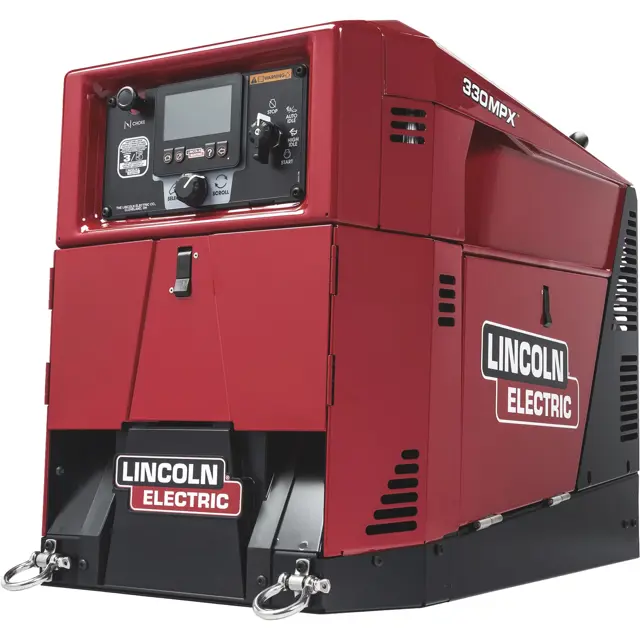
The Lincoln Electric Welder Ranger 330MPX is a versatile industrial welder designed for high-performance welding applications. Known for its reliability and efficiency, this welder is ideal for both professional and heavy-duty use, ensuring excellent results in various welding tasks.
Turn manuals into instant answers
with your AI-powered assistantTurn manuals into instant answers
with your AI-powered assistant
Manual for Lincoln Electric Welder Ranger 330MPX
Complete asset maintenance, one click away
Get instant access to all the maintenance information you need. Empower technicians to perform preventive maintenance with asset packages, ready to use right out of the box.

Documents & Manuals
Find all the essential guides in one place.
 Tensioning Guide
- Belt-diagram
- C-120 pulleys
+ 13 more

Work Order Templates
Pre-built workflows to keep your asset running smoothly.
- Daily Electrical System Inspection
- Replace Roller and Pulley
- Install Engine B-120
+ 29 more

Procedures
Integrate maintenance plans directly into your work orders.
- Motion Industries
- Applied Industrial Technologies
- Electrical Brothers
+ 5 more

Parts
Access the parts list for your equipment in MaintainX.
- Drive Motor
- B2 Rollers
- Tensioning System
+ 40 more
Lincoln Electric Welder Ranger 330MPX
Create an account to install this asset package.
Maintenance Plans for Lincoln Electric Welder Model Ranger 330MPX
Integrate maintenance plans directly into your work orders in MaintainX.
1000 Hourly Brush Maintenance
- Shut off power to the machine
- Using a T-30 Torx bit, remove the 8 screws securing the casevback and remove the case back
- Using a 5/8” socket and impact wrench, remove the rotor through bolt and then remove the rear alternator fan. Note there isvLoctite on the rotor through bolt - Remove leads 200 and 219 from the brush holder
- Using a 10mm wrench, remove the two screws securing the brush holder assembly. Lift the brush holder assembly up and then out
- Examine the brushes for chips, cracks or excess or uneven wear. The brush should be at least 1⁄4” long. Verify the brush springs are operating and are not stuck. Replace the brush assembly as needed. Inspect the rotor slip rings for grooves or excess wear
- Reassemble the brush holder assemble and tighten the bolts to 41 in-lbs
- Connect leads 200 and 219 to the brush holder;

100 Hourly Air Filter Change
Air Filter Pre-cleaner Service
- Loosen the cover retaining knob and remove the cover
- Remove the pre-cleaner from the paper element
- Wash the pre-cleaner in warm water with detergent. Rinse the pre-cleaner thoroughly until all traces of detergent are removed. Squeeze out excess water (do not wring). Allow the pre-cleaner to dry
- Reinstall the pre-cleaner over the paper element
- Reinstall the air cleaner cover. Secure the cover with the cover retaining knob
Air Filter Paper Element
- Loosen the cover retaining knob and remove the cover
- Remove the pre-cleaner from the paper element
500 Hourly Spark Plug Service
- Remove the spark plug cap
- Clean any dirt from around the spark plug base
- Use a plug wrench to remove the spark plug
- Visually inspect the spark plug. Discard them if the insulator is cracked or chipped. Clean the spark plug with a wire brush if it is to be reused
- Measure the plug gap with a feeler gauge. Correct as necessary by bending the side electrode
- Check that the spark plug washer is in good condition and thread the spark plug in by hand to prevent cross-threading
- After the spark plug is seated, tighten with a spark plug wrench to compress the washer
- If installing a new spark plug, tighten 1/2 turn after the spark plug seats to compress the washer
- If reinstalling a used spark plug, tighten 1/8 - 1⁄4 turn after the spark plug seats to compress the washer
200 Hourly Fuel Filter Change
- Check the fuel filter for water accumulation or sediment
- Replace the fuel filter if it is found with excessive water accumulation or sediment;
100 Hourly Spark Arrestor Cleaning
- Clean the spark arrestor;
Parts for Lincoln Electric Welder Ranger 330MPX
Access the parts list for your equipment in MaintainX.
PTA-17V TIG Torch
K1782-9
Fender and Light Kit
K2639-1
Square Wave TIG 200
K5126-1
TIG module
K930-2
Air Filter Element
24 083 03
PTA-17V TIG Torch
K1782-9
Fender and Light Kit
K2639-1
Square Wave TIG 200
K5126-1
TIG module
K930-2
Air Filter Element
24 083 03
PTA-17V TIG Torch
K1782-9
Fender and Light Kit
K2639-1
Square Wave TIG 200
K5126-1
TIG module
K930-2
Air Filter Element
24 083 03
Unlock efficiency
with MaintainX CoPilot
MaintainX CoPilot is your expert colleague, on call 24/7, helping your team find the answers they need to keep equipment running.
Reduce Unplanned Downtime
Ensure your team follows consistent procedures to minimize equipment failures and costly delays.
Maximize Asset Availability
Keep your assets running longer and more reliably, with standardized maintenance workflows from OEM manuals.
Lower Maintenance Costs
Turn any technician into an expert to streamline operations, maintain more assets, and reduce overall costs.
Thousands of companies manage their assets with MaintainX

'%3e%3cpath%20fill='url(%23b)'%20d='M66.008%2080.068c-5.084-.786-9.763-3.834-12.442-8.68a16.942%2016.942%200%200%201-1.87-5.18c1.096.19%202.203.476%203.298.87%206.525%202.333%2010.836%207.68%2011.014%2012.99ZM51.47%2061.576c.488-5.524%203.62-10.716%208.847-13.597a17.132%2017.132%200%200%201%2011.335-1.882c-.798%208.145-7.43%2014.848-16.038%2015.599-1.417.119-2.799.07-4.144-.12Zm28.564-11.478a17.513%2017.513%200%200%201%203.727%204.62c4.608%208.335%201.584%2018.813-6.75%2023.409a16.988%2016.988%200%200%201-4.359%201.679%2019.624%2019.624%200%200%201-3.977-12.776c.346-7.561%204.942-13.931%2011.36-16.932Z'/%3e%3cpath%20fill='%23110F0D'%20fill-rule='evenodd'%20d='M142.831%2048.324h4.977V77.03h-4.977V48.324Zm27.278%2013.002c.322%201.048.453%202.263.453%203.62v12.073h-4.787V66.208c0-.75-.047-1.572-.154-2.143-.453-2.382-1.822-3.572-4.215-3.572-2.31%200-3.882%201.274-4.43%203.476-.143.596-.226%201.405-.226%202.25v10.8h-4.787V56.623h4.477v2.989c1.536-2.5%203.906-3.43%206.371-3.43%203.488%200%206.263%201.68%207.298%205.144Zm24.636%207.323c0%203.882-2.358%206.525-5.763%207.727-1.298.453-2.632.643-4.62.643h-10.169V48.324h9.085c1.691%200%203.156.143%204.049.38%203.465.93%205.727%203.68%205.727%207.335%200%202.441-.81%204.156-2.762%205.644%202.905%201.417%204.453%203.727%204.453%206.966Zm-15.634-8.656h4.584c1.024%200%201.917-.143%202.536-.417%201.215-.548%201.905-1.608%201.905-3.167%200-1.548-.643-2.572-1.845-3.132-.691-.31-1.762-.452-2.763-.452h-4.417v7.168Zm10.716%208.465c0-1.536-.893-3.37-3.227-3.893-.428-.095-1.036-.143-1.571-.143h-5.918v8.085h5.501c.56%200%201.429-.048%201.953-.167%201.94-.453%203.262-1.846%203.262-3.882Zm47.747-11.847-8.097%2020.408h-4.429l-8.109-20.408h5.191l5.192%2014.574%205.108-14.574h5.144Zm-20.218%2010.002c0%20.69-.036%201.262-.155%201.94h-15.943c.631%202.87%202.714%204.728%205.882%204.728%202.131%200%203.607-.882%204.703-2.525h4.87c-1.762%204.144-5.204%206.692-9.657%206.692-6.084%200-10.537-4.858-10.537-10.49%200-6.108%204.524-10.776%2010.335-10.776%206.239%200%2010.442%204.954%2010.502%2010.43Zm-4.763-1.405c-.333-2.846-2.643-4.858-5.691-4.858-2.894%200-5.287%201.929-5.621%204.858h11.312Zm-72.667%203.44c0%204.787-3.287%208.371-9.419%208.371H119.363V64.66c-1.917.274-3.87.69-5.811%201.238l4.537%2011.121h-5.418l-3.596-9.585c-5.144%202.084-10.085%205.216-14.217%209.585h-4.786L101.8%2048.312h4.56l5.68%2013.883a44.112%2044.112%200%200%201%207.323-1.774V48.312h9.084c1.703%200%203.156.143%204.061.393%203.453.929%205.727%203.667%205.727%207.323%200%201.917-.738%204.179-2.81%205.691%203.06%201.56%204.501%204.025%204.501%206.93Zm-15.634-8.667a62.664%2062.664%200%200%201%202.06-.036c1.703.012%203.239.131%204.608.37%201.441-.549%202.357-1.727%202.357-3.537%200-1.941-.881-3.144-2.488-3.667-.548-.18-1.358-.286-2.322-.286h-4.215v7.156Zm-16.55%203.905-3.715-9.894-6.394%2016.502c2.833-2.595%206.263-4.858%2010.109-6.608Zm27.254%204.74c0-2.775-3.131-4.347-8.513-4.418-.715%200-1.441.011-2.191.047v8.252h5.918c2.548%200%204.786-1.37%204.786-3.882Z'%20clip-rule='evenodd'/%3e%3c/g%3e%3cdefs%3e%3clinearGradient%20id='b'%20x1='51.47'%20x2='85.916'%20y1='62.946'%20y2='62.946'%20gradientUnits='userSpaceOnUse'%3e%3cstop%20stop-color='%23CD9F28'/%3e%3cstop%20offset='1'%20stop-color='%23ECD80B'/%3e%3c/linearGradient%3e%3cclipPath%20id='a'%3e%3cpath%20fill='%23fff'%20d='M51.47%2045.728h186.104V80.14H51.47z'/%3e%3c/clipPath%3e%3c/defs%3e%3c/svg%3e)


More from Lincoln Electric


Explore Other Assets


© 2026 MaintainX. All rights reserved.