First, perform a visual inspection of the lift truck and its components.
Walk around the truck and take note of any obvious damage or maintenance problems.
Check to be sure all capacity, safety, and warning plates are attached and legible.
NAME PLATES AND DECALS: Do not operate a lift truck with damaged or lost decals and nameplates. Replace them immediately. They contain important information.
Inspect the truck, before and after starting the engine, for any sign of external leakage of fuel, engine coolant, transmission fluid, etc.
Check for hydraulic oil leaks and loose fittings.
CAUTION HYDRAULIC FLUID PRESSURE: Do not use your hands to check for hydraulic leakage. Fluid under pressure can penetrate your skin and cause serious injury.
Be sure that the driver's overhead guard and any safety devices are in place, undamaged, and attached securely.
Check the overhead guard for damage.
Be sure that it is properly positioned and all mounting fasteners are in place and tight.
The overhead guard must not be modified from CLARK specification.
Look for obvious wear and maintenance problems and damaged or missing parts.
Check for any loose parts or fittings.
Check for leaks, damaged or loose rollers, and rail wear (metal flaking).
Carefully check the lift chains for Check that the lift and carriage chains are correctly adjusted to have equal tension.
Check that the lift chain anchor fasteners and locking means are in place and tight.
Inspect all lift line hydraulic connections for leaks.
IMPORTANT Uprights and lift chains require special attention and maintenance to remain in safe operating condition. Refer to “Lift Chain Maintenance” in this Section for additional information.
Always maintain a lift truck in a clean condition.
Do not allow dirt, dust, lint, or other contaminants to accumulate on the truck.
Keep the truck free from leaking oil and grease.
Wipe up all oil spills
Keep the controls and floorboards clean, dry, and safe.
A clean truck makes it easier to see leakage and loose, missing, or damaged parts, and helps prevent fires.
A clean truck runs cooler.
The environment in which a lift truck operates determines how often and to what extent cleaning is necessary.
The radiator especially may require daily air cleaning to ensure correct cooling.
If air pressure does not remove heavy deposits of grease, oil, etc., it may be necessary to use steam or liquid spray cleaner.
Lubricate truck. (See component)
Locate the engine oil dipstick.
Pull the dipstick out, wipe it with a clean wiper, and reinsert it fully into the dipstick tube.
Remove the dipstick and check oil level.
It is normal to add some oil between oil changes. Keep the oil level above the ADD mark on the dipstick by adding oil as required.
Do not overfill.
Use the correct oil as specified under Lubricant Specifications.
Engine oil at operating temperature is hot and can cause burns. Beware of splashing oil. The time interval for changing engine oil depends upon your application and operating conditions.
To determine the correct schedule for your truck, it is suggested that you periodically submit engine oil samples to a commercial laboratory for analysis of the condition of the oil.
This analysis can used to reduced time intervals but not increase them.
Engine Oil Performance Designation
Remove the filter cartridge
Lightly grease the sealing ring on the new filter cartridge and screw in the cartridge until it is hand tight.
Remove the oil pan drain plug to drain old oil after the truck has been in operation and the engine (oil) is at operating temperature.
Carefully check for leaks after changing oil and installing new filter.
Clean and replace LPG/Gas engine air filter. (*)
Clean and replace Diesel engine air filter. (*)
Change Diesel fuel filter
Change LPG/Gas fuel filter
Drain heavy ends from vaporizer.
To check engine coolant level open the hood to the engine compartment.
Visually inspect the recovery bottle, locate the “HOT” and “COLD” marks.
The “HOT” mark indicates maximum level at operating temperature.
The “COLD” mark indicates additional coolant needs to be added to the system.
The recovery bottle shown is a typical illustration of overflow system. Your actual system may vary slightly
A level anywhere between the FULL and LOW marks is normal
Inspect the coolant level in the overflow bottle only.
If the level is low, add a 50/50 mixture of specified coolant and water to the correct fill level. If you have to add coolant more than once a month or if you have to add more than one litre at a time, check the coolant system for leaks. Your lift truck cooling system is filled with a factoryinstalled solution of 50% water and 50% permanent-type antifreeze containing rust and corrosion inhibitors.
You should leave the solution in year around.
Plain water may be used in an emergency, but replace it with the specified coolant as soon as possible to avoid damage to the system.
Do not use alcohol or methanol antifreeze.
You will start the engine to complete the functional tests, so be sure that: Be sure that the travel area is clear in front of the truck. . If the terminals are corroded, clean and protect them with CLARK Battery Saver (available from your CLARK dealer).
If your battery has removable cell caps, check to be sure the cells are all filled.
Refill them with distilled water.
EXPLOSIVE GASES: Do not smoke or have open flames or sparks near batteries. An explosion can cause injury or death.
Check the planned maintenance interval (operating hours) or the condition of the oil to determine if the transmission fluid needs to be changed.
Change transmission fluid. (drain and replace)
Change (replace) transmission oil filter
Change drive axle fluid. (cooling system not equipped) - Cooling system equipped : 2,000 hours Clean drive axle air vent.
With the direction control in NEUTRAL and the engine running, push the service brake pedal fully down and hold.
The brakes should apply before the pedal reaches the floorplate.
If the pedal continues to creep downward, report the failure immediately.
Perform the same check with the inching pedal. (Additional braking/inching checks will follow.)
Lubrication and inspection of truck chassis components, including : Refer to your Service Manual for additional information on machine blocking and jacking.
Also refer to Service Manual for the location of grease fittings.
Inspect the steering cylinder piston Lubricate the steer axle linkage rod ends and linkage pivot points.
Be sure to clean the grease fittings before lubricating, and remove the excess grease from all points after lubricating.
Lubricate miscellaneous linkage as needed.
The steering hand wheel operates a steering control valve that directs the oil flow to the steering cylinder connected to the steer axle.
The steering control valve can also act as a pump to provide manual steering if the hydraulic pump stops.
Drain and replace the hydraulic sump fluid every 2000 operating hours. (Severe service or adverse conditions may require more frequent fluid change).
Replace the hydraulic oil filter elements at every oil change.
Remove, clean, and reinstall the hydraulic and steer system suction line screens at time of fluid change.
Check for leaks after installation of the filters.
Also, check that the hydraulic line connections at the filter adapter are tightened correctly.
The procedure for draining hydraulic sump tank is in your Service Manual.
Remove the sump tank fill cap/breather and inspect for excessive (obvious) contamination and damage.
Replace the fill cap/breather, per recommended PM schedule or as required by operating conditions.
Check the hydraulic sump tank fluid level.
Correct fluid level is important for proper system operation.
Low fluid level can cause pump damage.
Overfilling can cause loss of fluid or lift system malfunction.
Hydraulic fluid expands as its temperature rises.
Therefore, it is preferable to check the fluid level at operating temperature (after approximately 30 minutes of truck operation).
To check the fluid level, first park the truck on a level surface and block the drive wheels.
Put the upright in a vertical position and lower the fork carriage fully down.
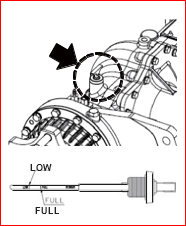
Pull the dipstick out, (attached to the sump breather) wipe it with a clean wiper, and reinsert it.
Remove dipstick and check oil level. Keep the oil level above the LOW mark on the dipstick by adding recommended hydraulic fluid only, as required. Do not overfill.
Check the condition of the hydraulic fluid (age, color or clarity, contamination).
Change (replace) the oil as necessary.
Clean the fittings and lubricate the tilt cylinder rod end bushings (forward end) and both the base rod-end bushings (rear end).
Clean and lubricate the upright trunnion bushings U
Lubricate the entire length of the upright rail lift and carriage chains with CLARK Chain and Cable Lube.
Do not lubricate the carriage roller rails.
Inspect and lubricate the lift chains every PM (500 hours).
When operating in corrosive environments, inspect the chains every 50 hours.
Rust and corrosion, cracked plates, raised or turned pins,tight joints, wear, and worn pins or holes.
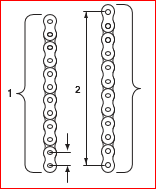
When the pins or holes become worn, the chain becomeslonger. When a section of chain is 3% longer than a section of new chain, the chain is worn and must be discarded.
Chain wear can be measured by using a chain scale or asteel tape measure.
When checking chain wear, be sure to measure a segment of chain that moves over a sheave.
Do not repair chains by cutting out the worn section and joining in a new piece. If part of a chain is worn, replace all the chains on a truck.
Lift chain lubrication is an important part of your maintenance program.
The lift chains operate under heavy loadings and function more safely and have longer life if they are regularly and correctly lubricated.
CLARK chain lubricant is recommended; it is easily sprayed on and provides superior lubrication.
Heavy motor oil may also be used as a lubricant and corrosion inhibitor.
Lift Chain Wear and Replacement Criteria: All chains must be replaced if any link has wear of 3% or more, or if any of the damaged conditions noted above are found during inspection.
Order replacement chains from your CLARK dealer. Replace all chains as a set.
Do not remove factory lubrication or paint new chains.
Replace anchor pins and worn or broken anchors when installing new chains.
Adjust tension on new chains. Lubricate chains when they are installed on the upright.
Lubricate upright rollers.