Daily Operator’s Checklist For Skyjack SJ4732
Use the applicable section of the operation manual to inspect each item. Check or complete the applicable box for each item as you inspect it.
Daily Operator’s Checklist For Skyjack SJ4732
Use the applicable section of the operation manual to inspect each item. Check or complete the applicable box for each item as you inspect it.
Procedure Max Score: 119
Hour meter Reading:
Meter name
Unit
Date
Operator’s Name
Operator's Signature:
Click here to sign
Visual and Daily Maintenance Inspections
Labels - Do an inspection for damaged, or missing labels
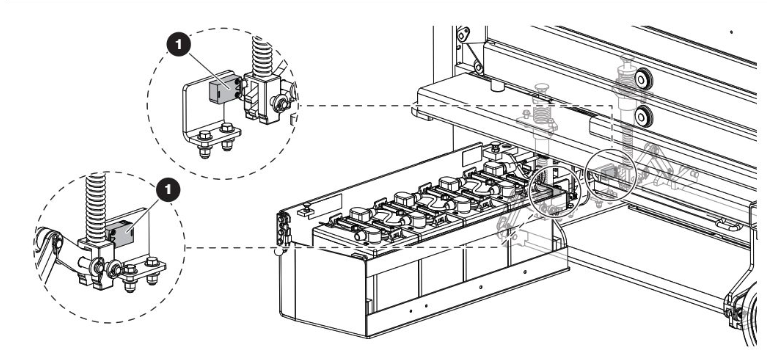
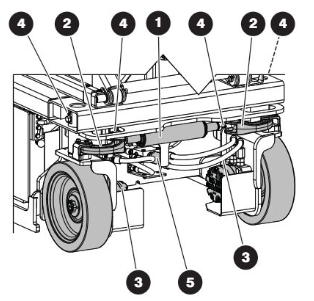
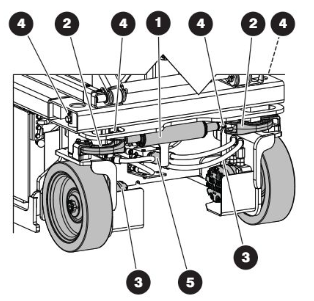
Pothole protection limit switches - Do an inspection for loose, damaged, or missing components
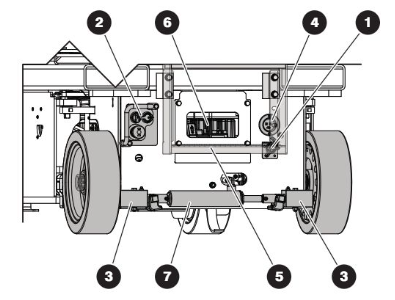
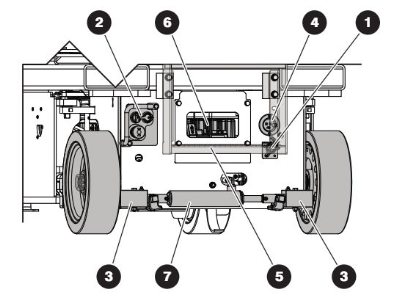
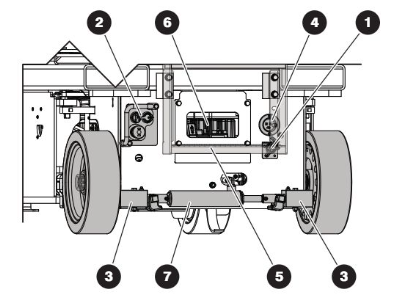
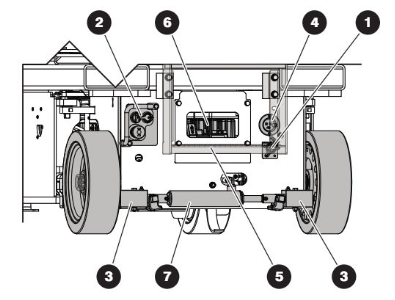
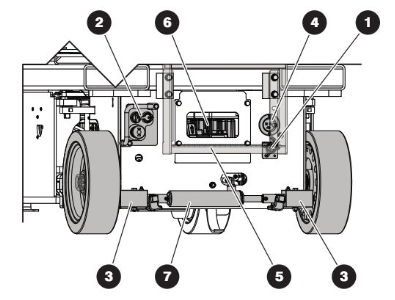
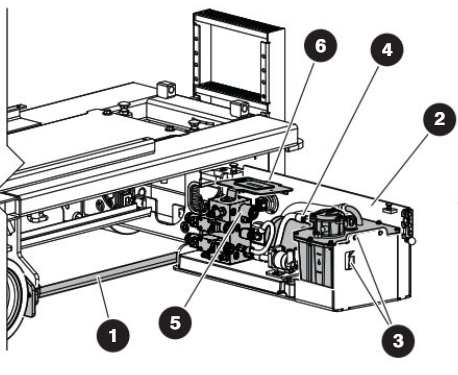
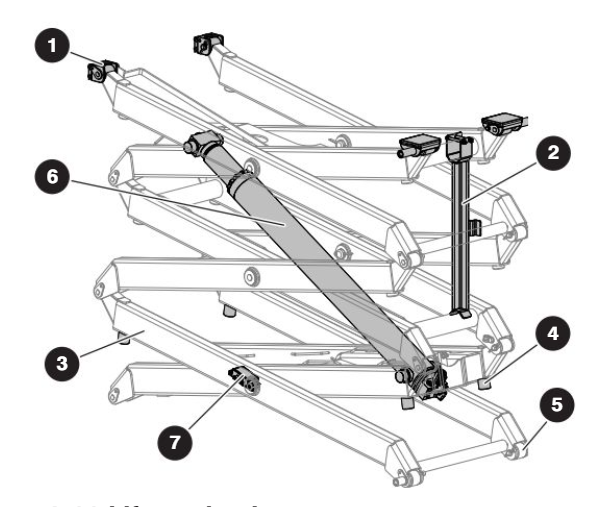
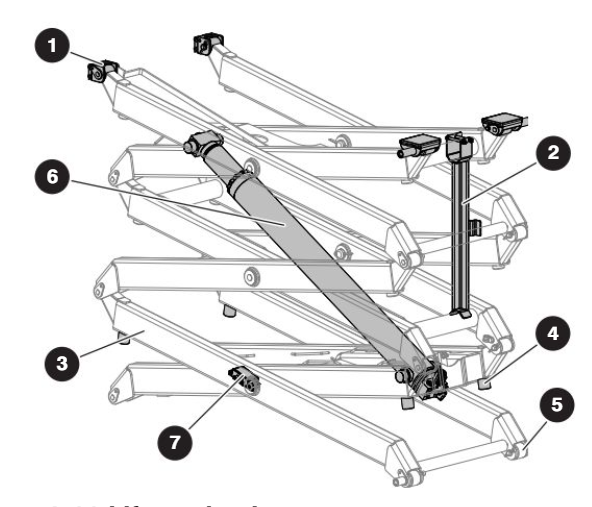
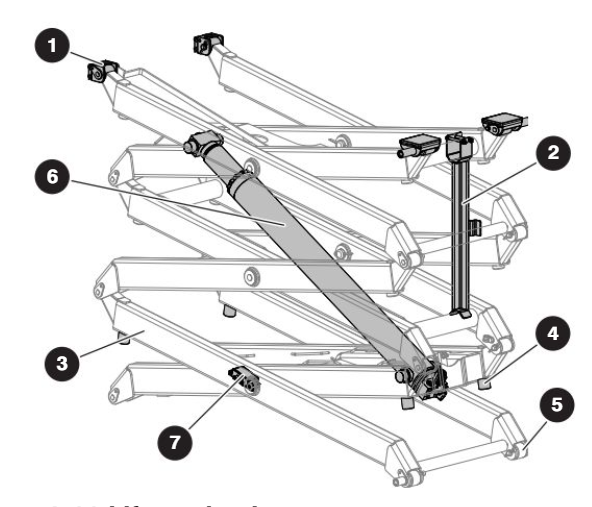
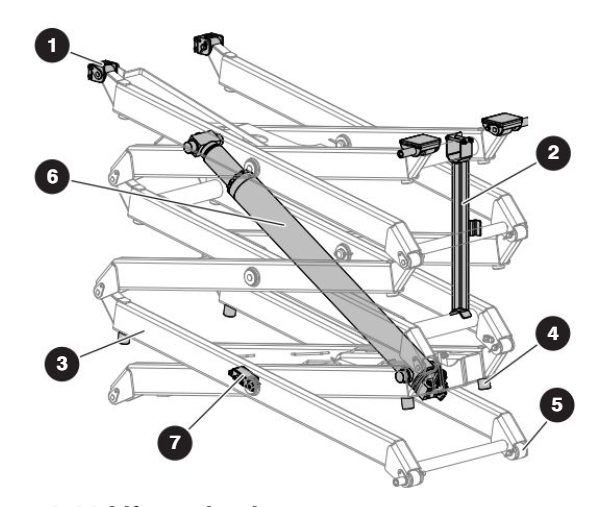
Make sure the pothole protection limit switches (1) are correctly attached, there is no visible damage, and the movement is not blocked.
Electrical - Do an inspection for loose, damaged, or missing components
Do a check on these areas for chafed, corroded, and loose wires: ▪ Base to platform cables and wiring harness ▪ Battery tray wiring harnesses ▪ Hydraulic and electrical wiring harnesses.
Hydraulic - Do an inspection for loose, damaged, or missing components
Do a check on these areas and make sure there are no signs of leakage: ▪ Hydraulic tank, filter, fittings, hoses. ▪ All hydraulic cylinders ▪ All hydraulic manifolds ▪ The ground area below the MEWP
Wheel/tire assembly - Do an inspection for loose, damaged, or missing components
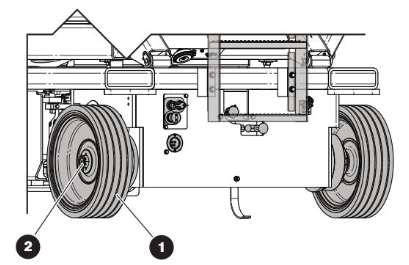
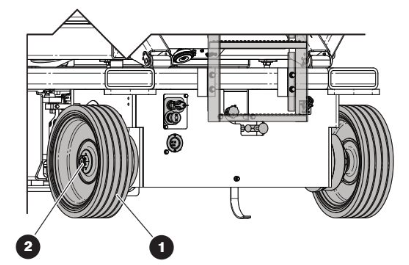
Wheel/tire assembly
Do the inspection that follows: (1) Wheel/tire assembly ▪ Do a check on all the tire treads and sidewalls for cuts, cracks, and unusual wear. ▪ Do a check on each wheel for damage, and cracked welds. ▪ Make sure the wheels are correctly aligned vertically and horizontally. ▪ Make sure there is no visible damage.
Wheel nuts
(2) Wheel nuts ▪ Make sure the castle nut is in position and istight. ▪ Make sure the cotter pin is correctly installed.
Entrance side - Do an inspection for loose, damaged, or missing components
Main power disconnect switch
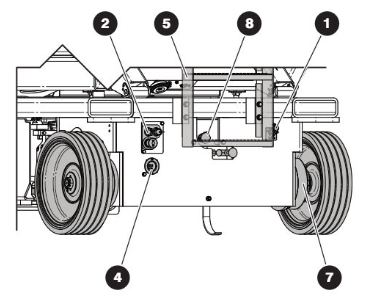
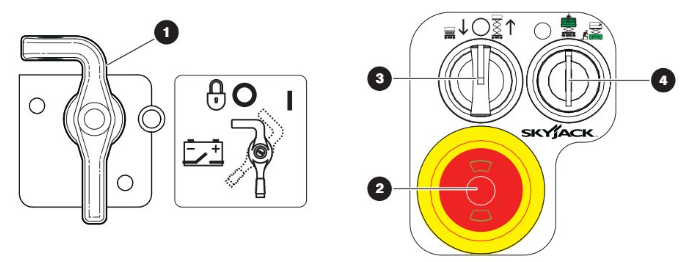
(1) Main power disconnect switch ▪ Turn the main power disconnect switch to the off position. ▪ Make sure the switch rotates and stays in the on and off position. ▪ Make sure the cables are not loose.
Base control
(2) Base control ▪ Make sure there is no visible damage, and allthe switches are in their off/neutral positions.
Pin brake blocks
(3) Make sure there are no loose or missing fasteners. ▪ Make sure there is no visible damage. ▪ Make sure the tabs are not locked.
AC power socket
(4) AC power socket ▪ Make sure that the socket is free of dirt or blockages.
Ladder
(5) Ladder ▪ Make sure there are no loose or missing parts. ▪ Make sure there is no visible damage.
Brakes
(7) Brakes ▪ Make sure there are no loose or missing fasteners. ▪ Make sure there is no visible damage.
Freewheeling valve
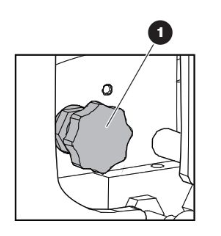
(8) Freewheeling Valve ▪ Make sure there are no loose or missing parts, and there is no visible damage.
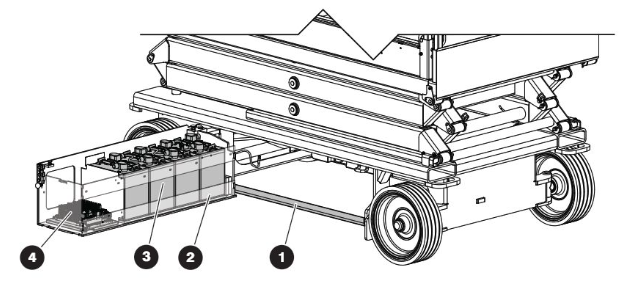
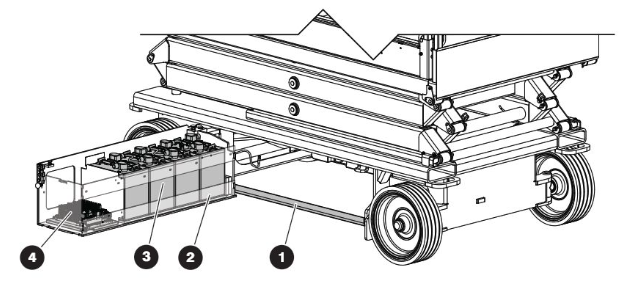
Battery tray side - Do an inspection for leaks and loose, damaged, or missing components
Corrosion hazard. Do not touch battery acid. Wear the correct PPE. If the battery acid touches you, immediately flush the area with cold water and get medical aid.
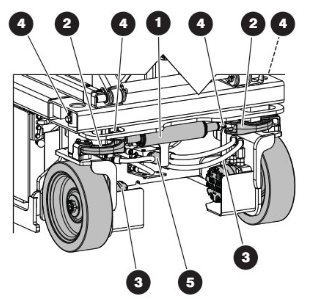
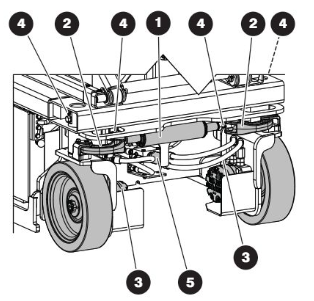
Pothole protection device
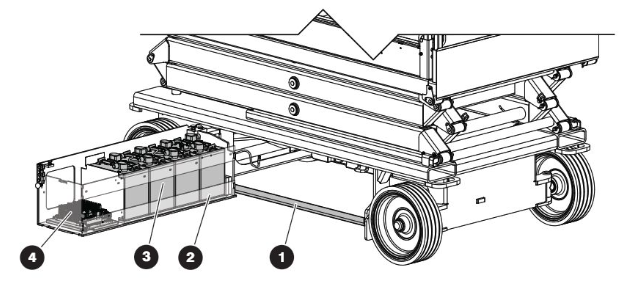
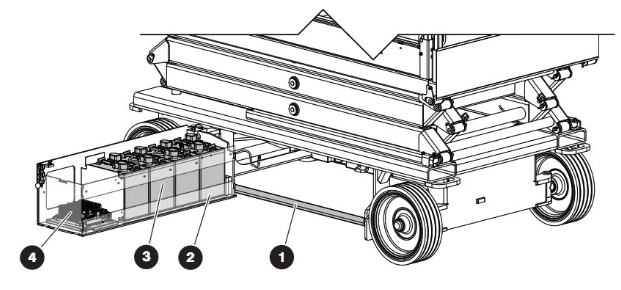
(1) Pothole protection device ▪ Make sure there are no loose or missing parts. ▪ Make sure there is no visible damage. ▪ Make sure there is no dirt and blockages.
Battery tray
(2) Battery tray ▪ Make sure that the battery tray latches correctly and is in good condition.
Batteries
(3) Batteries ▪ Do an inspection of the battery case for damage. ▪ Make sure all the battery connections are tight.
Battery charger
▪ Make sure that the battery charger is correctly installed, and in good condition. ▪ Make sure there is no visible damage.
Extension side - Do an inspection for leaks and loose, damaged, or missing components
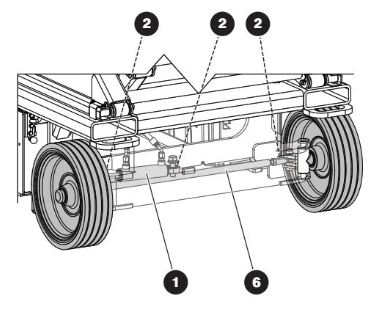
Steer cylinder
(1) Steer Cylinder ▪ Make sure that the steer cylinder assembly is correctly installed. ▪ Make sure there are no loose or missing fasteners. ▪ Make sure there is no visible damage.
Steer linkages
(2) Steer linkages ▪ Make sure there are no loose or missing fasteners and lock-pins. ▪ Make sure that the steer linkages and bushings are correctly attached. ▪ Make sure there is no visible damage.
Wheel/motor assembly
(3) Wheel/motor assembly ▪ Make sure there are no loose or missing fasteners. ▪ Make sure there is no visible damage.
Greasing points
(4) Greasing points ▪ Make sure there is no visible damage. ▪ Make sure there is no dirt or blockages.
Tie rod (SJ3220, SJ3226, SJ4720, SJ4726, SJ4732 only)
(6) Tie Rod ▪ Make sure there are no loose or missing parts, and there is no visible damage. ▪ Make sure the tie rod end studs are locked.
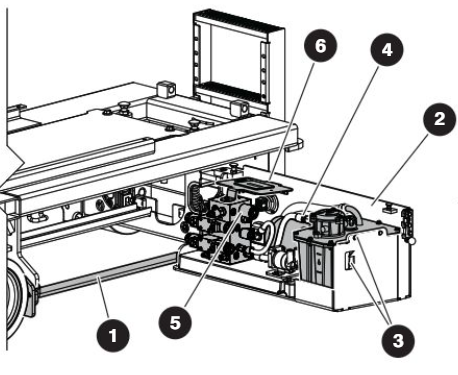
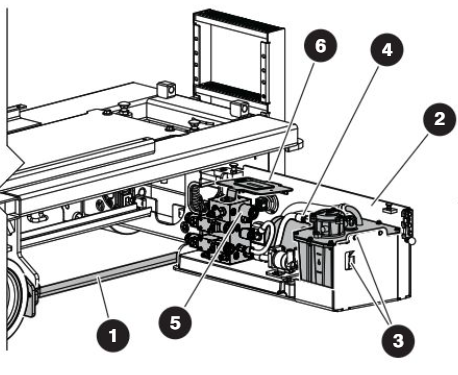
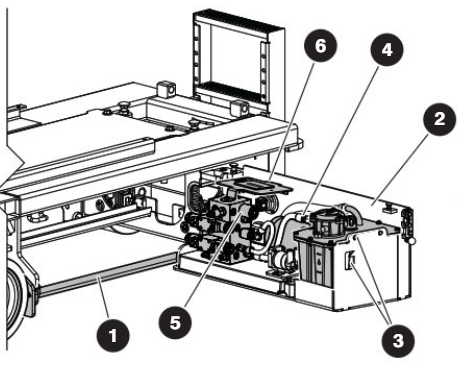
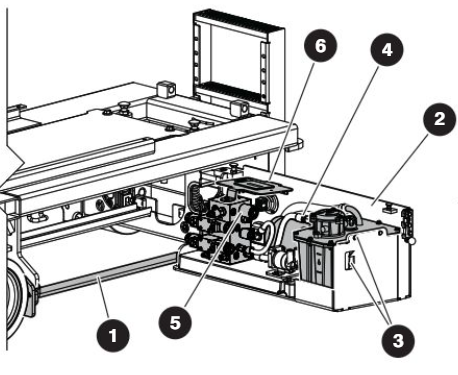
Hydraulic and electric tray side - Do an inspection for leaks and loose, damaged, or missing components
Pothole protection device
(1) Pothole protection device ▪ Make sure there are no loose or missing parts. ▪ Make sure there is no visible damage. ▪ Make sure there is no dirt and blockages.
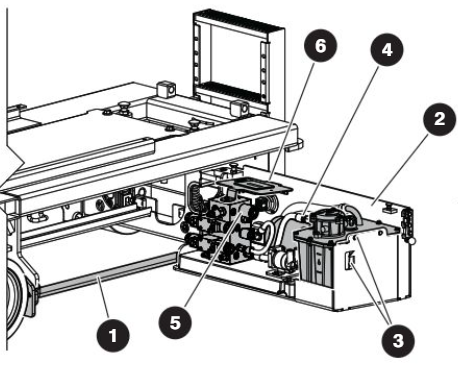
Hydraulic and electric tray
(2) Hydraulic and electric tray ▪ Make sure that the hydraulic and electric tray latches correctly and is in good condition.
Hydraulic tank
(3) Hydraulic tank ▪ Make sure the hydraulic filler cap closes tightly. ▪ Make sure there is no visible damage or hydraulic leaks. ▪ Hydraulic oil level: 1. Fully lower the platform. 2. Do a check on the gauge on the left side of the hydraulic oil tank. The hydraulic oil level must be at or a small distance above the top mark of the gauge.
Hydraulic pump and motor
(4) Hydraulic pump and motor ▪ Make sure there are no loose or missing fasteners. ▪ Make sure there is no visible damage.
Main manifold
(5) Main Manifold ▪ Make sure all fittings and hoses are correctly tightened. ▪ Make sure there is no indication of hydraulic leakage. ▪ Make sure there are no loose wires or missing fasteners.
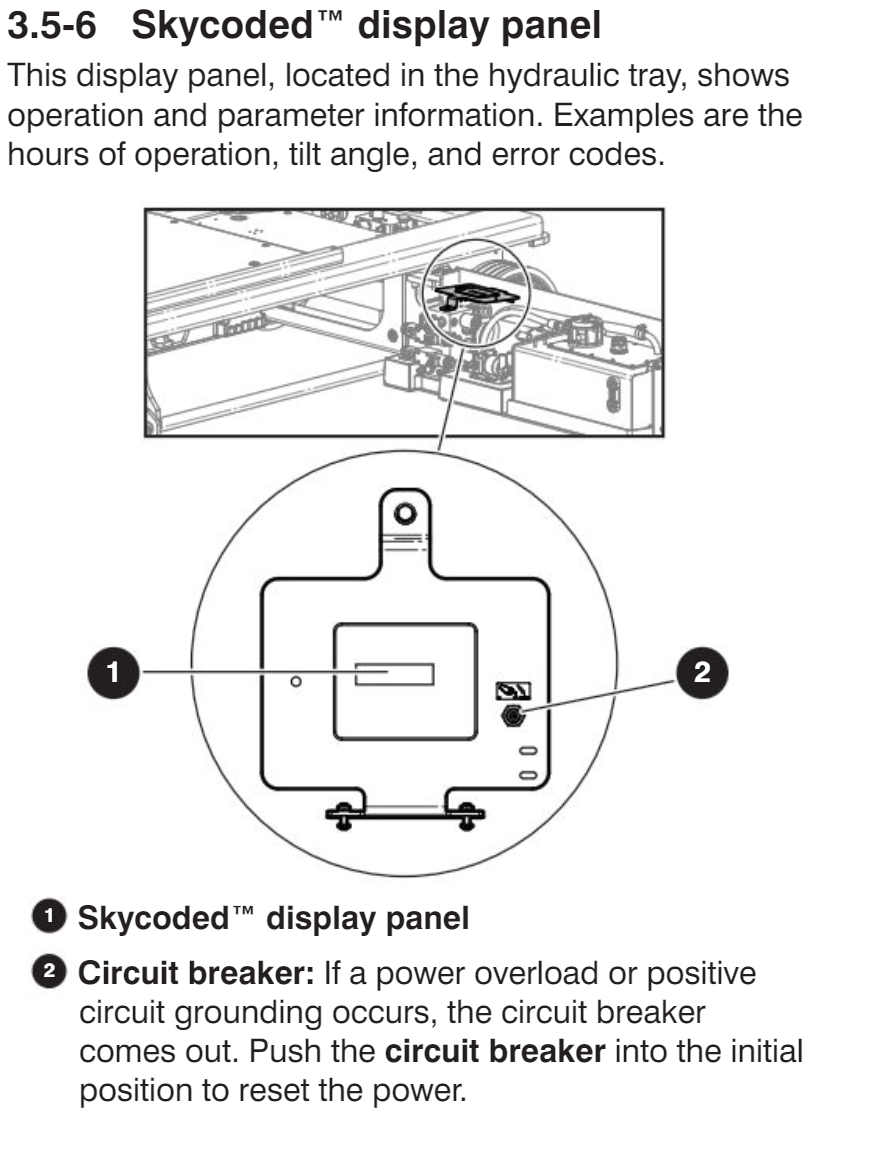
Skycoded™ display panel
(6) Skycoded™ display panel ▪ Make sure the panel is correctly attached, and there is no visible damage.
Platform assembly - Do an inspection for loose, damaged, or missing components.
1. Use the MEWP ladder to enter the platform. 2. Close the gate.
Platform railings
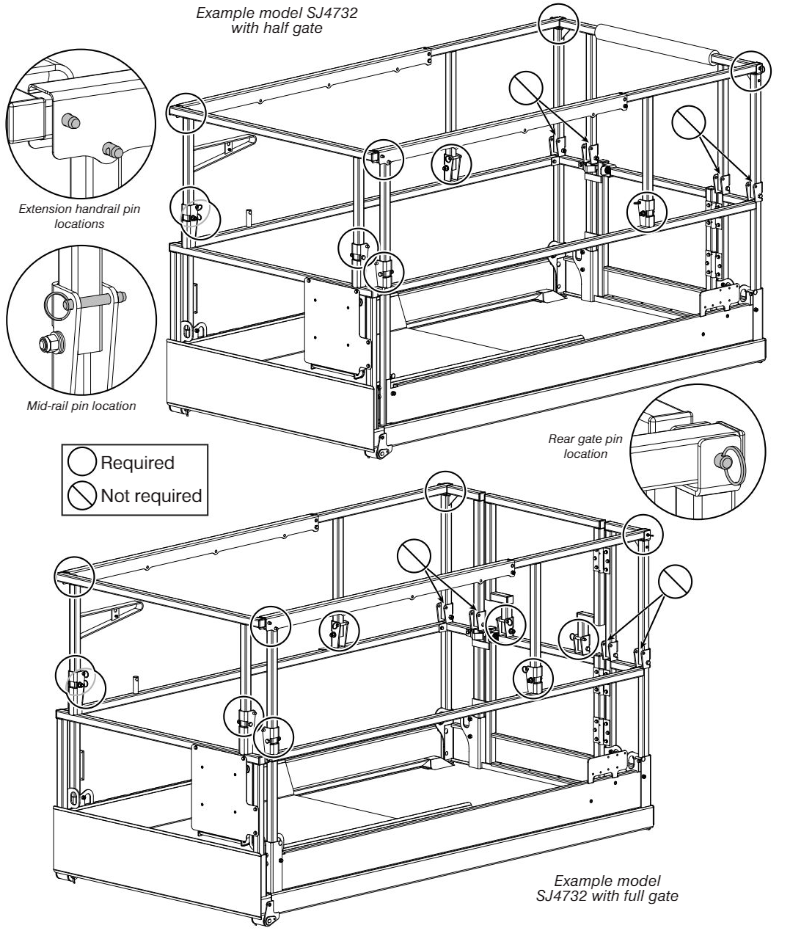
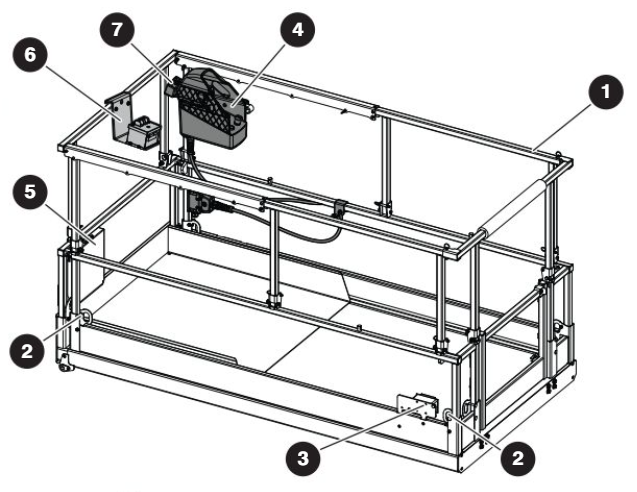
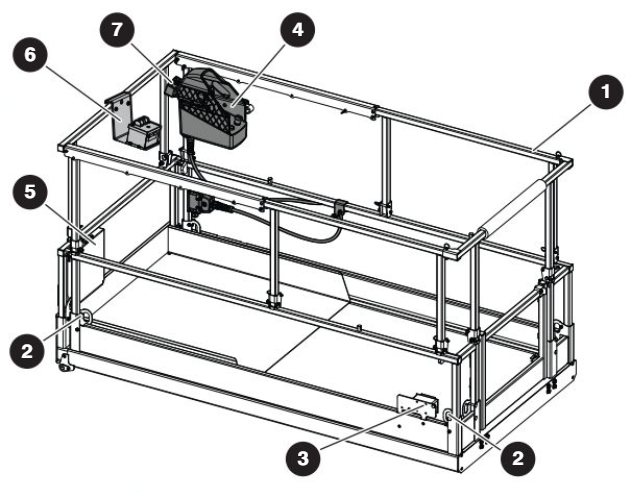
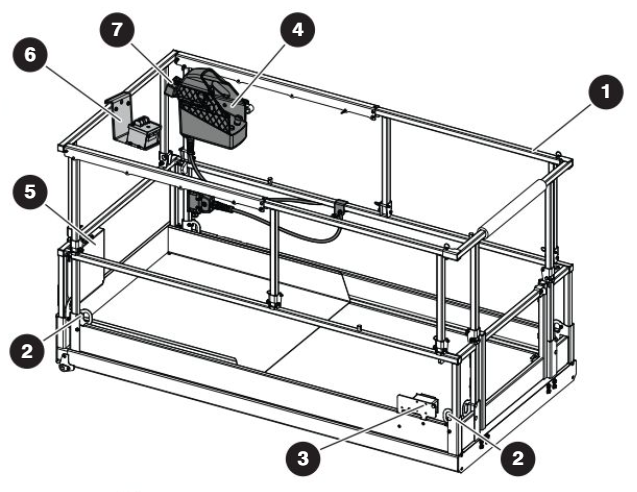
Platform railings ▪ Make sure there are no loose or missing parts, and there is no visible damage. ▪ Make sure that the lock-pins and fasteners are correctly locked. ▪ Make sure that the platform railings 1 are in the correct position and locked with lock-pins. Refer to attached photo. ▪ Make sure that the gate is in good condition and operates correctly.
Fall-protection anchorages
(2) Fall-protection anchorages ▪ Make sure that the fall-protection anchorages are correctly installed. ▪ Make sure there is no visible damage.
AC power socket
(3) AC power socket ▪ Make sure that the socket is free of dirt or blockages.
Platform control console
(4) Platform control console ▪ Make sure that the control console is locked with lock-pins. ▪ Make sure that the platform control cable is correctly locked, and there is no visible damage.
Manual storage box
(5) Manual storage box ▪ Make sure that the operation manual and other important documents are in the manual storage box. ▪ Make sure that the documents are in good condition, and you can read them. ▪ Always put the manuals and other documents back in the storage box after use.
3. Use the MEWP ladder to exit the platform.
Lift mechanism - Do an inspection for loose, damaged, or missing components
Sliders
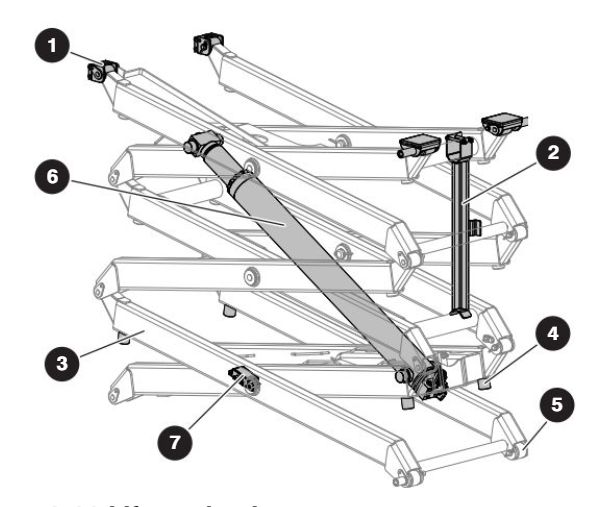
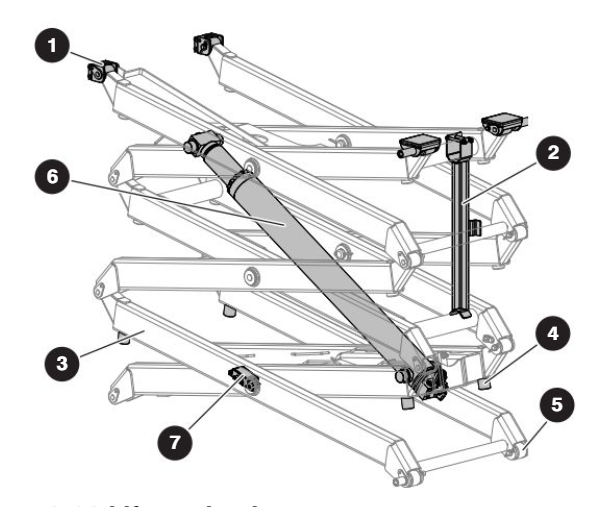
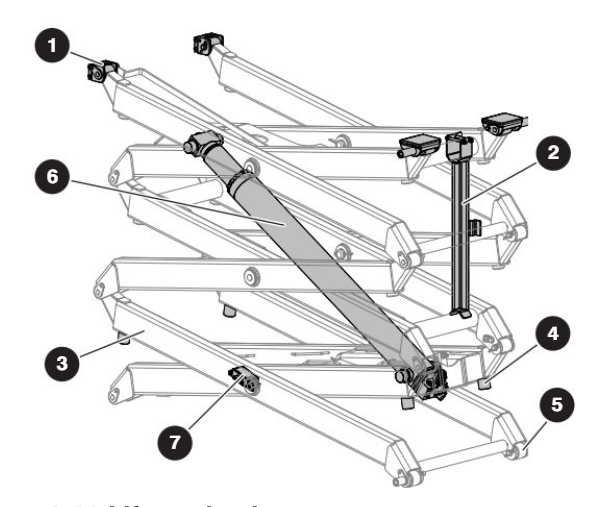
(1) Sliders ▪ Make sure that the sliders on the left and right side of the MEWP are correctly attached. ▪ Make sure there is no visible damage. ▪ Make sure there is no dirt or blockages in the slider paths.
1. Remove all personnel and material from the platform. 2. Raise the platform until there is adequate clearance to deploy the maintenance support(s). 3. Deploy the maintenance support. 4. Lower the platform until the maintenance support(s) touch the cross members with labels, and the platform stops. 5. Turn the main power disconnect switch to the off position.
Maintenance support(s)
(2) Maintenance support ▪ Make sure that the maintenance support are correctly attached and show no visible damage.
Scissor assembly
(3) Scissor assembly ▪ Make sure that the scissor assembly shows no signs of visible damage, deformation, or cracks in the weldments. ▪ Make sure all the pins and fasteners are correctly installed, including the connections to the base and platform. ▪ Make sure that the cables and wires have the correct routing, and show no signs of wear and/or physical damage.
Scissor bumpers
(4) Scissor bumpers ▪ Make sure that the bumpers are correctly attached and have no visible damage.
Rollers
(5) Rollers ▪ Make sure that the rollers on the left and right side of the MEWP are correctly installed. ▪ Make sure there is no visible damage. ▪ Make sure there is no dirt or blockages in the rollers’ travel path.
Lift cylinder
(6) Lift cylinder ▪ Make sure that the lift cylinders are correctly installed. ▪ Make sure there are no loose or missing fasteners. ▪ Make sure there is no indication of leaks or damage.
Angle transducer
(7) Angle transducer ▪ Make sure that the angle transducer is correctly attached.
1. Turn the main power disconnect switch to the on position. 2. Raise the platform until there is adequate clearance to retract the maintenance support. 3. Retract the lower maintenance support into the storage bracket.
Function Tests
Do a test of the main power disconnect switch
1. Turn the main power disconnect switch (1) the off position. 2. Pull the emergency-stop button (2) control console. to on the base 3. Turn and hold the off/platform/base switch (4) to the base position. 4. Turn and hold the lower/neutral/raise switch (3) to the raise position. ▪ Result: The platform does not rise.
Do a test of the control module and load sensing module self-check
1. Push the emergency-stop button on the base control console. 2. Turn the main power disconnect switch to the on position. 3. Pull the emergency-stop button on the base control console. ▪ Result: The beeper makes a sound for approximately 1 second. The light on the emergency-stop button comes on. This shows that the system is in operation, and there are no faults. 4. Make sure there are no error codes on the Skycoded™ display panel. ▪ Result: If you see an error code, lock and tag the MEWP. Remove the MEWP for servicing. Speak to a qualified service technician for repairs
Do a test of the emergency-stop button on the base
1. Turn the main power disconnect switch to the on position. 2. Push the emergency-stop button. 3. Turn and hold the off/platform/base switch to the base position. 4. Turn and hold the lower/neutral/raise switch to the raise position. ▪ Result: The platform does not rise.
Do a test of the off/platform/base key switch
1. Pull the emergency-stop button. 2. Turn the off/platform/base key switch to the platform position. 3. Turn and hold the lower/neutral/raise switch to the raise position. ▪ Result: The platform does not rise. 4. Turn and hold the off/platform/base key switch to the base position. 5. Turn and hold the lower/neutral/raise switch to the raise position. ▪ Result: The platform rises.
Do a test of the lower/neutral/raise switch
1. Turn and hold the off/platform/base switch to the base position. 2. Turn and hold the lower/neutral/raise switch to the raise position. ▪ Result: The platform rises. 3. Turn and hold the lower/neutral/raise switch to the lower position. ▪ Result: The platform lowers.
Do a test of the emergency-lowering function
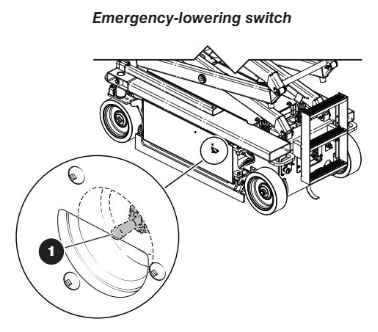
1. Raise the platform. 2. Hold the emergency-lowering switch (1) to the left side or right side to lower the platform. ▪ Result: The platform lowers.
Do a test of the freewheeling function
1. Make sure the path of travel is clear. 2. Put wheel chocks or blocks at the front of the wheels and behind them to prevent MEWP movement. 3. Turn the freewheeling valve knob 1 counterclockwise to a fully open position. 4. Release the brakes manually. 5. Remove the wheel chocks or blocks. 6. Push or pull the MEWP. ▪ Result: The MEWP moves. 7. Put wheel chocks or blocks at the front of the wheels and behind them to prevent MEWP movement. 8. Turn the freewheeling valve knob clockwise to a fully close position for operation. 9. Engage the brake.
Do a test of the emergency-stop button on the platform
1. Make sure the main power disconnect switch is in the on position. 2. Pull the emergency-stop button on the base control console. 3. Turn the off/platform/base key switch to the platform position. 4. Use the MEWP ladder to enter the platform. 5. Close the gate. 6. Pull the emergency-stop (5) button on the platform control console. 7. Move the lift/off/drive switch (4) to the drive position. 8. Push the emergency-stop button. 9. Squeeze and hold the function-enable switch (3). 10. Push the controller handle (2) to drive forward. ▪ Result: The drive function does not operate.
Do a test of the function-enable switch
1. Make sure the path you plan to travel is clear. 2. Pull the emergency-stop button. 3. Move the lift/off/drive switch to the drive position. 4. Do not use the function-enable switch, and try to drive the MEWP by moving the controller handle forward. ▪ Result: The drive function does not operate.
Do a test of the steer function
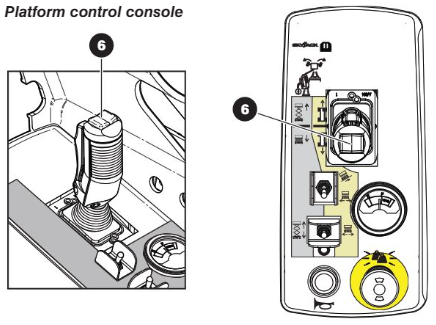
1. Move the lift/off/drive switch to the drive position. 2. Squeeze and hold the function-enable switch. 3. Press the steering rocker switch (6) on top of the controller handle to steer left and right. ▪ Result: The steer wheels turn left and right.
Do a test of the drive function
1. Make sure the path of intended motion is clear. 2. Move the lift/off/drive switch to the drive position. 3. Squeeze and hold the function-enable switch. 4. Slowly push the controller handle until the MEWP starts to move. Then, release the handle, so that it goes back to the center position. ▪ Result: The MEWP moves in the forward direction and then stops. 5. Slowly pull the controller handle until the MEWP starts to move. Then, release the handle, so that it goes back to the center position. ▪ Result: The MEWP moves in the opposite direction and then stops.
Do a test of the anti-tiedown function
1. Make sure the path of intended motion is clear. 2. Move the lift/off/drive switch to the drive position. 3. Squeeze and hold the function-enable switch for more than 7 seconds. 4. Slowly push the controller handle to move the MEWP in the forward direction. ▪ Result: The MEWP does not move in the forward direction.
Do a test of the brakes
1. Make sure the path of intended motion is clear. 2. Move the lift/off/drive switch to the drive position. 3. Squeeze and hold the function-enable switch. 4. Drive the MEWP forward and then rearward. Release the controller handle. ▪ Result: The MEWP stops. Do not operate the MEWP if the MEWP pulls to one side while it stops. A service technician must do a check on the brake adjustments. 5. Drive the MEWP forward and then rearward. Release the function-enable switch only. ▪ Result: The MEWP comes to an instant and sudden stop. Do not operate the MEWP if it does not stop immediately, or it pulls to one side while it stops. A service technician must do a check on the brake adjustments.
Do a test of the platform raise and lower functions
1. Move the lift/off/drive switch to the lift position. 2. Squeeze and hold the function-enable switch. 3. Push the controller handle to raise the platform by approximately 0.5 m (20 in). ▪ Result: The platform rises. 4. Squeeze and hold the function-enable switch. 5. Pull the controller handle to fully lower the platform. ▪ Result: The platform fully lowers.
Do a test of the horn
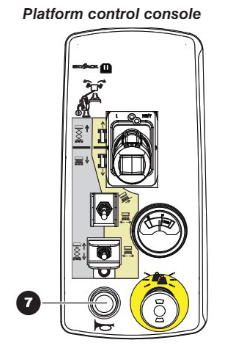
1. Push the horn button (7). ▪ Result: The horn makes a sound.
Do a test of the pothole protection device
1. Push the emergency-stop button. 2. Use the MEWP ladder to exit the platform. 3. Put a block (approximately 3.75 cm (1.5 in) below the hydraulic and electric tray of the MEWP. 4. Use the MEWP ladder to enter the platform. 5. Close the gate. 6. Pull the emergency-stop button. 7. Raise the platform until it is at a height of approximately 4.3 m (14 ft). 8. Drive the MEWP forward or rearward. ▪ Result: The drive function does not operate. 9. Fully lower the platform. 10. Do steps 1 to 9 again, with the block put below the battery tray of the MEWP. ▪ Result: The drive function does not operate. 11. Push the emergency-stop button. 12. Use the MEWP ladder to exit the platform. 13. Remove the block.
Do a test of the elevated travel speed
1. Pull the emergency-stop button. 2. Make sure the path of intended motion is clear. 3. Raise the platform until it is at a height of approximately 4.3 m (14 ft). 4. Drive the MEWP forward and then rearward. ▪ Result: The MEWP drives slower than when it was in the lowered travel position.
Do a test of the flashing light
1. Make sure the path of intended motion is clear. 2. Operate the drive or lift function. ▪ Result: The light flashes. 3. Stop all MEWP motion. ▪ Result: The light does flash.
Source: Nexii Building Solutions (Community Member)

